Friday, September 18, 2015

Oracle Taleo WebService Sample Client Code to Create New Candidate and apply to a Taleo job offer (requisition)

Let's assume you are a Taleo Partner (EBS/Peoplesoft) and want to export a candidate from your application and import it into Taleo systems by attaching candidate to a existing Taleo job offer (requisition) .

<!-- Candidate Import Request with attaching Taleo job offer (requisition) -->
<soapenv:Envelope xmlns:soapenv="http://schemas.xmlsoap.org/soap/envelope/" xmlns:e="http://www.taleo.com/ws/tee800/2009/01/candidate">
   <soapenv:Header>
      <itk:Debug xmlns:itk="http://www.taleo.com/ws/itk21/2005/07">
         <itk:StackTrace>true</itk:StackTrace>
      </itk:Debug>
   </soapenv:Header>
   <soapenv:Body>
      <e:merge>
         <e:candidate>
            <e:Address>123 Main Street</e:Address>
            <e:Address2>Apartment 1</e:Address2>
            <e:City>Seattle</e:City>
            <e:EmailAddress>xxx@invalid.address.com</e:EmailAddress>
            <e:FirstName>XYZ</e:FirstName>
            <e:LastName>XYZ</e:LastName>
            <e:ZipCode>74554-234</e:ZipCode>
            <e:Applications>
               <e:Application>
                  <e:Requisition>
                     <e:Requisition>
                        <e:ContestNumber searchType="search" searchValue="XXXXX"/>
                     </e:Requisition>
                  </e:Requisition>
               </e:Application>
            </e:Applications>
         </e:candidate>
      </e:merge>
   </soapenv:Body>
</soapenv:Envelope>

Oracle Taleo WebService Sample Client Code to Create New Candidate

Let's assume you wants to import the candidates into Taleo systems. Using Taleo BulkAPI, CandidateService allows your application to create and update a candidate in Taleo systems.

We can implement the above usecase with following options:

  • Java Code using SAAJ: SAAJ stands for "SOAP with Attachments API for Java." With it, you can make Java API calls that generate XML messages which comply with the SOAP 1.1 or 1.2 specifications, as well as the WS-I Basic Profile 1.1 specification. It allows developers to read and write SOAP-based XML messages, and in some cases, to send and receive those messages over the Internet. SAAJ offers an alternative to JAX-RPC or JAX-WS
public class SOAPClientSAAJ {
    /**
     * This method process the new candidate creation
     * @return employeeNumber
     * @throws SOAPException
     * @throws Exception
     */
    public static String processCandidateCreationSOAPRequest() throws SOAPException, Exception {
        SOAPConnectionFactory soapConnectionFactory = SOAPConnectionFactory.newInstance();
        SOAPConnection soapConnection = soapConnectionFactory.createConnection();

        // Trust to certificates
        doTrustToCertificates();

        // Send SOAP Message to SOAP Server
        String url = "https://xxx.taleo.net/enterprise/soap?ServiceName=CandidateService";
        SOAPMessage soapResponse = soapConnection.call(callCandidateCreationSOAPRequest(), url);
        String employeeNumber = processCandidateCreationSOAPResponse(soapResponse);
        return employeeNumber;
    }
 
    public SOAPClientSAAJ() {
        super();
    }
    
    /**
     * This method parse the soapResponse and gets the employeeNumber 
     * @param soapResponse
     * @return employeeNumber
     * @throws TransformerConfigurationException
     * @throws SOAPException
     * @throws ParserConfigurationException
     * @throws TransformerException
     * @throws SAXException
     * @throws IOException
     */
    private static String processCandidateCreationSOAPResponse(SOAPMessage soapResponse) throws TransformerConfigurationException,
                                                                               SOAPException,
                                                                               ParserConfigurationException,
                                                                               TransformerException, SAXException,
                                                                               IOException {
        TransformerFactory transformerFactory = TransformerFactory.newInstance();
        Transformer transformer = transformerFactory.newTransformer();
        Source sourceContent = soapResponse.getSOAPPart().getContent();
        StringWriter writer = new StringWriter();
        transformer.transform(sourceContent, new StreamResult(writer));
        String output = writer.toString();

        DocumentBuilder db = DocumentBuilderFactory.newInstance().newDocumentBuilder();
        InputSource is = new InputSource();
        is.setCharacterStream(new StringReader(output));

        Document doc = db.parse(is);
        NodeList nodes = doc.getElementsByTagName("createResponse");
        Element element = (Element)nodes.item(0);
        NodeList name = element.getElementsByTagName("Number");
        Element line = (Element)name.item(0);
        return getCharacterDataFromElement(line).toString();
    }

    /**
     * This method creates the soapMessage and calls the webservice
     * @return
     * @throws Exception
     */
    private static SOAPMessage callCandidateCreationSOAPRequest() throws Exception {
        MessageFactory messageFactory = MessageFactory.newInstance();
        SOAPMessage soapMessage = messageFactory.createMessage();
        SOAPPart soapPart = soapMessage.getSOAPPart();

        // SOAP Envelope
        SOAPEnvelope envelope = soapPart.getEnvelope();
        envelope.addNamespaceDeclaration("can", "http://www.taleo.com/ws/tee800/2009/01/candidate");
        envelope.addNamespaceDeclaration("ns1",
                                         "http://docs.oasis-open.org/wss/2004/01/oasis-200401-wss-wssecurity-secext-1.0.xsd");

        SOAPHeader soapHeader = envelope.getHeader();
        SOAPElement SecuritySoapElement = soapHeader.addChildElement("Security", "ns1");
        SOAPElement usernameTokenSoapElement = SecuritySoapElement.addChildElement("UsernameToken", "ns1");

        SOAPElement usernameSoapElement = usernameTokenSoapElement.addChildElement("Username", "ns1");
        usernameSoapElement.addTextNode("username");
        SOAPElement passwordSoapElement = usernameTokenSoapElement.addChildElement("Password", "ns1");
        passwordSoapElement.addTextNode("password");


        // SOAP Body
        SOAPBody soapBody = envelope.getBody();
        SOAPElement createSoapBodyElem = soapBody.addChildElement("create", "can");
        SOAPElement candidateSoapBodyElem = createSoapBodyElem.addChildElement("candidate", "can");

        SOAPElement emailAddressSoapBodyElem = candidateSoapBodyElem.addChildElement("EmailAddress", "can");
        emailAddressSoapBodyElem.addTextNode("xxx@invalid.address.com");

        SOAPElement addressSoapBodyElem = candidateSoapBodyElem.addChildElement("Address", "can");
        addressSoapBodyElem.addTextNode("123 Main Street");

        SOAPElement address2SoapBodyElem = candidateSoapBodyElem.addChildElement("Address2", "can");
        address2SoapBodyElem.addTextNode("Apartment 1");

        SOAPElement firstNameSoapBodyElem = candidateSoapBodyElem.addChildElement("FirstName", "can");
        firstNameSoapBodyElem.addTextNode("XYZ");

        SOAPElement lastNameSoapBodyElem = candidateSoapBodyElem.addChildElement("LastName", "can");
        lastNameSoapBodyElem.addTextNode("XYZ");

        // Save message
        soapMessage.saveChanges();
        return soapMessage;
    }

    /**
     * This method trust the https certificates 
     * @throws Exception
     */
    private static void doTrustToCertificates() throws Exception {
        Security.addProvider(new com.sun.net.ssl.internal.ssl.Provider());
        TrustManager[] trustAllCerts = new TrustManager[] { new X509TrustManager() {
                public X509Certificate[] getAcceptedIssuers() {
                    return null;
                }

                public void checkServerTrusted(X509Certificate[] certs, String authType) throws CertificateException {
                    return;
                }

                public void checkClientTrusted(X509Certificate[] certs, String authType) throws CertificateException {
                    return;
                }
            } };

        SSLContext sc = SSLContext.getInstance("SSL");
        sc.init(null, trustAllCerts, new SecureRandom());
        HttpsURLConnection.setDefaultSSLSocketFactory(sc.getSocketFactory());
        HostnameVerifier hv = new HostnameVerifier() {
            public boolean verify(String urlHostName, SSLSession session) {
                if (!urlHostName.equalsIgnoreCase(session.getPeerHost())) {
                    System.out.println("Warning: URL host '" + urlHostName + "' is different to SSLSession host '" +
                                       session.getPeerHost() + "'.");
                }
                return true;
            }
        };
        HttpsURLConnection.setDefaultHostnameVerifier(hv);
    }

    private static String getCharacterDataFromElement(Element e) {
        Node child = e.getFirstChild();
        if (child instanceof CharacterData) {
            CharacterData cd = (CharacterData)child;
            return cd.getData();
        }
        return "";
    }

}

  • Java Code using Apache Axis2: - First you should Import the WSDL Files into Your Development Platform using below command.

“wsdl2java.bat -uri pathToWsdl/WsdlFilename -d xmlbeans -ns2p namespaceURL=javaPackageName”

public class CandidateDC {
 
    /**
     * Main method call the importCandidate method
     * @param args
     */
    public static void main(String[] args) {
        try {
            long employeeNumber = importCandidate();
            System.out.println("Candidate Num: " + employeeNumber);
        } catch (AxisFault e) {
            e.printStackTrace();
        } catch (RemoteException e) {
            e.printStackTrace();
        } catch (WebServiceFault e) {
            e.printStackTrace();
        }
    }
 
    /**
     * This method process the new candidate creation
     * @return employeeNumber
     * @throws AxisFault
     * @throws RemoteException
     * @throws WebServiceFault
     */
    public static long importCandidate() throws AxisFault, RemoteException, WebServiceFault {
        CandidateServiceStub stub =
            new CandidateServiceStub("https://hostname/enterprise/soap?ServiceName=CandidateService");
        HttpTransportProperties.Authenticator auth = new HttpTransportProperties.Authenticator();
        auth.setUsername("Username");
        auth.setPassword("Password");
        auth.setPreemptiveAuthentication(true); // activate preemptive authentication
        stub._getServiceClient().getOptions().setProperty(HTTPConstants.AUTHENTICATE, auth);


        CreateDocument createDoc = CreateDocument.Factory.newInstance();
        CreateDocument.Create create = createDoc.addNewCreate();
        Candidate candidate = create.addNewCandidate();

        SearchableStringField address = candidate.addNewAddress();
        address.setStringValue("123 Main Street");

        SearchableStringField address2 = candidate.addNewAddress2();
        address2.setStringValue("Apartment 1");

        SearchableStringField lastName = candidate.addNewLastName();
        lastName.setStringValue("XYZ");

        SearchableStringField firstName = candidate.addNewFirstName();
        firstName.setStringValue("XYZ");

        SearchableStringField emailAddress = candidate.addNewEmailAddress();
        emailAddress.setStringValue("xxx@invalid.address.com");

        CreateResponseDocument createResponse = stub.create(createDoc);
        long val = createResponse.getCreateResponse().getNumber();
        return val;
    }
 
 public CandidateDC() {
        super();
    }
}

If you get the "java.net.SocketException: Software caused connection abort: recv failed" issue - More Details

Thursday, January 15, 2015

Oracle Taleo WebService Integration - "java.net.SocketException: Software caused connection abort: recv failed"

Recently I was trying to integrate Oracle Taleo WebService with one of the 3rd party system. I tried with WSDL2Java from the Apache Axis2 and SAAJ (SOAP with Attachments API for Java) types for the integration.

But on both the types I was getting "java.net.SocketException: Software caused connection abort: recv failed" issue. Below is the error detail.

org.apache.axis2.AxisFault: Software caused connection abort: recv failed 
at org.apache.axis2.AxisFault.makeFault(AxisFault.java:430) 
at org.apache.axis2.transport.http.HTTPSender.sendViaPost(HTTPSender.java:197) 
at org.apache.axis2.transport.http.HTTPSender.send(HTTPSender.java:75) 
at org.apache.axis2.transport.http.CommonsHTTPTransportSender.writeMessageWithCommons(CommonsHTTPTransportSender.java:404) 
at org.apache.axis2.transport.http.CommonsHTTPTransportSender.invoke(CommonsHTTPTransportSender.java:231) 
at org.apache.axis2.engine.AxisEngine.send(AxisEngine.java:443) 
at org.apache.axis2.description.OutInAxisOperationClient.send(OutInAxisOperation.java:406) 
at org.apache.axis2.description.OutInAxisOperationClient.executeImpl(OutInAxisOperation.java:229) 
at org.apache.axis2.client.OperationClient.execute(OperationClient.java:165) 
at com.taleo.www.ws.tee800._2009._01.candidate.CandidateServiceStub.create(CandidateServiceStub.java:1284) 
at com.taleo.Generic.main(Generic.java:54) 
Caused by: java.net.SocketException: Software caused connection abort: recv failed 
at java.net.SocketInputStream.socketRead0(Native Method) 
at java.net.SocketInputStream.read(SocketInputStream.java:152) 
at java.net.SocketInputStream.read(SocketInputStream.java:122) 
at java.io.BufferedInputStream.fill(BufferedInputStream.java:235) 
at java.io.BufferedInputStream.read(BufferedInputStream.java:254) 
at org.apache.commons.httpclient.HttpParser.readRawLine(HttpParser.java:78) 
at org.apache.commons.httpclient.HttpPars 

Solution:-

The error message that we are getting is not because of the java code, it's related to a HTTPS/SSL setup/configuration problem.

Connection to the Taleo zone requires use of the "HTTPS" protocol which uses "SSL". You need to Import the HTTPS Certificate into Java HTTPS certificates, this should solve the above issue.

Note:- If you are deploying your application to any web server, please check if the certificate is trusted by the 3rd party web server.

Steps to Import Certificate :-

  • Export the HTTPS Certificate into a file
    • Open your web browser
    •  Enter your web browser's "Options" utility. Internet Explorer users will need to click "Tools" and then "Internet Options," for example. Mozilla Firefox users will need to click "Tools" and then "Options..." Google Chrome users will need to click "Customize" and then "Options"
    • Click "Content" and then "Certificates" in Internet Explorer. Click on the certificate you'd like to export and then click on the "Export" button to export it for use on other servers
    • Click "Advanced" and then "View Certificates" in Mozilla Firefox. Click on the certificate you'd like to export and then click on the "Export" button to export it for use on other servers
    • Click "Under the Hood" and then "Manage Certificates" in Google Chrome. Click on the certificate you'd like to export and then click on the "Export" button to export it for use on other servers
  • Import the HTTPS Certificate into Java HTTPS certificates
    • Java HTTPS certificates stored in - $JAVA_HOME/jre/lib/security/cacerts
    • To import your new certificate into “cacerts” run below command:
“keytool -import -file amirssw.cer -keystore cacerts”
The Password is “changeit”

Saturday, June 28, 2014

How to check AMX page is fully loaded or not

Sometimes you might requires to manipulate the HTML elements after the page is fully loaded. In HTML file it an be checked using window.onload or deviceready but same doesn't guarantees the appropriate ADF Mobile state.

In ADF mobile using showpagecomplete event on the handlePageShown callback function it can be checked.
<script>
        function handlePageShown() {
          console.log("Page is shown!");
        }
        document.addEventListener("showpagecomplete", handlePageShown, false);
</script>
The showpagecomplete event guarantees the appropriate ADF Mobile state; other browser and third-party events, such as load and Cordova's deviceready, may not.

In my next article I will show the usage of showpagecomplete event with example.

Friday, June 27, 2014

ADF Mobile - Get network status dynamically

While working on ADF mobile application with offline/online capabilities, before calling webservices network has to be checked whether it is "connected" or "disconnected".

In my previous article Offline Data Synchronization for ADF Mobile, I was using the javascript to evaluate the network connectivity and store the connection status in pageFlowScope variable. But after subsequent checks pageFlowScope variable was not refreshing properly. Please see the oracle forum for more info,  ADF Mobile - Get network status.

Steps to check network status dynamically:-

1. Java Script to check the network status
 /**
  * Method to check the network status
  */
  application.checkConnection = function () {
     var isConnected;
     var connectionType = navigator.network.connection.type;
     var states = {
      };
     states[Connection.UNKNOWN] = 'Unknown connection';
     states[Connection.ETHERNET] = 'Ethernet connection';
     states[Connection.WIFI] = 'WiFi connection';
     states[Connection.CELL_2G] = 'Cell 2G connection';
     states[Connection.CELL_3G] = 'Cell 3G connection';
     states[Connection.CELL_4G] = 'Cell 4G connection';
     states[Connection.NONE] = 'No network connection';
     if (connectionType == Connection.NONE || connectionType == Connection.UNKNOWN) {
        isConnected = false;
     }else {
        isConnected = true;
     }
     var obj = {connectionType : connectionType, isConnected : isConnected};
     return obj;
  }
2. In managed bean call the application.checkConnection method
public void checkNetworkStatusAction(ActionEvent actionEvent) {
String networkDetails = (String)AdfmfContainerUtilities.invokeContainerJavaScriptFunction(AdfmfJavaUtilities.getFeatureName(),"application.checkConnection",new Object[] { });
   try {
        JSONObject obj = new JSONObject(networkDetails);
        String connectionType = (String)obj.getString("connectionType");
        boolean isConnected = (boolean)obj.getBoolean("isConnected");
        setIsConnected(isConnected);
        setConnectionType(connectionType);
    } catch (JSONException e) {
        throw new AdfException("Error while trying to connect to network", AdfException.ERROR);
    }
}
Application screen looks like below when it deployed to Android device, When there is no network available in the device.


Enable the Mobile Data or Wireless and click on the Check button, Connection Type and Network Status will be displayed on the screen.


You can download the sample workspace from here
[Runs with Oracle JDeveloper 11.1.2.4.0]

Thursday, March 6, 2014

ADF Mobile - Popup at center of the window

Sometimes you may want to position amx:popup at the center of the window. At this moment, in 11.1.2.4.0 there is no declarative solution for this usecase, In this post I'm sharing a code snippet that I noticed from Denis Tyrell(Oracle) for the same.

You can align the amx:showPopupBehavior with overlapTop property, this indicates how the popup should be aligned relative to the panelPage and then in the amx:popup code you can set the inlineStyle as below:
<amx:popup id="p1" autoDismiss="true"
     inlineStyle="position:relative;margin-top:#{(deviceScope.hardware.screen.availableHeight-200)/2}px;margin-left:#{(deviceScope.hardware.screen.availableHeight*10)/100}px;margin-right:#{(deviceScope.hardware.screen.availableHeight*10)/100}px;width:#{deviceScope.hardware.screen.availableWidth};height:200px;">
    <amx:outputText value="Popup at center of the window" id="ot4"/>
</amx:popup>
Application screen looks like below when it deployed to IOS simulator.

Sunday, March 2, 2014

ADF Mobile - Reading custom properties from adf-config.xml

Take a scenario where you have integrated the push notification feature into mobile application and application needs to be shipped to client, to work push notification feature you need Sender ID for both Android and iOS and client want's to use their own Sender Id.

Next question will be where can we store the custom Sender Id in the application so that the client can edit. Credit goes to Srini Indla(Oracle), I have extracted the idea based on one of his forum reply and below is one of the way.

Custom values can be stored in add-config.xml file under <adf:adf-properties-child> tag, add-config.xml is used to configure application-level settings, including the Configuration Service parameters and read more on ADF Mobile Configuration Service Usage. The advantage of storing the properties and accessing it via the adf-confg.xml is that the values can be accessible using the EL expression at run time.

Below is a sample adf-confif.xml with custom properties:
<?xml version="1.0" encoding="ISO-8859-1" ?>
<adf-config xmlns="http://xmlns.oracle.com/adf/config" xmlns:config="http://xmlns.oracle.com/bc4j/configuration"
            xmlns:adf="http://xmlns.oracle.com/adf/config/properties">
  <adf-adfm-config xmlns="http://xmlns.oracle.com/adfm/config">
    <defaults changeEventPolicy="ppr" useBindVarsForViewCriteriaLiterals="true"/>
    <startup>
      <amconfig-overrides>
        <config:Database jbo.locking.mode="optimistic"/>
      </amconfig-overrides>
    </startup>
  </adf-adfm-config>
  <adf:adf-properties-child xmlns="http://xmlns.oracle.com/adf/config/properties">
    <adf-property name="adfAppUID" value="MobileAdfConfig-1564"/>
    <adf-property name="username" value="Weblogic"/>
    <adf-property name="password" value="Weblogic1"/>
  </adf:adf-properties-child>
</adf-config>
In Amx page you can access the above custom defined properties using EL expression.
For ex:  "#{applicationScope.configuration.username}"

Below is the sample code to access custom properties from adf-config.xml in managed bean.
ValueExpression userNameVe =
            AdfmfJavaUtilities.getValueExpression("#{applicationScope.configuration.username}", String.class);
String userName = (String)userNameVe.getValue(AdfmfJavaUtilities.getAdfELContext());

ValueExpression passwordVe =
            AdfmfJavaUtilities.getValueExpression("#{applicationScope.configuration.password}", String.class);
String password = (String)passwordVe.getValue(AdfmfJavaUtilities.getAdfELContext());

ADF Mobile - How to add a record using Constructor option

It’s been a while since my last post, but it doesn't mean that new discoveries were not happening. Well to be fair, I have been really busy with various responsibilities, I hope to re-take blogging again it into my daily routine. Now let’s get into business!

This article is a continuation of "ADF Mobile - Access Device Native SQLite Database to Store Data" and here I will try to explain a way of creating the record using the Constructor option with Bean DataControl.

You can download the sample workspace from here
[Runs with Oracle JDeveloper 11.1.2.4.0]

Implementation Steps:- 

Create an ADF Mobile Application, expand the ViewController project. Locate and expand the Application Sources folder, create a Department.java file and add the below code.
public class Departments {
    protected int departmentId;
    protected String departmentName;
    protected int locationId;
    private transient PropertyChangeSupport propertyChangeSupport = new PropertyChangeSupport(this);

    public void addPropertyChangeListener(PropertyChangeListener l) {
        propertyChangeSupport.addPropertyChangeListener(l);
    }

    public void removePropertyChangeListener(PropertyChangeListener l) {
        propertyChangeSupport.removePropertyChangeListener(l);
    }

    public Departments() {
        super();
    }

    public String getKey() {
        Integer i = new Integer(departmentId);
        return i.toString();
    }

    public Departments(int departmentId, String departmentName, int locationId) {
        this.setDepartmentId(departmentId);
        this.setDepartmentName(departmentName);
        this.setLocationId(locationId);
    }


    Departments(Departments newDepartments) {
        this.setDepartmentId(newDepartments.getDepartmentId());
        this.setDepartmentName(newDepartments.getDepartmentName());
        this.setLocationId(newDepartments.getLocationId());
    }

    public void setDepartmentId(int departmentId) {
        int oldDepartmentId = this.departmentId;
        this.departmentId = departmentId;
        propertyChangeSupport.firePropertyChange("departmentId", oldDepartmentId, departmentId);
    }


    public int getDepartmentId() {
        return departmentId;
    }

    public void setLocationId(int locationId) {
        int oldLocationId = this.locationId;
        this.locationId = locationId;
        propertyChangeSupport.firePropertyChange("locationId", oldLocationId, locationId);
    }

    public int getLocationId() {
        return locationId;
    }

    public void setDepartmentName(String departmentName) {
        String oldDepartmentName = this.departmentName;
        this.departmentName = departmentName;
        propertyChangeSupport.firePropertyChange("departmentName", oldDepartmentName, departmentName);
    }

    public String getDepartmentName() {
        return departmentName;
    }
}
Create DepartmentList.java file and add the below code. Create DataControl based on DepartmentList.java file.
public class DepartmentsList {
    private static List s_departments = null;
    private Departments editDepartment = new Departments();
    private transient ProviderChangeSupport providerChangeSupport = new ProviderChangeSupport(this);

    private transient PropertyChangeSupport propertyChangeSupport = new PropertyChangeSupport(this);


    public void addPropertyChangeListener(PropertyChangeListener l) {
        propertyChangeSupport.addPropertyChangeListener(l);
    }

    public void removePropertyChangeListener(PropertyChangeListener l) {
        propertyChangeSupport.removePropertyChangeListener(l);
    }

    public void addProviderChangeListener(ProviderChangeListener l) {
        providerChangeSupport.addProviderChangeListener(l);
    }

    public void removeProviderChangeListener(ProviderChangeListener l) {
        providerChangeSupport.removeProviderChangeListener(l);
    }

    public DepartmentsList() {
        if (s_departments == null) {
            s_departments = new ArrayList();
            Execute();
        }
    }

    public void Execute() {
        Trace.log(Utility.ApplicationLogger, Level.INFO, DepartmentsList.class, "Execute",
                  "!!!!!!!!!!!!!!!!!In DEPARTMENT Execute!!!!!!!!!!!!!!!!!!!!!!!!!");
        try {
            Connection conn = DBConnectionFactory.getConnection();
            s_departments.clear();
            conn.setAutoCommit(false);
            PreparedStatement stat = conn.prepareStatement("SELECT * from DEPARTMENTS ORDER BY DEPARTMENT_NAME");
            ResultSet rs = stat.executeQuery();
            Trace.log(Utility.ApplicationLogger, Level.INFO, DepartmentsList.class, "Execute",
                      "!!!!!!!!!!!!!!!!!Query Executed!!!!!!!!!!!!!!!!!!!!!!!!!");
            while (rs.next()) {
                Trace.log(Utility.ApplicationLogger, Level.INFO, DepartmentsList.class, "Execute",
                          "!!!!!!!!!!!!!!!!!Adding Department!!!!!!!!!!!!!!!!!!!!!!!!!");
                int departmentId = rs.getInt("DEPARTMENT_ID");
                String departmentName = rs.getString("DEPARTMENT_NAME");
                int locationId = rs.getInt("LOCATION_ID");
                s_departments.add(new Departments(departmentId, departmentName, locationId));
            }
            rs.close();
            providerChangeSupport.fireProviderRefresh("departments");
        } catch (SQLException e) {
            System.err.println(e.getMessage());
        } catch (Exception e) {
            System.err.println(e.getMessage());
        }
    }

    public Departments[] getDepartments() {
        Departments d[] = null;
        d = (Departments[])s_departments.toArray(new Departments[s_departments.size()]);
        return d;
    }


    public void persistDepartments(int departmentId, String departmentName, int locationId) {
        Connection conn;
        try {
            conn = DBConnectionFactory.getConnection();
            conn.setAutoCommit(false);
            String insertSQL = "Insert into DEPARTMENTS (DEPARTMENT_ID,DEPARTMENT_NAME,LOCATION_ID) values (?,?,?)";
            PreparedStatement pStmt = conn.prepareStatement(insertSQL);
            pStmt.setInt(1, departmentId);
            pStmt.setString(2, departmentName);
            pStmt.setInt(3, locationId);
            pStmt.execute();
            conn.commit();

            editDepartment.setDepartmentId(departmentId);
            editDepartment.setDepartmentName(departmentName);
            editDepartment.setLocationId(locationId);

            s_departments.add(0, editDepartment);
            providerChangeSupport.fireProviderCreate("departments", editDepartment.getKey(), editDepartment);
        } catch (Exception e) {
            e.printStackTrace();
        }
    }
}
In below section I will not show all screen creation, here I'm interested in DeptAdd.amx page. Take a look at the DepartmentList data control in the below image, drag and drop DepartmentsList->Constructors->com.oracle.hr.Departments->Departments as ADF Mobile Parameter Form.   


Next drag and drop DepartmentsList->persistDepartment->Method as ADF Mobile Button and in Edit Action Binding window map the parameter binding values as shown below.


Application screen looks like below when it deployed to IOS simulator. Displaying the Departments List is fetched from SQLite, click on the Add button to create new department record.


Enter the details in the department form and click on Save button. The Department information will saved to the database and moved to Dept List screen and department list will get updated by newly added department record.


Monday, October 21, 2013

ADF Mobile - Integrating Signature Capture

This article provide an example of how to write a custom user control to collect and store of an Electronic Signature created on a Android devices using stylus or a finger on the touch screen. 

I have integrated the SignaturePad jQuery plugin for assisting in the creation of an HTML5 canvas based signature pad. Records the drawn signature in JSON format in SQLite database for later regeneration.

Application screen looks like below when it deployed and run on Android Device/Emulator. Displays the Employee list on the screen.


Clicking on any employee will take you to the selected Employee details page, click on View Signature button will open up the popup, there is no signature since database doesn't have signature value for this employee.


Next click on the Edit button will navigate to the Employee details page, clicking on Capture Signature button will open up the popup and Signature Pad jQuery plugin will transform an HTML form into a signature pad. User can use stylus or a finger on the touch screen to do signature and click the Save button to save the signature value(JSON format) in SQLite database.


I wasn't able to draw signature of King properly in android emulator :). Save button will navigate back to Employee details and recorded signature value in database will be used to regenerate the signature on Signature Pad.


You can download the sample workspace from here.
[Runs with Oracle JDeveloper 11.1.2.4.0]

In this sample application I'm storing the signature value into database, even we can store captured signature value as Image format.  For more information and option visit Signature Pad.

Friday, September 6, 2013

Jdeveloper 12c - EJB with Rest WebService and Filtering Data Collection

In Jdeveloper 12c there is a support for Rest WebService based on EJB and its only for Java Service Facade not for Session Facade. You can create Rest WebService just right click on the Java Service Facade and in context menu click on Create RESTful Service.

In this blog entry I'm interested in constructing dynamic data collection based on the URI, query-string parameters and send Rest WebService response. Having sensible resource names or paths (e.g., /departments/10 instead of /api?type=departments&id=10) improves the clarity of what a given request does. Using URL query-string parameters is fantastic for filtering, sorting, limit, pagination or dynamic fields. Here HTTP GET method is used to retrieve (or read) a representation of a resource. Read more on Rest Webservice.

The resources are based on EJB Java Service Facade. I tried adding GET parameters (PathParam/QueryParam) to a collection in order to add functionality such as filtering, sorting, filetering fields, limit. I have written logic in Java Service Facade for few resources that looks as below:

HTTP Verb Resource Naming (URI) Entire Collection (e.g. departments)
GET RestApplication/resources/model/departments Return list of departments.
GET RestApplication/resources/model/departments?offset=1 Return individual department object.
GET RestApplication/resources/model/departments?limit=4&childValue=false Return list of departments based on limit, if childValue passed as false response will not contains employeeList object.
GET RestApplication/resources/model/departments?limit=4&childValue=false&orderBy=departmentId
&orderType=DESC
Return list of departments based on ascending/descending order.
GET RestApplication/resources/model/departments?limit=4&childValue=false
&fields=departmentId,departmentName
Return list of departments with selected departments fields dynamically.
GET RestApplication/resources/model/departments/20 Return department object by departementId.

You can download the sample workspace from here
[Runs with Oracle JDeveloper 12.1.2.0.0]

JDeveloper provides WADL supports to run the REST WebService, below are the examples.
  • GET http://127.0.0.1:7101/RestApplication/resources/model/departments - Return list of departments
  • GET http://127.0.0.1:7101/RestApplication/resources/model/departments?offset=1 - Return department object.
  • GET http://127.0.0.1:7101/RestApplication/resources/model/departments?limit=4&childValue=false - Return list of departments based on limit, if childValue passed as false response will not contains employeeList object.
  • GET http://127.0.0.1:7101/RestApplication/resources/model/departments?limit=4&childValue=false&orderBy=departmentId&orderType=DESC - Return list of departments based on ascending/descending order.
  • GET http://127.0.0.1:7101/RestApplication/resources/model/departments?limit=4&childValue=false&fields=departmentId,departmentName - Return list of departments with dynamic departments fields.
  • GET http://127.0.0.1:7101/RestApplication/resources/model/departments/20 - Return department object by departementId.

Below Java Service Facade code explains how to create resources and filter the data collection for above scenarios.
@Path("model")
public class JavaServiceFacade {
    private final EntityManager em;
    private String XMLResponse;
    private String fields = null;
    private boolean childValue;

    public JavaServiceFacade() {
        final EntityManagerFactory emf = Persistence.createEntityManagerFactory("Model-1");
        em = emf.createEntityManager();
    }

    /**
     * @param childValue
     * @param offset
     * @param limit
     * @param fields
     * @param orderBy
     * @param orderType
     * @return
     */
    @GET
    @Produces("application/xml")
    @Path("/departments")
    public String getDepartmentsFindAll(@DefaultValue("true") @QueryParam("childValue") boolean childValue,
                                        @DefaultValue("0") @QueryParam("offset") int offset,
                                        @DefaultValue("0") @QueryParam("limit") int limit,
                                        @QueryParam("fields") String fields, @QueryParam("orderBy") String orderBy,
                                        @QueryParam("orderType") String orderType) {
        this.childValue = childValue;
        this.fields = fields;

        Query query = null;
        if (offset > 0) {
            query =
                em.createNamedQuery("Departments.findAll", Departments.class).setFirstResult(offset).setMaxResults(1);
            this.generateXMlResponse(query, false);
        } else if (orderBy != null) {
            String qlString = "select o from Departments o order by o." + orderBy;
            if (orderType != null)
                qlString += " " + orderType;
            query = em.createQuery(qlString, Departments.class).setMaxResults(limit);
            this.generateXMlResponse(query, false);
        } else {
            query = em.createNamedQuery("Departments.findAll", Departments.class).setMaxResults(limit);
            this.generateXMlResponse(query, false);
        }
        return this.XMLResponse;
    }

    /**
     * @param departmentId
     * @param fields
     * @param childValue
     * @return
     */
    @GET
    @Produces("application/xml")
    @Path("/departments/{departmentId}")
    public String getDepartmentById(@PathParam("departmentId") int departmentId, @QueryParam("fields") String fields,
                                    @DefaultValue("true") @QueryParam("childValue") boolean childValue) {
        this.childValue = childValue;
        this.fields = fields;
        Query query =
            em.createNamedQuery("Departments.ByDeptId", Departments.class).setParameter("bind_departmentId",
                                                                                        departmentId);
        this.generateXMlResponse(query, true);
        return this.XMLResponse;
    }

    /**
     * @param query
     * @param singleResult
     */
    public void generateXMlResponse(Query query, boolean singleResult) {
        if (singleResult == true) {
            List deptResultList = query.getResultList();
            if (deptResultList.size() > 0) {
                this.XMLResponse = "";
                Iterator deptListIterator = deptResultList.iterator();
                while (deptListIterator.hasNext()) {
                    this.XMLResponse += "";
                    Departments dept = (Departments) deptListIterator.next();
                    this.constructXML(dept.getClass(), dept, false);
                    if (this.childValue == true) {
                        List empList = dept.getEmployeesList1();
                        for (int j = 0; j < empList.size(); j++) {
                            Employees emp = empList.get(j);
                            this.XMLResponse += "";
                            this.constructXML(emp.getClass(), emp, true);
                            this.XMLResponse += "";
                        }
                    }
                    this.XMLResponse += "";
                }
                this.XMLResponse += "";
            }
        } else {
            Vector resultList = (Vector) query.getResultList();
            int deptSize = resultList.size();
            if (deptSize > 0) {
                this.XMLResponse = "";
                for (int i = 0; i < deptSize; i++) {
                    //  Object obj = resultList.elementAt(i);
                    this.XMLResponse += "";
                    Departments dept = (Departments) resultList.elementAt(i);
                    this.constructXML(dept.getClass(), dept, false);
                    if (this.childValue == true) {
                        List empList = dept.getEmployeesList1();
                        for (int j = 0; j < empList.size(); j++) {
                            Employees emp = empList.get(j);
                            this.XMLResponse += "";
                            this.constructXML(emp.getClass(), emp, true);
                            this.XMLResponse += "";
                        }
                    }
                    this.XMLResponse += "";
                }
                this.XMLResponse += "";
            }
        }
    }

    /**
     * @param clazz
     * @param obj
     * @param childValue
     */
    public void constructXML(Class clazz, Object obj, boolean childValue) {
        Class noparams[] = { };
        try {
            Field[] field = clazz.getDeclaredFields();
            for (int i = 0; i < field.length; i++) {
                String fieldName = field[i].getName();
                if (field[i].isAnnotationPresent(Column.class)) {
                    String methodName =
                        "get" + field[i].getName().toString().substring(0, 1).toUpperCase() +
                        field[i].getName().toString().substring(1);
                    Method method = clazz.getDeclaredMethod(methodName, noparams);
                    Object fieldValue = method.invoke(obj, null);

                    if (this.fields == null || childValue == true) {
                        this.XMLResponse += "<" + fieldName + ">" + fieldValue + "</" + fieldName + ">";
                    } else {
                        String columnNames[] = this.fields.split(",");
                        for (int j = 0; j < columnNames.length; j++) {
                            if (columnNames[j] != null) {
                                boolean colNamesExist = this.findFieldExists(Departments.class, columnNames[j]);
                                if (colNamesExist == true && columnNames[j].equals(fieldName))
                                    this.XMLResponse += "<" + fieldName + ">" + fieldValue + "</" + fieldName + ">";
                            }
                        }
                    }
                }
            }
        } catch (NoSuchMethodException e) {
            e.printStackTrace();
        } catch (IllegalAccessException e) {
            e.printStackTrace();
        } catch (InvocationTargetException e) {
            e.printStackTrace();
        }
    }

    /**
     *
     * @param clazz
     * @param fieldName
     * @return boolean
     */
    public boolean findFieldExists(Class clazz, String fieldName) {
        try {
            Field field = clazz.getDeclaredField(fieldName);
            if (field != null)
                return true;
        } catch (NoSuchFieldException e) {
            e.printStackTrace();
        }
        return false;
    }
 
  /**
     * All changes that have been made to the managed entities in the
     * persistence context are applied to the database and committed.
     */
    private void commitTransaction() {
        final EntityTransaction entityTransaction = em.getTransaction();
        if (!entityTransaction.isActive()) {
            entityTransaction.begin();
        }
        entityTransaction.commit();
    }

    public Object queryByRange(String jpqlStmt, int firstResult, int maxResults) {
        Query query = em.createQuery(jpqlStmt);
        if (firstResult > 0) {
            query = query.setFirstResult(firstResult);
        }
        if (maxResults > 0) {
            query = query.setMaxResults(maxResults);
        }
        return query.getResultList();
    }

    public  T persistEntity(T entity) {
        em.persist(entity);
        commitTransaction();
        return entity;
    }

    public  T mergeEntity(T entity) {
        entity = em.merge(entity);
        commitTransaction();
        return entity;
    }
}

Thursday, September 5, 2013

ADF Mobile - Programmatically call RestServiceAdapter for POST Request

In my previous blog entry we saw how to get Rest WebService based form values in managed bean programmatically. In this entry will see how RestServiceAdapter interface lets you trigger execution of web service operations without the need to create a web service data control or interact with it directly.

Below code will explain how to get REST WebService based form values in managed bean and programmatically call the RestServiceAdapter for the POST request . Already there is a documentation on this, but here I'm trying to explain the end to end scenario as mentioned in below steps.
  1. Get the form values from departmentsIterator programmatically. 
  2. Dynamically construct the response xml based on departmentsIterator.
  3. Set the Rest WebService Connection with POST request option.
Take an example with mobile application having two screen. First screen consists of departments list and in second screen you can add new department for the Save button I have created the managed bean with actionListener method as below. 
public class DeptBean {
    public DeptBean() {
    }

    public void addDeptAction(ActionEvent actionEvent) {
        RestServiceAdapter restServiceAdapter = Model.createRestServiceAdapter();
        // Clear any previously set request properties, if any
        restServiceAdapter.clearRequestProperties();
        // Set the connection name
        restServiceAdapter.setConnectionName("RestServerEndpoint");
        restServiceAdapter.setRequestType(RestServiceAdapter.REQUEST_TYPE_POST);
        // Specify the type of request
        restServiceAdapter.addRequestProperty("Content-Type", "application/xml");
        restServiceAdapter.addRequestProperty("Accept", "application/xml; charset=UTF-8");
        // Specify the number of retries
        restServiceAdapter.setRetryLimit(0);
        // Set the URI which is defined after the endpoint in the connections.xml.
        // The request is the endpoint + the URI being set
        restServiceAdapter.setRequestURI("/EJBRestServiceDemo/jersey/EJBRestServiceDemo");

        ValueExpression ve =
            AdfmfJavaUtilities.getValueExpression("#{bindings.departmentsIterator.currentRow.dataProvider}",
                                                  Object.class);
        Object obj = ve.getValue(AdfmfJavaUtilities.getAdfELContext());
        if (obj instanceof VirtualJavaBeanObject) {
            try {
                VirtualJavaBeanObject vjbo = (VirtualJavaBeanObject)obj;
                String postData = this.constructXMlResponse(vjbo);
                response = restServiceAdapter.send(postData);
            } catch (Exception e) {
                e.printStackTrace();
            }
        }
    }

    /**
     * Construct the XMLResponse based on the VirtualJavaBeanObject dynamically
     * @param vjbo
     * @return
     */
    public static String constructXMlResponse(VirtualJavaBeanObject vjbo) {
        String XMLResponse = "";
        if (vjbo.getAttributeInfoCount() > 0) {
            String xmlRootTag = getClassName(vjbo.getName());
            XMLResponse += "<" + xmlRootTag + ">";
            int count = vjbo.getAttributeInfoCount();
            for (int i = 0; i < count; i++) {
                AttributeInfo fieldName = vjbo.getAttributeInfo(i);
                XMLResponse +=
                        "<" + fieldName.name + ">" + vjbo.getAttribute(fieldName.name).toString() + "</" + fieldName.name +
                        ">";
            }
            XMLResponse += "</" + xmlRootTag + ">";
        }
        return XMLResponse;
    }


    /**
     * Get the class name with/without the package
     * @param className
     * @return
     */
    public static String getClassName(String className) {
        int firstChar = className.lastIndexOf('_') + 1;
        if (firstChar > 0) {
            className = className.substring(firstChar);
        }
        return className.toLowerCase();
    }
}
Note:- The GenericType is only exposed in SOAP data controls, so Rest Webservice data control can't be executed directly using AdfmfJavaUtilities.invokeDataControlMethod.

You can download the sample workspace from here.
[Runs with Oracle JDeveloper 11.1.2.4.0]

Thursday, August 29, 2013

ADF Mobile - How to get the Preferences value in HTML page

In my previous blog entry I went over "Usage of User Preferences in ADF Mobile", In this entry we'll see how to get the Preferences value in HTML page.

In this type of scenarios we can use Javascript Callback Function "adf.mf.api.invokeMethod" invoke a Java method from any class in a classpath.

Below Code illustrate how to call the Java method from HTML and get Preferences values back into the HTML.
<script type="text/javascript" charset="utf-8">
  /**
   * Document is done loading this is called and we add a listener for the
   * phonegap event 'deviceready'.
   */
  function onBodyLoad() {
	  document.addEventListener("deviceready", onDeviceReady, false);
  };

  /**
   * When this function is called, PhoneGap has been initialized and is ready to roll.
   */
  function onDeviceReady() {
	  adf.mf.api.invokeMethod("mobile.LoginBean", "getPreferencesData", onSuccess, onFail);
  }

  function onSuccess(request, response) {
	  // Process any return values that comes back in the "response" parameter 
          // Overwrite the below html field values
	  document.getElementById("username").value = response[0];
	  document.getElementById("password").value = response[1];
	  document.getElementById("serviceURL").value = response[2];
  }

  function onFail(request, response) {
  }
</script>
You can download the sample workspace from here
[Runs with Oracle JDeveloper 11.1.2.4.0]

Implementation Steps

Create a ADF Mobile application, In ViewController project. Locate and expand the Application Sources folder, then expand the META-INF folder. You will see the adfmf-feature.xml file, click on the adfmf-feature.xml file to launch the Feature editor. Add a new feature by clicking the green plus sign on the Features table near top of the editor this will launch the new Create ADF Mobile Feature dialog, modify the Feature Name as "feature1".

In the Features table, select the newly created feature feature1  Under the Features table, click the Content tab, and locate the Content table. Notice that the content item feature1.1 is created by default and Type as Local HTML. Next add a new file by clicking the green plus sign and create a index.html file.

Open adfmf-feature.xml, add the adfmf:preferences for "feature1" as shown below.
<?xml version="1.0" encoding="UTF-8" ?>
<adfmf:features xmlns:xsi="http://www.w3.org/2001/XMLSchema-instance" xmlns:adfmf="http://xmlns.oracle.com/adf/mf">
    <adfmf:feature id="feature1" name="feature1" credentials="none">
        <adfmf:content id="feature1.1">
            <adfmf:constraints/>
            <adfmf:localHTML url="feature1/index.html"/>
        </adfmf:content>
        <adfmf:preferences>
            <adfmf:preferenceGroup id="security" label="Security">
                <adfmf:preferenceText id="username" label="User Name" default="oracle"/>
                <adfmf:preferenceText id="password" label="Password" secret="true" default="oracle12"/>
                <adfmf:preferenceText id="serviceURL" label="Security URL" default="http://security.foo.com/provider"/>
            </adfmf:preferenceGroup>
        </adfmf:preferences>
    </adfmf:feature>
</adfmf:features>
In ViewController project, locate and expand the Application Sources folder, create a LoginBean.java file and add the below code.
public class LoginBean {
    public LoginBean() {
        super();
    }

    public List getPreferencesData() {
        List preferences = new ArrayList();
        String username =
            (String)AdfmfJavaUtilities.evaluateELExpression("#{preferenceScope.feature.feature1.security.username}");
        String password =
            (String)AdfmfJavaUtilities.evaluateELExpression("#{preferenceScope.feature.feature1.security.password}");
        String serviceURL = (String)AdfmfJavaUtilities.evaluateELExpression("#{preferenceScope.feature.feature1.security.serviceURL}");
        preferences.add(username);
        preferences.add(password);
        preferences.add(serviceURL);
        return preferences;
    }
}
Open the index.html page and add the below code.
<html>
    <head>
        <meta http-equiv="Content-Type" content="text/html; charset=windows-1252"></meta>
        <title>index</title>
        <script type="text/javascript">
          if (!window.adf)
              window.adf = {
              };
          adf.wwwPath = "../../../../www/";
        </script>
        <script type="text/javascript" src="../../../../www/js/base.js"></script>
        <script type="text/javascript" charset="utf-8">
          /**
           * Document is done loading this is called and we add a listener for the
           * phonegap event 'deviceready'.
           */
          function onBodyLoad() {
              document.addEventListener("deviceready", onDeviceReady, false);
          };

          /**
           * When this function is called, PhoneGap has been initialized and is ready to roll.
           */
          function onDeviceReady() {
              adf.mf.api.invokeMethod("mobile.LoginBean", "getPreferencesData", onSuccess, onFail);
          }

          function onSuccess(request, response) {
              // Process any return values that comes back in the "response" parameter 
              document.getElementById("username").value = response[0];
              document.getElementById("password").value = response[1];
              document.getElementById("serviceURL").value = response[2];
          }

          function onFail(request, response) {
          }
        </script>
    </head>
    <body id="mainBody" onload="onBodyLoad()">
        <div id="bodyPage">
            <div class="amx-view-container current">
                <div class="amx-node amx-view">
                    <div class="amx-node amx-panelPage">
                        <div class="amx-panelPage-header">
                            <div class="amx-panelPage-facet-header">
                                <div class="amx-node amx-outputText" id="message">
                                    <br></br>
                                </div>
                            </div>
                        </div>
                        <div class="amx-panelFormLayout amx-label-position-start amx-field-halign-end amx-layout-one-row amx-node">
                            <div class="amx-panelFormLayout_body">
                                <div class="amx-panelFormLayout_sizing">
                                    <div class="field-label"></div>
                                    <div class="field-value"></div>
                                </div>
                                <div class="field amx-node amx-inputText">
                                    <div class="field-label">
                                        <label>Security URL</label>
                                    </div>
                                    <div class="field-value">
                                        <input type="text" name="serviceURL" id="serviceURL" value=""/>
                                    </div>
                                </div>
                            </div>
                        </div>
                        <div class="amx-panelFormLayout amx-label-position-start amx-field-halign-end amx-layout-one-row amx-node">
                            <div class="amx-panelFormLayout_body">
                                <div class="amx-panelFormLayout_sizing">
                                    <div class="field-label"></div>
                                    <div class="field-value"></div>
                                </div>
                                <div class="field amx-node amx-inputText">
                                    <div class="field-label">
                                        <label>User Name</label>
                                    </div>
                                    <div class="field-value">
                                        <input type="text" name="username" id="username" value=""/>
                                    </div>
                                </div>
                            </div>
                        </div>
                        <div class="amx-panelFormLayout amx-label-position-start amx-field-halign-end amx-layout-one-row amx-node">
                            <div class="amx-panelFormLayout_body">
                                <div class="amx-panelFormLayout_sizing">
                                    <div class="field-label"></div>
                                    <div class="field-value"></div>
                                </div>
                                <div class="field amx-node amx-inputText" onclick="adf.mf.login.focusPassword();">
                                    <div class="field-label">
                                        <label>Password</label>
                                    </div>
                                    <div class="field-value">
                                        <input type="password" name="password" id="password" value=""/>
                                    </div>
                                </div>
                            </div>
                        </div>
                        <div style="text-align: center;">
                            <div id="loginButton" class="amx-node amx-commandButton">
                                <div class="amx-node amx-commandButton-label">
                                    <p>Login</p>
                                </div>
                            </div>
                        </div>
                    </div>
                </div>
            </div>
            <div id="amx-loading" class="amx-loading hidden"></div>
        </div>
    </body>
</html>
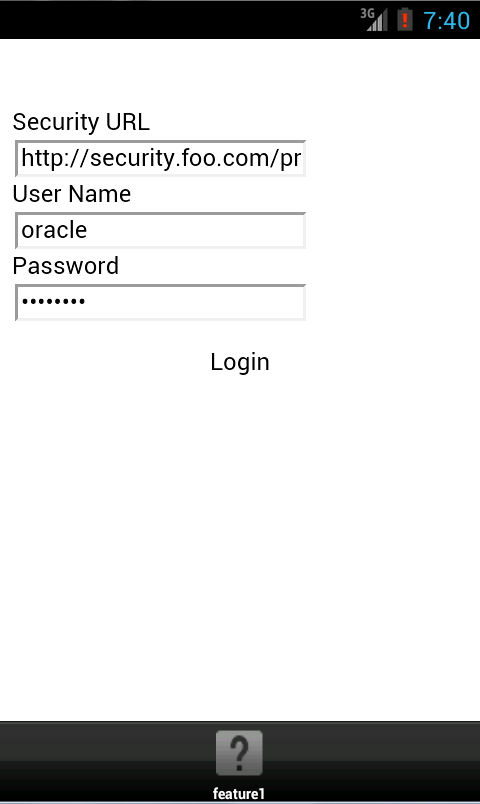
Application screen looks like below when it deployed and run on Android Device/Emulator. When the application loads, Security values will be fetched from Preferences and displayed on the html file.

Thursday, August 22, 2013

ADF Mobile - Get REST WebService based form values in managed bean

In my previous blog entry I went over "Get ADF Mobile Form values in managed bean using Accessor Iterator", In this entry we'll see how to get Rest WebService based form values in managed bean programmatically.

Below is one of the way to access Rest WebService based form values, here is the code below.
ValueExpression ve =
            AdfmfJavaUtilities.getValueExpression("#{bindings.editEmployeeIterator.currentRow.dataProvider}",
                                                  Object.class);
        Object obj = ve.getValue(AdfmfJavaUtilities.getAdfELContext());
  if (obj instanceof VirtualJavaBeanObject) {
            VirtualJavaBeanObject vjbo = (VirtualJavaBeanObject)obj;
            if (vjbo.getAttributeInfoCount() > 0) {
                int count = vjbo.getAttributeInfoCount();
                for (int i = 0; i > count; i++) {
                    AttributeInfo fieldName = vjbo.getAttributeInfo(i);
                    String fieldValue = vjbo.getAttribute(fieldName.name).toString();
                    System.out.println(fieldName.name + " :" + fieldValue);
                }
            }
        }

Thursday, August 1, 2013

EJB provides Accessor iterators for Parameterized Named Query in JDeveloper 12c

Scenario is to add new row to the ADF Table, here ADF Table is based on Named Query having parameters.

When a user defines a JPA named query with parameters in Employee entity using persistence xml (for ex: "select o from Employees o where o.departmentId = :bind_departmentId"), these queries were exposed through non-getter methods on the EJB Session or Java Service facade classes and will be exposed as method actions. Method Action looks as below.


In JDeveloper 12c same queries will be exposed through getter methods as Accessor iterators. Accessor iterator looks as below.


Note:- Named Query name should be defined in following pattern: "<entity name>.<query name>" and query name should start with "get" + "<first char should be uppercase>"
For ex: Employees.getByDeptId

If the named query name doesn't follow the above pattern, then it will be exposed as Method Action.

You can download the sample workspace from here
[Runs with Oracle JDeveloper 12.1.2.0.0]

Implementation Steps

Create Fusion Web Application with entity based on Employees table, open the employees entity java class and add the below Named Query inside @NamedQueries section.
@NamedQuery(name = "Employees.getByDeptId",
                          query = "select o from Employees o where o.departmentId = :bind_departmentId")
Next create a session bean and expose all methods to local/remote interface and generate data control.

In ViewController project, create and open the index.jspx page and follow the below steps:
  • In the Data Controls accordion, expand the SessionEJBBean node, drop employeesGetByDeptId->Operations->ExecuteWithParams as ADF Parameter Form. Notice in the below image, parameter value binding will be bind_departmentId.


Note:- ExecuteWithParams operation is supported in EJB Datacontrols from Jdeveloper 12c.
  • Drop employeesGetByDeptId->Table/List View as ADF Table. 
  • In the Data Controls accordion, expand the SessionEJBBean node, drop employeesGetByDeptId->Operations->Create as ADF Button
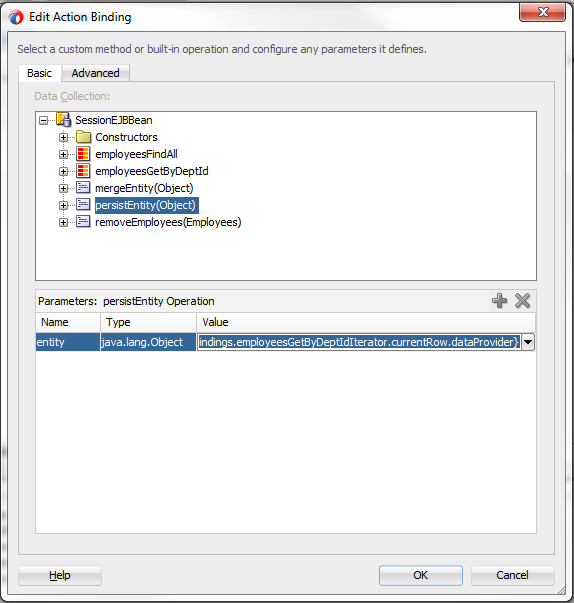
  • Drop the persistEntity(Object) as Method->ADF Button. In Edit Action Binding window select the binding value as "#{bindings.employeesGetByDeptIdIterator.currentRow.dataProvider}"


Run the index.jspx page and enter values in search form with departmentId as 90 and click on ExecuteWithParam button. Named query will filter the data and display employee records which are associated with departmentId.


Next clicking on Create Button will insert new row inside the table, enter the employee information and click on persistEntity button to save the record.

Wednesday, July 31, 2013

JDeveloper 12c - WebService support for EJB entities having foreign key relationship

Oracle Jdeveloper provides an easily way to create SOAP Webservice based on EJB entities, just need to annotate SessionEJBBean with @Webservice or right click on the SessionEJBBean and in context menu click on "Create Web Service".

In earlier version of Jdeveloper you can create Webservice based on EJB entities having foreign key relationship(Departments and Employees tables).  Run the Webservice in Jdeveloper WADL, this will give the Response HTTP headers Status as 200 but no content will be displayed because of the foreign key relationship.


Now Jdeveloper 12c supports creating the Webservice based on EJB entities having foreign key relationship(Departments and Employees tables), to achieve this while creating the "EJB Entities from Tables" we need to select "Generate For Webservice".


Here Departments entity has foreign key relationship with Employees entity but when we run the Webservice in Jdeveloper WADL, this will give the Response HTTP headers Status as 200 and records will be returned only for Departments entity not employee list associated with departmentId.


Wednesday, June 19, 2013

ADF Mobile Push Notifications With Google Cloud Messaging (GCM) Part 2

Server Side Code Implementation Using PHP

In this tutorial I have used PHP as server side programming language and MySQL database to store data. Since sending message from PHP to GCM is easy, here we'll be using CURL to create a message request to send for Google GCM server. CURL is a library that lets you make HTTP requests in PHP.

You can download the workspace from here. Extract the file to public html folder and modify the PHP files code as shown in below section to make PHP application work.

Open the config.php and enter the Mysql sever details where your Mysql DB is installed. Also change the Google API Key associated with Google project. Create the gcm_users table in the database, gcm_users.sql script is located in etc folder.


Developed the SOAP based Web service to receive device token/ registration id from ADF mobile and store that in Mysql database. Here I have used NuSOAP to create webservice, NuSOAP is a rewrite of SOAPx4, provided by NuSphere and Dietrich Ayala. It is a set of PHP classes - no PHP extensions required - that allow developers to create and consume web services based on SOAP 1.1, WSDL 1.1 and HTTP 1.0/1.1

Open the http://hostname/GcmService.php in browser, you can see the gcmService as showed below.


Clicking on the WSDL link will loads the Webservice WSDL URL - "http://hostname/GcmService.php?wsdl", which will be used in the ADF Mobile Push Notifications With Google Cloud Messaging (GCM) Part 1 to create Web service data control to send data back to provider application server.

Open the http://hostname/index.php in the browser, page loads with no devices is registered. 


Push Notification provides a channel to push notifications to clients, and the notification payload can contain some limited set of parameter-value pairs that can be parsed by the ADF Mobile app, when you click on the   notification message. In this example I am sending the payload as

"$message = array("alert" => $message, 'sound' => 'default', 'customMessage' => $customMessage);"

You can alter the payload in send_message.php. Once the users registered with GCM,  http://hostname/index.php screen will looks as below.


Now you can send the Push Notification message to registered users.

ADF Mobile Push Notifications With Google Cloud Messaging (GCM) Part 1

Oracle ADF Mobile 11.1.2.4 release adds the Push Notification Support,  now ADF Mobile application can register to receive notifications through both the Apple and Google notification services. In this article I try to explain on how to implement “Google Cloud Messaging for Android (GCM) with ADF Mobile, GCM is a service that helps developers to send data from servers to their Android applications on Android devices“.

Thanks to Joe Haung his article helped me to understand the implementation of ADF Mobile with push notification.    

Below diagram illustrates the overview working concept of ADF Mobile with Push Notification support.


[Runs with Oracle JDeveloper 11.1.2.4.0].

Registering with Google Cloud Messaging
  • Open Google APIs Console page and create a new project. (If you haven’t created already otherwise it will take you to dashboard). 
  • After creating project, click on Overview tab. Note down the Project Number which will be used as Sender Id / Authorization Id in ADF Mobile application
  • Click on Services tab on the left panel and turn on Google Cloud Messaging for Android.
  • Once you are done, click on API Access and note down the API Key. This API key will be used when sending requests to GCM server.

ADF Mobile Implementation Steps

Create an ADF Mobile application, In the application controller project, register an application lifecycle event listener (ALCL) class. Open the Application Resources -> Descriptors -> ADF META-INF -> adfmf-application.xml, click on the LifeCycle Event Listener search icon and added “application.LifeCycleListenerImpl”.


Open the LifeCycleListenerImpl class and implement the oracle.adfmf.application.PushNotificationConfig interface. This interface provides the registration configuration for push notifications. Override and implement the getNotificationStyle and getSourceAuthorizationID methods of the PushNotificationConfig interface. LifeCycleListenerImpl java class looks like below.
public class LifeCycleListenerImpl implements LifeCycleListener, PushNotificationConfig {
    public LifeCycleListenerImpl() {
    }
  
    public long getNotificationStyle() {
        return 0L;
    }

    public String getSourceAuthorizationId() {
        return null;
    }
  
    public void start() {
       // Add code here...
    }

    public void stop() {
        // Add code here...
    }

    public void activate() {
        // Add code here...
    }

    public void deactivate() {
        // Add code here...
    }
} 
In the application controller project, create a push notification listener class (for example, NativePushNotificationListener) that handles push notification events. This class must implement the oracle.adfmf.framework.event.EventListener interface that defines an event listener.
public class NativePushNotificationListener implements EventListener {

    public NativePushNotificationListener() {
        super();
    }

    public void onMessage(Event event) {
        //Parsing the payload JSON string
        JSONBeanSerializationHelper jsonHelper = new JSONBeanSerializationHelper();
        try {
            PayloadServiceResponse serviceResponse =
                (PayloadServiceResponse)jsonHelper.fromJSON(PayloadServiceResponse.class, event.getPayload());
            //Can access the variables like below
            serviceResponse.getCustomMessage();
            // To do 
        } catch (Exception e) {
            e.printStackTrace();

        }
    }

    public void onError(AdfException adfException) {
    }

    public void onOpen(String string) {
        // Storing the regisration id send by GCM server in #{applicationScope.deviceToken} for further usage
        ValueExpression ve = AdfmfJavaUtilities.getValueExpression("#{applicationScope.deviceToken}", String.class);
        ve.setValue(AdfmfJavaUtilities.getAdfELContext(), string);
    }
}
Create a PayloadServiceResponse.java class and add the below code.
public class PayloadServiceResponse {
    private double from;
    private String collapse_key;
    private String customMessage;
    private String sound;
    private String alert;

    public void setFrom(double from) {
        this.from = from;
    }

    public double getFrom() {
        return from;
    }

    public void setCollapse_key(String collapse_key) {
        this.collapse_key = collapse_key;
    }

    public String getCollapse_key() {
        return collapse_key;
    }

    public void setCustomMessage(String customMessage) {
        this.customMessage = customMessage;
    }

    public String getCustomMessage() {
        return customMessage;
    }

    public void setSound(String sound) {
        this.sound = sound;
    }

    public String getSound() {
        return sound;
    }

    public void setAlert(String alert) {
        this.alert = alert;
    }

    public String getAlert() {
        return alert;
    }
}
Open the LifeCycleListenerImpl class and modify the below method code as followed.
public void start() {
        //Create an EventSource object that represents the source of a native push notification event:
        EventSource evtSource =
            EventSourceFactory.getEventSource(NativePushNotificationEventSource.NATIVE_PUSH_NOTIFICATION_REMOTE_EVENT_SOURCE_NAME);
        //Create and add an object of the push notification listener class to the event source
        evtSource.addListener(new NativePushNotificationListener());
    }
   
   public long getNotificationStyle() {
        return 0L;
    }

    public String getSourceAuthorizationId() {
        //Here AuthorizationId is the "Sender Id" of Google project created earlier
        String senderId = "765350429141";
        ValueExpression ve = AdfmfJavaUtilities.getValueExpression("#{applicationScope.applicationId}", String.class);
        ve.setValue(AdfmfJavaUtilities.getAdfELContext(), senderId);
        return senderId;
    } 
In the application controller project, click on new gallery expand the General - Data Control nodes and select Webservice Service Data Control. Refer to the ADF Mobile Push Notifications With Google Cloud Messaging (GCM) Part 2, set the server side code to access http://hostname/GCMService.php?wsdl


In the Create Web Service Data Control - Step 2 of 5 wizard, move the persistGCMUser from available to selected and click on Finish.


In ViewController project. Locate and expand the Application Sources folder, then expand the META-INF folder. You will see the adfmf-feature.xml file, click on the adfmf-feature.xml file to launch the Feature editor. Add a new feature by clicking the green plus sign on the Features table near top of the editor this will launch the new Create ADF Mobile Feature dialog, modify the values as shown below.


In the Features table, select the newly created feature SaveDeviceToken. Under the Features table, click the Content tab, and locate the Content table. Notice that the content item SaveDeviceToken.1 is created by default. Next add a new file by clicking the green plus sign and select ADF Mobile AMX Page option, this will launch the new Create ADF Mobile AMX Page, modify the File Name as "SaveDeviceToken.amx".

From Data Control palette drag and drop GCMService->persistGCMUser_parameters->gcmUser as ADF Mobile Form and  GCMService->persistGCMUser as ADF Mobile button as shown below.


In SaveDeviceToken.amx page,  create a managed bean with action listener method (name as executePersistGCMUser) and map to  persistGCMuser button action listener.


Open the SaveDeviceToken.amx and modify the page with below code.
<?xml version="1.0" encoding="UTF-8" ?>
<amx:view xmlns:xsi="http://www.w3.org/2001/XMLSchema-instance" xmlns:amx="http://xmlns.oracle.com/adf/mf/amx"
          xmlns:dvtm="http://xmlns.oracle.com/adf/mf/amx/dvt">
    <amx:panelPage id="pp1">
        <amx:facet name="header">
            <amx:outputText value="Save Device Token" id="ot1"/>
        </amx:facet>
        <amx:panelFormLayout id="pfl1">
            <amx:inputText value="#{bindings.username.inputValue}" label="#{bindings.username.hints.label}" id="it4"/>
            <amx:inputText value="#{bindings.email.inputValue}" label="#{bindings.email.hints.label}" id="it3"/>
            <amx:panelLabelAndMessage label="GCM Device Token" id="plam1">
                <amx:outputText value="#{applicationScope.deviceToken}" id="ot3"/>
            </amx:panelLabelAndMessage>
        </amx:panelFormLayout>
        <amx:commandButton actionListener="#{SaveDeviceTokenBean.executePersistGCMUser}" text="Save GCM User"
                           disabled="#{!bindings.persistGCMUser.enabled}" id="cb1">
            <amx:setPropertyListener id="spl1" from="#{applicationScope.applicationId}"
                                     to="#{bindings.applicationId.inputValue}" type="action"/>
            <amx:setPropertyListener id="spl2" from="#{deviceScope.device.os}" to="#{bindings.deviceType.inputValue}"
                                     type="action"/>
            <amx:setPropertyListener id="spl3" from="#{applicationScope.deviceToken}"
                                     to="#{bindings.deviceToken.inputValue}" type="action"/>
        </amx:commandButton>
    </amx:panelPage>
</amx:view>

Open the SaveDeviceTokenBean.java class and modify the executePersistGCMUser as shown below.
public void executePersistGCMUser(ActionEvent actionEvent) {
        MethodExpression me =
            AdfmfJavaUtilities.getMethodExpression("#{bindings.persistGCMUser.execute}", Object.class,
                                                   new Class[] { });
        me.invoke(AdfmfJavaUtilities.getAdfELContext(), new Object[] { });
        //Navigate to the Tasks feature
        AdfmfContainerUtilities.gotoFeature("Tasks");
    }
SaveDeviceToken.amx preview looks as below.


Open on the adfmf-feature.xml file to launch the Feature editor. Add a new feature by clicking the green plus sign on the Features table near top of the editor this will launch the new Create ADF Mobile Feature dialog, modify the values as shown below.


In the Features table, select the newly created feature Tasks. Under the Features table, click the Content tab, and locate the Content table. Notice that the content item Tasks.1 is created by default. Next add a new file by clicking the green plus sign and select ADF Mobile AMX Page option, this will launch the new Create ADF Mobile AMX Page, modify the File Name as "TasksIndexPage.amx". Page preview looks like below.


Deployed and tested the Push Notification support on both Android Device/Emulator and work's fine. If your are running the application on the emulator make sure you select target as Google APIs while creating the Android Virtual Device.


Click on the Settings icon in the emulator and go to ACCOUNTS section. Add the Google account, so that C2DM configure with Gmail account for mapping a unique device.


Application screen looks like below when it run on Android Device/Emulator. At this stage the application would initiate a registration request with push notification services, after successful registration, GCM server issues registration id back to the android device that would uniquely identify the ADF Mobile application and the device.  Note in the first screen GCM Device Token is displayed after successful registration.


Enter form details and click save button to send back the data to application provider server, also navigates to Tasks Details screen.


Handling Push Notifications
  • The ADF Mobile application is installed, but not running and ADF Mobile application is running in the background - In both the cases notification the notification message displays with the registered notification style (none, banner, or alert). When the user taps the message (if its a banner-style notification) or touches the action button (if the message appears as an alert), the ADF Mobile application launches, invoking the application notification handlers. 
  • The ADF Mobile application is running in the foreground - No notification message displays. The application notification handlers are invoked.
Open the http://hostname in the browser will load the index.php page and displays devices which are registered and send the message.


Refer the ADF Mobile Push Notifications With Google Cloud Messaging (GCM) Part 2, how to set the server side code to access http://hostname/index.php and send message from sever side to GCM. Once the message is sent you can see the notification in both Device/Emulator as shown below.


In the NativePushNotificationListener class - onMessage method load, you can parse the event payload and invoke additional application logic accordingly. Below is the example how the payload looks when you run in the debug mode. You can refer to NativePushNotificationListener class I have showed how to parse the payload. 


[Runs with Oracle JDeveloper 11.1.2.4.0].