In my previous blog entry I went over "Usage of User Preferences in ADF Mobile", In this entry we'll see how to get the Preferences value in HTML page.
In this type of scenarios we can use Javascript Callback Function "adf.mf.api.invokeMethod" invoke a Java method from any class in a classpath.
Below Code illustrate how to call the Java method from HTML and get Preferences values back into the HTML.
[Runs with Oracle JDeveloper 11.1.2.4.0]
Implementation Steps
Create a ADF Mobile application, In ViewController project. Locate and expand the Application Sources folder, then expand the META-INF folder. You will see the adfmf-feature.xml file, click on the adfmf-feature.xml file to launch the Feature editor. Add a new feature by clicking the green plus sign on the Features table near top of the editor this will launch the new Create ADF Mobile Feature dialog, modify the Feature Name as "feature1".
In the Features table, select the newly created feature feature1 Under the Features table, click the Content tab, and locate the Content table. Notice that the content item feature1.1 is created by default and Type as Local HTML. Next add a new file by clicking the green plus sign and create a index.html file.
Open adfmf-feature.xml, add the adfmf:preferences for "feature1" as shown below.

In this type of scenarios we can use Javascript Callback Function "adf.mf.api.invokeMethod" invoke a Java method from any class in a classpath.
Below Code illustrate how to call the Java method from HTML and get Preferences values back into the HTML.
<script type="text/javascript" charset="utf-8">
  /**
   * Document is done loading this is called and we add a listener for the
   * phonegap event 'deviceready'.
   */
  function onBodyLoad() {
	  document.addEventListener("deviceready", onDeviceReady, false);
  };

  /**
   * When this function is called, PhoneGap has been initialized and is ready to roll.
   */
  function onDeviceReady() {
	  adf.mf.api.invokeMethod("mobile.LoginBean", "getPreferencesData", onSuccess, onFail);
  }

  function onSuccess(request, response) {
	  // Process any return values that comes back in the "response" parameter
          // Overwrite the below html field values
	  document.getElementById("username").value = response[0];
	  document.getElementById("password").value = response[1];
	  document.getElementById("serviceURL").value = response[2];
  }

  function onFail(request, response) {
  }
</script>[Runs with Oracle JDeveloper 11.1.2.4.0]
Implementation Steps
Create a ADF Mobile application, In ViewController project. Locate and expand the Application Sources folder, then expand the META-INF folder. You will see the adfmf-feature.xml file, click on the adfmf-feature.xml file to launch the Feature editor. Add a new feature by clicking the green plus sign on the Features table near top of the editor this will launch the new Create ADF Mobile Feature dialog, modify the Feature Name as "feature1".
In the Features table, select the newly created feature feature1 Under the Features table, click the Content tab, and locate the Content table. Notice that the content item feature1.1 is created by default and Type as Local HTML. Next add a new file by clicking the green plus sign and create a index.html file.
Open adfmf-feature.xml, add the adfmf:preferences for "feature1" as shown below.
<?xml version="1.0" encoding="UTF-8" ?>
<adfmf:features xmlns:xsi="http://www.w3.org/2001/XMLSchema-instance" xmlns:adfmf="http://xmlns.oracle.com/adf/mf">
    <adfmf:feature id="feature1" name="feature1" credentials="none">
        <adfmf:content id="feature1.1">
            <adfmf:constraints/>
            <adfmf:localHTML url="feature1/index.html"/>
        </adfmf:content>
        <adfmf:preferences>
            <adfmf:preferenceGroup id="security" label="Security">
                <adfmf:preferenceText id="username" label="User Name" default="oracle"/>
                <adfmf:preferenceText id="password" label="Password" secret="true" default="oracle12"/>
                <adfmf:preferenceText id="serviceURL" label="Security URL" default="http://security.foo.com/provider"/>
            </adfmf:preferenceGroup>
        </adfmf:preferences>
    </adfmf:feature>
</adfmf:features>public class LoginBean {
public LoginBean() {
super();
}
public List getPreferencesData() {
List preferences = new ArrayList();
String username =
(String)AdfmfJavaUtilities.evaluateELExpression("#{preferenceScope.feature.feature1.security.username}");
String password =
(String)AdfmfJavaUtilities.evaluateELExpression("#{preferenceScope.feature.feature1.security.password}");
String serviceURL = (String)AdfmfJavaUtilities.evaluateELExpression("#{preferenceScope.feature.feature1.security.serviceURL}");
preferences.add(username);
preferences.add(password);
preferences.add(serviceURL);
return preferences;
}
}<html>
<head>
<meta http-equiv="Content-Type" content="text/html; charset=windows-1252"></meta>
<title>index</title>
<script type="text/javascript">
if (!window.adf)
window.adf = {
};
adf.wwwPath = "../../../../www/";
</script>
<script type="text/javascript" src="../../../../www/js/base.js"></script>
<script type="text/javascript" charset="utf-8">
/**
* Document is done loading this is called and we add a listener for the
* phonegap event 'deviceready'.
*/
function onBodyLoad() {
document.addEventListener("deviceready", onDeviceReady, false);
};
/**
* When this function is called, PhoneGap has been initialized and is ready to roll.
*/
function onDeviceReady() {
adf.mf.api.invokeMethod("mobile.LoginBean", "getPreferencesData", onSuccess, onFail);
}
function onSuccess(request, response) {
// Process any return values that comes back in the "response" parameter
document.getElementById("username").value = response[0];
document.getElementById("password").value = response[1];
document.getElementById("serviceURL").value = response[2];
}
function onFail(request, response) {
}
</script>
</head>
<body id="mainBody" onload="onBodyLoad()">
<div id="bodyPage">
<div class="amx-view-container current">
<div class="amx-node amx-view">
<div class="amx-node amx-panelPage">
<div class="amx-panelPage-header">
<div class="amx-panelPage-facet-header">
<div class="amx-node amx-outputText" id="message">
<br></br>
</div>
</div>
</div>
<div class="amx-panelFormLayout amx-label-position-start amx-field-halign-end amx-layout-one-row amx-node">
<div class="amx-panelFormLayout_body">
<div class="amx-panelFormLayout_sizing">
<div class="field-label"></div>
<div class="field-value"></div>
</div>
<div class="field amx-node amx-inputText">
<div class="field-label">
<label>Security URL</label>
</div>
<div class="field-value">
<input type="text" name="serviceURL" id="serviceURL" value=""/>
</div>
</div>
</div>
</div>
<div class="amx-panelFormLayout amx-label-position-start amx-field-halign-end amx-layout-one-row amx-node">
<div class="amx-panelFormLayout_body">
<div class="amx-panelFormLayout_sizing">
<div class="field-label"></div>
<div class="field-value"></div>
</div>
<div class="field amx-node amx-inputText">
<div class="field-label">
<label>User Name</label>
</div>
<div class="field-value">
<input type="text" name="username" id="username" value=""/>
</div>
</div>
</div>
</div>
<div class="amx-panelFormLayout amx-label-position-start amx-field-halign-end amx-layout-one-row amx-node">
<div class="amx-panelFormLayout_body">
<div class="amx-panelFormLayout_sizing">
<div class="field-label"></div>
<div class="field-value"></div>
</div>
<div class="field amx-node amx-inputText" onclick="adf.mf.login.focusPassword();">
<div class="field-label">
<label>Password</label>
</div>
<div class="field-value">
<input type="password" name="password" id="password" value=""/>
</div>
</div>
</div>
</div>
<div style="text-align: center;">
<div id="loginButton" class="amx-node amx-commandButton">
<div class="amx-node amx-commandButton-label">
<p>Login</p>
</div>
</div>
</div>
</div>
</div>
</div>
<div id="amx-loading" class="amx-loading hidden"></div>
</div>
</body>
</html>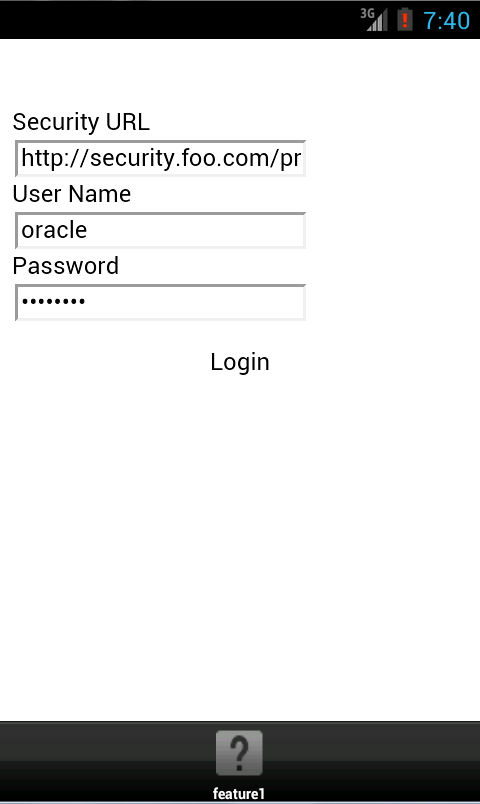
Hey Deepak,
ReplyDeleteIn your workspace I find a file called untitled1.js, how is it getting referenced. Also, is your code valid in MAF 12.1.3 as well.
Thanks,
Abhinav.
very useful
ReplyDeleteNice Blog!
ReplyDeleteThis is a difficult time for all of us. In such challenging times, we at QuickBooks Customer Service make sure to give you permanent solutions for QuickBooks errors.