Showing posts with label EJB DataControl. Show all posts

Thursday, August 1, 2013

EJB provides Accessor iterators for Parameterized Named Query in JDeveloper 12c

Scenario is to add new row to the ADF Table, here ADF Table is based on Named Query having parameters.

When a user defines a JPA named query with parameters in Employee entity using persistence xml (for ex: "select o from Employees o where o.departmentId = :bind_departmentId"), these queries were exposed through non-getter methods on the EJB Session or Java Service facade classes and will be exposed as method actions. Method Action looks as below.


In JDeveloper 12c same queries will be exposed through getter methods as Accessor iterators. Accessor iterator looks as below.


Note:- Named Query name should be defined in following pattern: "<entity name>.<query name>" and query name should start with "get" + "<first char should be uppercase>"
For ex: Employees.getByDeptId

If the named query name doesn't follow the above pattern, then it will be exposed as Method Action.

You can download the sample workspace from here
[Runs with Oracle JDeveloper 12.1.2.0.0]

Implementation Steps

Create Fusion Web Application with entity based on Employees table, open the employees entity java class and add the below Named Query inside @NamedQueries section.
@NamedQuery(name = "Employees.getByDeptId",
                          query = "select o from Employees o where o.departmentId = :bind_departmentId")
Next create a session bean and expose all methods to local/remote interface and generate data control.

In ViewController project, create and open the index.jspx page and follow the below steps:
  • In the Data Controls accordion, expand the SessionEJBBean node, drop employeesGetByDeptId->Operations->ExecuteWithParams as ADF Parameter Form. Notice in the below image, parameter value binding will be bind_departmentId.


Note:- ExecuteWithParams operation is supported in EJB Datacontrols from Jdeveloper 12c.
  • Drop employeesGetByDeptId->Table/List View as ADF Table. 
  • In the Data Controls accordion, expand the SessionEJBBean node, drop employeesGetByDeptId->Operations->Create as ADF Button
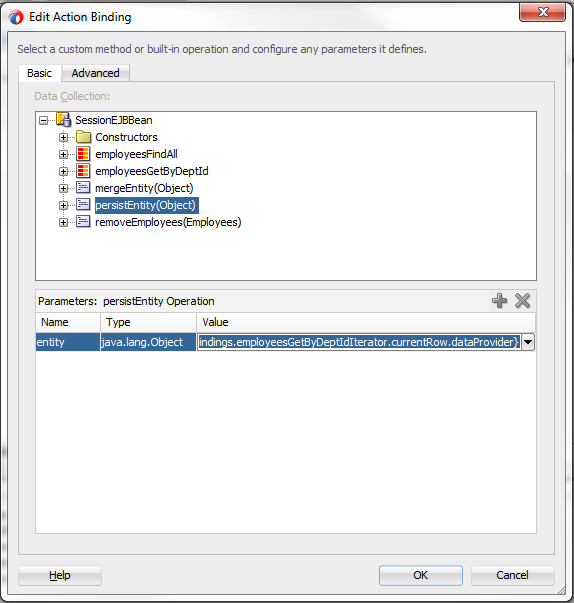
  • Drop the persistEntity(Object) as Method->ADF Button. In Edit Action Binding window select the binding value as "#{bindings.employeesGetByDeptIdIterator.currentRow.dataProvider}"


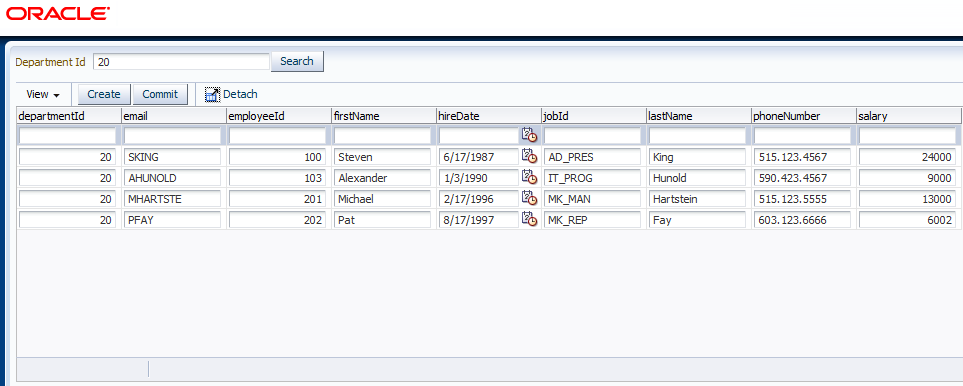
Run the index.jspx page and enter values in search form with departmentId as 90 and click on ExecuteWithParam button. Named query will filter the data and display employee records which are associated with departmentId.


Next clicking on Create Button will insert new row inside the table, enter the employee information and click on persistEntity button to save the record.

Sunday, May 19, 2013

ADF Mobile With EJB Restful Web Service

This article is the continuation of my previous article on Configuring EJB with Restful Web Service in ADF. Here will see how to integrate EJB Restful Web Service with ADF mobile.

Application screen looks like below when it is deployed and run on the Android Device/Emulator. In the below screen Department list will be displayed.


Clicking on any department will take you to the selected Department details page, edit the details and click on the Save button to submit the data. Clicking on delete button will delete the current department.


From Department List screen, click on add button to add the new record. Enter the details and click on Save button to submit the data.


After the below actions, updated department result page will be displayed as shown below.


You can download the sample workspace from here
[Runs with Oracle JDeveloper 11.1.2.4.0 + HR Schema]

Implementation Steps

Create an ADF Mobile Application, the application consists of two projects. Application Controller project of Application LifeCycle, Listeners, Device Features DataControl and ViewController project contains mobile features content like AMX Files, Task Flows and DataControl.

In Application Controller project, create a Departments.java file and add the below code.
public class Departments {
    private BigDecimal departmentId;
    private String departmentName;
    private BigDecimal locationId;
    private BigDecimal managerId;

    public Departments() {
        super();
    }

    public Departments(BigDecimal departmentId, String departmentName, BigDecimal locationId, BigDecimal managerId) {
        this.departmentId = departmentId;
        this.departmentName = departmentName;
        this.locationId = locationId;
        this.managerId = managerId;
    }

    public void setDepartmentId(BigDecimal departmentId) {
        this.departmentId = departmentId;
    }

    public BigDecimal getDepartmentId() {
        return departmentId;
    }

    public void setDepartmentName(String departmentName) {
        this.departmentName = departmentName;
    }

    public String getDepartmentName() {
        return departmentName;
    }

    public void setLocationId(BigDecimal locationId) {
        this.locationId = locationId;
    }

    public BigDecimal getLocationId() {
        return locationId;
    }

    public void setManagerId(BigDecimal managerId) {
        this.managerId = managerId;
    }

    public BigDecimal getManagerId() {
        return managerId;
    }
}
Create DepartmentsDC.java file and add the below code, create DataControl based on DepartmentsDC file
public class DepartmentsDC {
    public DepartmentsDC() {
        super();
    }

    public Departments ediDepartment(BigDecimal departmentId, String departmentName, BigDecimal locationId,
                                     BigDecimal managerId) {
        return new Departments(departmentId, departmentName, locationId, managerId);
    }

    public Departments addDepartment() {
        BigDecimal defaultVal = new BigDecimal("0");
        return new Departments(defaultVal, "", defaultVal, defaultVal);
    }
}
In the New Gallery expand the General - XML nodes and select XML Schema and click OK, enter Departments.xsd in File Name field and the following attributes as shown in below image.


In the New Gallery expand the General - Connection nodes and select URL Connection and click OK, enter the URL Endpoint details, You can download Configuring EJB with Restful Web Service in ADF from my previous article.


Note: - Next create a URL Service Data Control from - http://IpAddress:7101/EJBRestService/jersey/EJBRESTService api with HTTP Methods: GET, PUT, POST, DELETE.

In the New Gallery expand the General - Data Control nodes and select URL Service Data Control and click OK and enter the details to create the GET method


In the New Gallery expand the General - Data Control nodes and select URL Service Data Control and click OK and enter the details to create the POST method.


In Create URL Service Data Control wizard - step 3 of 5, specify the XSD url which we created earlier.


In the New Gallery expand the General - Data Control nodes and select URL Service Data Control and click OK and enter the details to create the PUT method.


In Create URL Service Data Control wizard - step 3 of 5, specify the XSD url which we created earlier.


In the New Gallery expand the General - Data Control nodes and select URL Service Data Control and click OK and enter the details to create the DELETE method.


In Create URL Service Data Control wizard - step 3 of 5, enter the departmentId value as 0.


Next open the DataControls.dcx file and change the Definition id values to looks like below.


In ViewController project. Locate and expand the Application Sources folder, then expand the META-INF folder. You will see the adfmf-feature.xml file, click on the adfmf-feature.xml file to launch the Feature editor. Add a new feature by clicking the green plus sign on the Features table near top of the editor this will launch the new Create ADF Mobile Feature dialog, modify the values as shown below.


In the Features table, select the newly created feature Departments. Under the Features table, click the Content tab, and locate the Content table. Notice that the content item Departments.1 is created by default. Next add a new file by clicking the green plus sign and select taskflow option, this will launch the new Create ADF Mobile Task Flow dialog, modify the value as shown below.


Click on the DepartmentsTaskflow.xml to open the file in taskflow editor and follow the below steps.
  • Create three views and name them as deptList, deptAdd and deptEdit respectively
  • Draw the control flow case from deptList to addDept and Outcome as "add"
  • Draw the control flow case from deptList to editDept and Outcome as "edit" 
  • From DataControl palette drag and drop getDepartmentsFindAll and drop as method-call
  • Draw the control flow case from getDepartmentsFindAll method-call to deptList and Outcome as "getDepartmentsFindAll"
  • Draw the control flow case from addDept to getDepartmentsFindAll method-call and Outcome as "list"
  • Draw the control flow case from editDept to getDepartmentsFindAll method-call and Outcome as "list"
DepartmentsTaskflow.xml will looks as shown below diagram.


Double click on deptList view will launch Create ADF Mobile AMX Page dialog, in page facets select Header and Secondary Action. Go to source tab and follow the below steps:
  • In Header facet, amx:outputText set the value as "Dept List"
  • In Secondary Action facet, for amx:commandButton modify the values text: Add, action: add
  • From DC palette drag and drop EJBService->getDepartmentsFindAll()->Return->departmentss->departments->ADF Mobile List View and select the default options
  • In amx:Item, set the action as "edit"
  • Inside amx:Item set the setPropertyListener as shown below

Note:- Created the DataControl DepartmentsDC with addDepartment and editDepartment methods, so that the type casting the ADF form values to departments object will be easy.

Double click on deptAdd view will launch Create ADF Mobile AMX Page dialog, in page facets select Header, Primary Action. Go to source tab and follow the below steps:
  • In Header facet, amx:outputText set the value as "Add Dept"
  • In Primary Action facet, for amx:commandButton modify the values text: Back, action: __back
  • From DC palette drag and drop DepartmentsDC->addDepartment->Departments->Form as ADF Mobile Form.
  • Go to bindings and add the following attributesValues, departmentId, departmentName, locationId, managerId as shown below.
  • From DC palette drag and drop postDepartments->Method as ADF Mobile Button, set name as "Save", action as "list" and set the setPropertyListener as shown below 

Double click on deptAdd view will launch Create ADF Mobile AMX Page dialog, in page facets select Header, Primary, Secondary Action. Go to source tab and follow the below steps:
  • In Header facet, amx:outputText set the value as "Edit Dept"
  • In Primary Action facet, for amx:commandButton modify the values text: Back, action: __back
  • In Secondary Action facet,  from DC palette drag and drop EJBService->deleteDepartments->Method as ADF Mobile Button, set action as "list". In Edit Action Binding wizard mention the parameter for departmentId as #{pageFlowScope.departmentId}
  • From DC palette drag and drop DepartmentsDC->editDepartment->Departments->Form as ADF Mobile Form and in edit action binding wizard mention the parameters as shown below
  • Go to bindings and add the following attributesValues, departmentId, departmentName, locationId, managerId as shown below.
  • From DC palette drag and drop putDepartments->Method as ADF Mobile Button, set name as "Save", action as "list" and set the setPropertyListener as shown below.

Thursday, January 17, 2013

EJB DC - Deleting Multi-Selected Rows From Adf Table

Let us take a scenario where in users wants to delete multiple records in the ADF table. In EJB this can't be achieved in straight forward way, we have to manually get all the selected row keys and delete the rows data using EntityManager API.

You can download the sample workspace from here
[Runs with Oracle JDeveloper 11.1.2.3.0 + HR Schema]

You can also look at  how to achieve in this article link "Update multiple rows using EJB Data Control".

Implementation Steps

Create Fusion Web Application with entity based on Departments, then create a stateless session bean and add the below method. Expose the method to local/remote interface and generate data control.

Note:- Here in the below code "em" is a EntityManager.
/**
* Here param deptList will be having the selected row.
* Iterating through the deptList and find the depratments object instance by primary key
* Delete the data using entity manager api
* @param deptList
*/
public void deleteMultipleDeptRows(List deptList) {
	if (deptList.size() > 0) {
		Iterator iter = deptList.iterator();
		while (iter.hasNext()) {
			HashMap map = (HashMap)iter.next();
			//Finding the departments object instance
			Departments departments = em.find(Departments.class, map.get("departmentId"));
			em.remove(departments);
		}
	}
}
Create index.jspx page and drag and drop departmentsFindAll->Table as ADF Table. and create the backingBean as "IndexBean". Surround the table with panel collection, add the toolbar, drop button inside toolbar and name as "Delete Multiple Rows".

Bind the departments table to the backing bean as show below.


Create the ActionListener method called "deleteAction" for save button.


Open the IndexBean backing bean and add the below code.
public void deleteAction(ActionEvent actionEvent) {
	RowKeySet selectedDepts = getDeptTable().getSelectedRowKeys();
	Iterator selectedDeptIter = selectedDepts.iterator();
	DCBindingContainer bindings = (DCBindingContainer)BindingContext.getCurrent().getCurrentBindingsEntry();
	DCIteratorBinding deptIter = bindings.findIteratorBinding("departmentsFindAllIterator");
	RowSetIterator deptRSIter = deptIter.getRowSetIterator();
	List deptList = new ArrayList();
	while (selectedDeptIter.hasNext()) {
		Key key = (Key)((List)selectedDeptIter.next()).get(0);
		Row currentRow = deptRSIter.getRow(key);

		HashMap rowValues = new HashMap();
		rowValues.put("departmentId", currentRow.getAttribute("departmentId"));
		deptList.add(rowValues);
	}
	//Execute the deleteMultipleDeptRows method by passing deptList param
	OperationBinding oper = bindings.getOperationBinding("deleteMultipleDeptRows");
	oper.getParamsMap().put("deptList", deptList);
	oper.execute();
	deptIter.executeQuery();
	//Refresh the table
	AdfFacesContext.getCurrentInstance().addPartialTarget(this.getDeptTable());
}
Go to Bindings tab in index.jspx page and add deleteMultipleDeptRows method action.


Run the index.jspx page, select the multiple rows and clicking on "Delete Multiple Rows" button should delete the multiple records from the database.

Tuesday, September 4, 2012

EJB DataControl - JPA Single Table Inheritance

JPA supports three types of inheritance, In this article will try "single table inheritance using EJB datacontrol". For more information on JPA inheritance go through the link.

In single table inheritance, a single table is used to store all of the instances of the entire inheritance hierarchy. The table will have a column for every attribute of every class in the hierarchy. A discriminator column is used to determine which class the particular row belongs to, each class in the hierarchy defines its own unique discriminator value.

Table Structure: -


Model Diagram:-


In the above example the discriminator column (SEX) is added to the table to distinguish between the Men and Women instances.

You can download the sample workspace from here
[Runs with Oracle JDeveloper 11.1.2.2.0 + HR Schema]
Note: - You can find the sql file in application JPASingleTableApp/etc/ folder

Implementation Steps:-

Lets create a Fusion Web Application with Entities based on Person, edit the Person.java entity and remove the menAttr, womenAttr attributes.  Add the below annotation in Person entity.

@Table(name="PERSON")
@Inheritance(strategy=InheritanceType.SINGLE_TABLE)
@DiscriminatorColumn(name="SEX", discriminatorType=DiscriminatorType.STRING,length=1)

Create an entity Men by extending the Person and add the below code.
@Entity
@Table(name = "PERSON")
@DiscriminatorValue("M")
@NamedQueries( { @NamedQuery(name = "Men.findAll", query = "select o from Men o") })
public class Men extends Person implements Serializable {
    @Column(name = "MEN_ATTR")
    private String menAttr;

    public Men() {
    }

    public String getMenAttr() {
        return menAttr;
    }

    public void setMenAttr(String menAttr) {
        this.menAttr = menAttr;
    }
}

Create an entity Women by extending the Person and add the below code.
@Entity
@Table(name = "PERSON")
@DiscriminatorValue("W")
@NamedQueries( { @NamedQuery(name = "Women.findAll", query = "select o from Women o") })
public class Women extends Person implements Serializable {
    @Column(name = "WOMEN_ATTR")
    private String womenAttr;

    public Women() {
    }

    public String getWomenAttr() {
        return womenAttr;
    }

    public void setWomenAttr(String womenAttr) {
        this.womenAttr = womenAttr;
    }
}

Next create a Session Bean and data control for the Session Bean and in ViewController project create a jspx page and drop menFindAll, womenFindAll as separate Table->ADF Read only Table. Run the jspx page and web page will be displayed as shown in below image, table bound to menFindAll should display only men records and table bound to womenFindAll should display only women records.

Monday, June 25, 2012

Get JPA Entity Attributes programmatically in managed bean

Sometimes it is necessary to get database table field column names for further functional process in applications. In one my previous article I have explained one of the use case - Configure Comparison of Row Objects at Run Time, here application module(BC4J) is used to access the ViewObject attributes.

In EJB data control doesn't create any application module or neither have access to application module Api's directly. When the ViewObject is accessed based on the Iterator a dummy object is created using DCDataVo Api. DCDataVo provides little leverage to access certain model layer functionality, so that all Adapter Data Control can use the DCDataVo api to extend to build custom features.

You can download the sample workspace from here
[Runs with Oracle JDeveloper 11.1.2.0.0 (11g R2) + HR Schema]

Here in the below code JPA entity attributes are accessed in managed bean using DCDataVo api.

/**
 * This method will get the View Object based on Iterator
 * Reads the entity attributes(column names)
 * @param actionEvent
 */
public void compareAttributes(ActionEvent actionEvent) {
 DCBindingContainer dcBindings = (DCBindingContainer)BindingContext.getCurrent().getCurrentBindingsEntry();
 DCIteratorBinding deptIter = dcBindings.findIteratorBinding("employeesFindAllIterator");
 ViewObject vo = deptIter.getViewObject();
 int count = 0;
 AttributeDef[] attrDefs = vo.getAttributeDefs();
 for (AttributeDef attrDef : attrDefs) {
  byte attrKind = attrDefs[count].getAttributeKind();
  //Condition to exclude the fk attributes
  if (attrKind == 1) {
   System.out.println(attrDef.getName());
   count++;
  }
 }
}

Displaying the Employee entity attributes.

Simulate JPA Dynamic Query Using View Criteria

Recently I'm working in an application where JPA entity has a named query with parameters passed to that query and exposed as EJB data control, here parameter is passed dynamically at run time. Now same data control is dropped as ADF table, where user can add new rows to the table and perform merge/persist operations.

JPA API provides an alternative way for defining JPA queries, which is mainly useful for building dynamic queries whose exact structure is only known at run time. Building a dynamic query based on fields that a user fills at run time in a form that contains many optional fields. 


In this article, I'm trying to Simulate JPA Dynamic Query Using View Criteria to filter ADF Table and perform merge/persist operations on ADF Table. Below solution is the workaround to achieve the above scenario using EJB data control.

In EJB data control doesn't create any application module or neither have access to application module Api's directly. When the ViewObject is accessed based on the Iterator a dummy object is created using DCDataVo Api.  DCDataVo provides little leverage to access certain model layer functionality, so that all Adapter Data Control can use the DCDataVo api to extend to build custom features.

You can download the sample workspace from here
[Runs with Oracle JDeveloper 11.1.2.0.0 (11g R2) + HR Schema]

Implementation Steps

Create Fusion Web Application with entities based on Emplo, then create a session bean and data control for the session bean.

In the ViewController create index.jspx page and create a IndexBean.java as backing bean, follow the below steps:
  • From data control palette drag and drop EmployeesFindAll()->Table as ADF Table.
  • Drop  EmployeesFindAll()->Operations->Create as ADF Button, name as "Commit".
  • Drop the persistEmployees as ADF button and bind the value to "#{bindings.employeesFindAllIterator.currentRow.dataProvider}"
  • From component palette drop Input Text and label as "Department Id"
  • Drop Button, name as "Search" and ActionListener method as "executeSearch"
Open the IndexBean.java and copy the below method code.

/**
 * This method will get the View Object based on Iterator
 * Creates the view crietria at the runtime,
 * Set the Operator type and pass the paramater 
 * Execute the View Object, print results to the web screen.
 * @param actionEvent
 */
public void executeSearch(ActionEvent actionEvent) {
 DCBindingContainer dcBindings = (DCBindingContainer)BindingContext.getCurrent().getCurrentBindingsEntry();
 DCIteratorBinding deptIter = dcBindings.findIteratorBinding("employeesFindAllIterator");
 // Getting the dummy ViewObject based on Iterator
 ViewObject vo = deptIter.getViewObject();
 // Create the viewCriteria at runtime
 ViewCriteria vc = vo.createViewCriteria();
 ViewCriteriaRow vcRow = vc.createViewCriteriaRow();
 // ViewCriteriaRow attribute value requires operator and value.
 // Note also single-quotes around string value.
 ViewCriteriaItem vcRowItem = vcRow.ensureCriteriaItem("departmentId");
 vcRowItem.setOperator("=");
 vcRowItem.getValues().get(0).setValue(this.getDeptId().getValue());
 vc.addElement(vcRow);
 vo.applyViewCriteria(vc);
 // Execute the query
 vo.executeQuery();
}

Run the index.jspx page and result page looks like below.


Now enter department Id in input text field and click on search button, Employees table will be filtered by department id. Now click on create button to add new rows to the particular searched department, notice a new row is created in the table. Enter the field values and save the record, here if you want to generate employee id as auto generated one then configure @Table Generator for employee id.