Showing posts with label BackingBean. Show all posts

Thursday, January 17, 2013

EJB DC - Deleting Multi-Selected Rows From Adf Table

Let us take a scenario where in users wants to delete multiple records in the ADF table. In EJB this can't be achieved in straight forward way, we have to manually get all the selected row keys and delete the rows data using EntityManager API.

You can download the sample workspace from here
[Runs with Oracle JDeveloper 11.1.2.3.0 + HR Schema]

You can also look at  how to achieve in this article link "Update multiple rows using EJB Data Control".

Implementation Steps

Create Fusion Web Application with entity based on Departments, then create a stateless session bean and add the below method. Expose the method to local/remote interface and generate data control.

Note:- Here in the below code "em" is a EntityManager.
/**
* Here param deptList will be having the selected row.
* Iterating through the deptList and find the depratments object instance by primary key
* Delete the data using entity manager api
* @param deptList
*/
public void deleteMultipleDeptRows(List deptList) {
	if (deptList.size() > 0) {
		Iterator iter = deptList.iterator();
		while (iter.hasNext()) {
			HashMap map = (HashMap)iter.next();
			//Finding the departments object instance
			Departments departments = em.find(Departments.class, map.get("departmentId"));
			em.remove(departments);
		}
	}
}
Create index.jspx page and drag and drop departmentsFindAll->Table as ADF Table. and create the backingBean as "IndexBean". Surround the table with panel collection, add the toolbar, drop button inside toolbar and name as "Delete Multiple Rows".

Bind the departments table to the backing bean as show below.


Create the ActionListener method called "deleteAction" for save button.


Open the IndexBean backing bean and add the below code.
public void deleteAction(ActionEvent actionEvent) {
	RowKeySet selectedDepts = getDeptTable().getSelectedRowKeys();
	Iterator selectedDeptIter = selectedDepts.iterator();
	DCBindingContainer bindings = (DCBindingContainer)BindingContext.getCurrent().getCurrentBindingsEntry();
	DCIteratorBinding deptIter = bindings.findIteratorBinding("departmentsFindAllIterator");
	RowSetIterator deptRSIter = deptIter.getRowSetIterator();
	List deptList = new ArrayList();
	while (selectedDeptIter.hasNext()) {
		Key key = (Key)((List)selectedDeptIter.next()).get(0);
		Row currentRow = deptRSIter.getRow(key);

		HashMap rowValues = new HashMap();
		rowValues.put("departmentId", currentRow.getAttribute("departmentId"));
		deptList.add(rowValues);
	}
	//Execute the deleteMultipleDeptRows method by passing deptList param
	OperationBinding oper = bindings.getOperationBinding("deleteMultipleDeptRows");
	oper.getParamsMap().put("deptList", deptList);
	oper.execute();
	deptIter.executeQuery();
	//Refresh the table
	AdfFacesContext.getCurrentInstance().addPartialTarget(this.getDeptTable());
}
Go to Bindings tab in index.jspx page and add deleteMultipleDeptRows method action.


Run the index.jspx page, select the multiple rows and clicking on "Delete Multiple Rows" button should delete the multiple records from the database.

Tuesday, August 7, 2012

How many rows Modified/Added in ADF Table

I was reading through OTN Discussion Forums where I found one topic "How many rows were Modified/Added in ADF Table by the user". Jobinesh has written article on "Displaying Transaction Log When User Commits a Transaction" which explains how to get the entity status, above example overrides EntityImpl::doDML(int operation, TransactionEvent e) method to track the status of entities.

I was trying to get Modified/Added rows in EJB DataControl but above suggested solution can't be implemented, because application module in not supported in EJB. So in this article I'm trying to get the entity status in backing bean using BC4J, in my next article I will try to explain on how to achieve the same scenario using EJB.

Results page looks like below.


You can download the sample workspace from here
[Runs with Oracle JDeveloper 11.1.2.2.0 + HR Schema]

Implementation Steps:

Create Fusion Web Application with business components from tables based Employees table, open Employees.xml and select Java tab. Generate EmployeesImpl and add the below code in create method to generate sequence number for employee id using SequenceImpl class.
/**
 * Add attribute defaulting logic in this method.
 * @param attributeList list of attribute names/values to initialize the row
 */
protected void create(AttributeList attributeList) {
	super.create(attributeList);
	SequenceImpl seq = new SequenceImpl("EMPLOYEES_SEQ", getDBTransaction());
	Number seqNextval = seq.getSequenceNumber();
	setEmployeeId(seqNextval);
}
Open the EmployeesView and select Java tab, generate EmployeesViewImpl class.

In ViewController project, create index.jspx page and backingbean as "IndexBean" with scope as "ViewScope". Open the IndexBean and copy the below method code.
private RichTable empTable;
private List selectedEmpArray = new ArrayList();
private int modifiedRows = 0;
private int newRows = 0;

public IndexBean() {
}

public void setEmpTable(RichTable empTable) {
	this.empTable = empTable;
}

public RichTable getEmpTable() {
	return empTable;
}

public void setModifiedRows(int modifiedRows) {
	this.modifiedRows = modifiedRows;
}

public int getModifiedRows() {
	return modifiedRows;
}

public void setNewRows(int newRows) {
	this.newRows = newRows;
}

public int getNewRows() {
	return newRows;
}

/**
 * Get the selected rowKey
 * Add the rowKey to selectedEmpArray arrayList
 * @param selectionEvent
 */
public void empSelectionEvent(SelectionEvent selectionEvent) {
	RowKeySet empRKS = selectionEvent.getAddedSet();
	if (empRKS.size() > 0) {
		Iterator empRKSIterator = empRKS.iterator();
		while (empRKSIterator.hasNext()) {
			Key key = (Key)((List)empRKSIterator.next()).get(0);
                        //Add the key if not existed in selectedEmpArray
			if (!selectedEmpArray.contains(key)) {
				selectedEmpArray.add(key);
			}
		}
	}
}

public BindingContainer getBindings() {
	return BindingContext.getCurrent().getCurrentBindingsEntry();
}

/**
 * While loop the selectedEmpArray
 * Get the entity status for the rowKeys
 * @param actionEvent
 */
public void fetchModifiedRows(ActionEvent actionEvent) {
	if (selectedEmpArray.size() > 0) {
		//Resetting the row counts
		this.setModifiedRows(0);
		this.setNewRows(0);

		DCBindingContainer dcBindings = (DCBindingContainer)getBindings();
		DCIteratorBinding EmpsDCIterBinding = dcBindings.findIteratorBinding("EmployeesView1Iterator");
		RowSetIterator EmpsRSIter = EmpsDCIterBinding.getRowSetIterator();
		ViewObject vo = EmpsDCIterBinding.getViewObject();

		Iterator selectedEmpsIter = selectedEmpArray.iterator();
		while (selectedEmpsIter.hasNext()) {
			Row currentRow = EmpsRSIter.getRow((Key)selectedEmpsIter.next());
			EmpsRSIter.setCurrentRow(currentRow);

			ViewRowImpl myRow = (ViewRowImpl)vo.getCurrentRow();
			EntityImpl entityImpl = (EntityImpl)myRow.getEntity(0);
			if (EntityImpl.STATUS_MODIFIED == entityImpl.getEntityState()) {
				this.setModifiedRows((this.getModifiedRows() + 1));
			} else if (EntityImpl.STATUS_NEW == entityImpl.getEntityState()) {
				this.setNewRows((this.getNewRows() + 1));
			}
		}
	}
	//Commit the transaction
	commitAction();
}

public String commitAction() {
	BindingContainer bindings = getBindings();
	OperationBinding operationBinding = bindings.getOperationBinding("Commit");
	Object result = operationBinding.execute();
	if (!operationBinding.getErrors().isEmpty()) {
		return null;
	}
	return null;
}

/**
 * CreateInsert new row and get rowKey for the added row
 * Add the rowKey to the selectedEmpArray arrayList
 * @param actionEvent
 */
public void createNewRow(ActionEvent actionEvent) {
	BindingContainer bindings = getBindings();
	OperationBinding oper = bindings.getOperationBinding("CreateInsert");
	oper.execute();

	DCBindingContainer dcBindings = (DCBindingContainer)BindingContext.getCurrent().getCurrentBindingsEntry();
	DCIteratorBinding EmpsIter = dcBindings.findIteratorBinding("EmployeesView1Iterator");
	EmployeesViewImpl eImpl = (EmployeesViewImpl)EmpsIter.getViewObject();
        //Add the key if not existed in selectedEmpArray
	if (!selectedEmpArray.contains(eImpl.getCurrentRow().getKey())) {
		selectedEmpArray.add(eImpl.getCurrentRow().getKey());
	}
}
Note:- Here createInsert is model driven component, when user clicks on the Create button the selectionListener will not be executed for the first time. So in the above createNewRow method,  the rowKey value will be added to selectedEmpArray.

Open index.jspx page.
  • From datacontrol palette drag and drop EmployeesView1->Table as ADF Table with rowSelection as multiple.
  • Surround the table with panel collection and add toolbar in that.
  • Bind the empolyees table as binding="#{viewScope.IndexBean.empTable}"
  • Set the SelectionListener as "#{viewScope.IndexBean.empSelectionEvent}"
  • Go to Bindings tab and Create Action Binding, Data Collection as EmployeesView1 and Operation as CreateInsert.
  • From component palette drop af:commandButton and set actionListener as "#{viewScope.IndexBean.createNewRow}".
  • Go to Bindings tab and Create Action Binding, Data Collection as AppModuleDataControl and Operation as Commit.
  • From component palette drop af:commandButton and set actionListener as #{viewScope.IndexBean.fetchModifiedRows}, disabled as "#{!bindings.Commit.enabled}", partialSubmit as "true".
  • Add af:outputLabel and value as "No of Rows Modified -  #{viewScope.IndexBean.modifiedRows}", partialTriggers to commit button.
  • Add af:outputLabel and value as "No of Rows Newly added - #{viewScope.IndexBean.newRows}",  partialTriggers to commit button.

Monday, June 25, 2012

Simulate JPA Dynamic Query Using View Criteria

Recently I'm working in an application where JPA entity has a named query with parameters passed to that query and exposed as EJB data control, here parameter is passed dynamically at run time. Now same data control is dropped as ADF table, where user can add new rows to the table and perform merge/persist operations.

JPA API provides an alternative way for defining JPA queries, which is mainly useful for building dynamic queries whose exact structure is only known at run time. Building a dynamic query based on fields that a user fills at run time in a form that contains many optional fields. 


In this article, I'm trying to Simulate JPA Dynamic Query Using View Criteria to filter ADF Table and perform merge/persist operations on ADF Table. Below solution is the workaround to achieve the above scenario using EJB data control.

In EJB data control doesn't create any application module or neither have access to application module Api's directly. When the ViewObject is accessed based on the Iterator a dummy object is created using DCDataVo Api.  DCDataVo provides little leverage to access certain model layer functionality, so that all Adapter Data Control can use the DCDataVo api to extend to build custom features.

You can download the sample workspace from here
[Runs with Oracle JDeveloper 11.1.2.0.0 (11g R2) + HR Schema]

Implementation Steps

Create Fusion Web Application with entities based on Emplo, then create a session bean and data control for the session bean.

In the ViewController create index.jspx page and create a IndexBean.java as backing bean, follow the below steps:
  • From data control palette drag and drop EmployeesFindAll()->Table as ADF Table.
  • Drop  EmployeesFindAll()->Operations->Create as ADF Button, name as "Commit".
  • Drop the persistEmployees as ADF button and bind the value to "#{bindings.employeesFindAllIterator.currentRow.dataProvider}"
  • From component palette drop Input Text and label as "Department Id"
  • Drop Button, name as "Search" and ActionListener method as "executeSearch"
Open the IndexBean.java and copy the below method code.

/**
 * This method will get the View Object based on Iterator
 * Creates the view crietria at the runtime,
 * Set the Operator type and pass the paramater 
 * Execute the View Object, print results to the web screen.
 * @param actionEvent
 */
public void executeSearch(ActionEvent actionEvent) {
 DCBindingContainer dcBindings = (DCBindingContainer)BindingContext.getCurrent().getCurrentBindingsEntry();
 DCIteratorBinding deptIter = dcBindings.findIteratorBinding("employeesFindAllIterator");
 // Getting the dummy ViewObject based on Iterator
 ViewObject vo = deptIter.getViewObject();
 // Create the viewCriteria at runtime
 ViewCriteria vc = vo.createViewCriteria();
 ViewCriteriaRow vcRow = vc.createViewCriteriaRow();
 // ViewCriteriaRow attribute value requires operator and value.
 // Note also single-quotes around string value.
 ViewCriteriaItem vcRowItem = vcRow.ensureCriteriaItem("departmentId");
 vcRowItem.setOperator("=");
 vcRowItem.getValues().get(0).setValue(this.getDeptId().getValue());
 vc.addElement(vcRow);
 vo.applyViewCriteria(vc);
 // Execute the query
 vo.executeQuery();
}

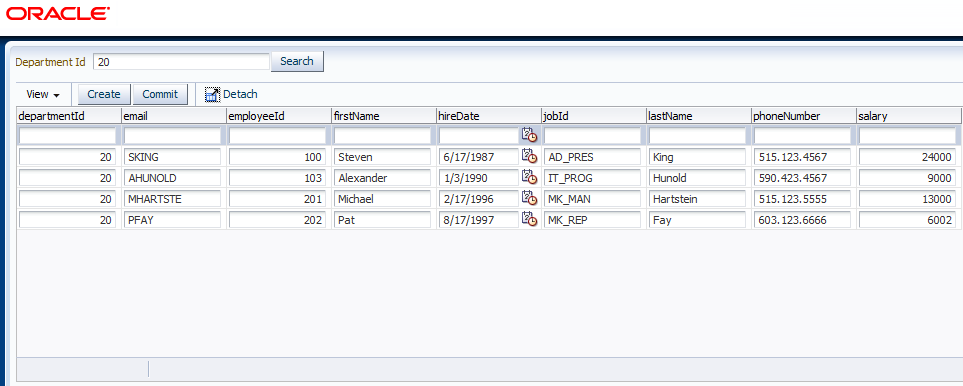
Run the index.jspx page and result page looks like below.


Now enter department Id in input text field and click on search button, Employees table will be filtered by department id. Now click on create button to add new rows to the particular searched department, notice a new row is created in the table. Enter the field values and save the record, here if you want to generate employee id as auto generated one then configure @Table Generator for employee id. 

Sunday, June 3, 2012

Configure Comparison of Row Objects at Run Time

Recently I was working in an application where I need to compare two or more row objects based on selected attributes. In this article I will explain one of the way to configure comparison of row objects at run time, so this pattern will give users the ability to select row objects for comparison and to define which of the available attributes they want to compare at run time.

So the out come of this scenario looks like below. In result page car details table will be displayed, user can select the multiple rows for comparison and click on Compare button.


Next screen will display the shuttle component, where it defines which are the attributes included in the comparison. So user can move attributes from available attributes to selected attributes to compare and click on the Process button.


Note:- In above shuttle component attributes are read from ViewObject programmatically, article written in one of my previous blog - Get ViewObject attributes are  read programmatically and display these attributes in ADF Shuttle component.

Final comparison results table, notice all selected attributes will be showed as first column values and also selected row objects are displayed.


Note:- Above dynamic table is used to display Cars Features Comparison, I followed the solution written on AMIS Technology Blog regarding Creating ADF Faces Dynamic Table with Head to Head comparison using managed bean.

You can download the sample workspace from here
[Runs with Oracle JDeveloper 11.1.2.0.0 (11g R2)]

Implementation steps

Create Fusion Web Application with business components from tables based on Cars table, create a new extended object from Cars View as shown in below image.


Note: Download the application from above link and unzip the application. schema.sql file is in application etc folder.

Open the childCarsView, select Query tab and create bind variable "Bind_CarsID".


Alter the query as below.
SELECT Cars.ID, 
       Cars.NAME, 
       Cars.MSRP, 
       Cars.BASE_ENGINE, 
       Cars.CYLINDERS, 
       Cars.DRIVE_TYPE, 
       Cars.FUEL_CAPACITY, 
       Cars.FUEL_ECONOMY, 
       Cars.FUEL_TYPE, 
       Cars.HORSE_POWER, 
       Cars.TORQUE, 
       Cars.TRANSMISSION
FROM CARS Cars
WHERE Cars.ID in (select regexp_substr(:Bind_CarsID,'[^,]+', 1, level) 
   from dual 
    connect by 
        regexp_substr(:Bind_CarsID, '[^,]+', 1, level) 
            is not null)
Arun Ramamoorthy has explained well in article how to split comma separated string and pass to IN clause of select statement.

Open the AppModule and select Data Model tab move "childCarsView" from available view objects to data model.


Create a CompareAttributes.java and paste the below code.
public class CompareAttributes {
    private String columnName;
    private String columnAliasName;

    public CompareAttributes() {
        super();
    }

    public CompareAttributes(String columnName, String columnAliasName) {
        super();
        this.columnName = columnName;
        this.columnAliasName = columnAliasName;
    }

    public void setColumnName(String columnName) {
        this.columnName = columnName;
    }

    public String getColumnName() {
        return columnName;
    }

    public void setColumnAliasName(String columnAliasName) {
        this.columnAliasName = columnAliasName;
    }

    public String getColumnAliasName() {
        return columnAliasName;
    }
}
Next go to Java tab in AppModule and click on edit java options. Generate the application module class: AppModuleImpl.java

Open the AppModuleImpl.java file and add the below methods code.
/**
 * This method reads the ViewObject attributes and populate CompareAttributes list
 * @return CompareAttributes list
 */
public List getCompareAttributes() {
	ViewObjectImpl vo = getCarsView1();
	ViewAttributeDefImpl[] attrDefs = vo.getViewAttributeDefImpls();
	int count = 0;
	List compareAttrs = new ArrayList();
	for (ViewAttributeDefImpl attrDef : attrDefs) {
		byte attrKind = attrDefs[count].getAttributeKind();
		//checks attribute kind for each element in an array of AttributeDefs
		if (attrKind != AttributeDef.ATTR_ASSOCIATED_ROW && attrKind != AttributeDef.ATTR_ASSOCIATED_ROWITERATOR) {
			String columnName = attrDef.getName();
			String columnAliasName = attrDef.getAliasName();
			//Excluding the Id and Name fields
			if (!columnName.equals("Id") && !columnName.equals("Name")) {
				compareAttrs.add(new CompareAttributes(columnName, columnAliasName));
			}
			count++;
		}
	}
	return compareAttrs;
}

/**
 * Clean up the childCarsView existing rows from collection.
 */
public void cleanUpChildCarsView1() {
	ViewObject childEmpVO = (ViewObject)this.getChildCarsView1();
	//avoid validation when navigating rows
	childEmpVO.setRowValidation(false);
	while (childEmpVO.hasNext()) {
		childEmpVO.setCurrentRow(childEmpVO.next());
		childEmpVO.removeCurrentRowFromCollection();
	}
}

/**
 * This method will populate the childCarsView 
 * carRowKeysList contains CARS table primiary key - Id and
 * which will be passed as In Clause params 
 * @param carRowKeysList
 */
public void populateSelectedRows(List carRowKeysList) {
	if (carRowKeysList != null && carRowKeysList.size() > 0) {
		//Clean up the childCarsView 
		cleanUpChildCarsView1();
		String carsSelectedString = "";
		ViewObject childcarsVo = getChildCarsView1();
		for (int i = 0; i < carRowKeysList.size(); i++) {
			carsSelectedString += carRowKeysList.get(i) + ",";
		}
		childcarsVo.setNamedWhereClauseParam("Bind_CarsID",
											 carsSelectedString.substring(0, (carsSelectedString.length() - 1)));
		childcarsVo.executeQuery();
	}
}
Go back to AppModule.xml and select Java tab in client interface section move getCompareAttributes and populateSelectedRows from available to selected block.


In ViewController project, create a bounded taskflow as "Compare-btf". Open the Compare-btf taskflow, from component palette drop views as "CarsDetails", "CarsCompare". Generate CarsDetails.jsff, CarsCompare.jsff pages and "CarsDetailsBean.java", "CarsCompareBean.java" respectively. Add the EmployeeDetailsBean.java, CarsCompareBean.java  file in taskflow with scope as viewScope.

Draw the control flow case from CarsDetails to CarsCompare, outcome as compare and draw the control flow case from CarsCompare to CarsDetails, outcome as back.

Open CarsDetails.jsff page
  • From data control palette drag and drop CarsView1->Table as ADF Read Only Table, set RowSelection as "muliptle".
  • Surround the table with panel collection component and add Compare button with text as "Compare". 
  • Create the actionListener method for Compare button as "fectchSelectedCarKeys" and action as "compare".
  • Add the binding for table as "carsTable".
Open the CarsDetailsBean.java file and copy the below methods code.
/**
 * This method will get selected rows primiary key - Id values
 * @param actionEvent
 */
public void fectchSelectedCarKeys(ActionEvent actionEvent) {
	RowKeySet selectedCars = getCarsTable().getSelectedRowKeys();
	if (selectedCars.size() > 0) {
		DCBindingContainer dcBindings = (DCBindingContainer)BindingContext.getCurrent().getCurrentBindingsEntry();
		DCIteratorBinding deptIter = dcBindings.findIteratorBinding("CarsView1Iterator");
		RowSetIterator deptRSIter = deptIter.getRowSetIterator();


		Iterator selectedCarsIter = selectedCars.iterator();
		List selectedRowKeys = new ArrayList();
		while (selectedCarsIter.hasNext()) {
			Key key = (Key)((List)selectedCarsIter.next()).get(0);
			Row currentRow = deptRSIter.getRow(key);
			selectedRowKeys.add(currentRow.getAttribute("Id"));
		}
		ADFContext.getCurrent().getPageFlowScope().put("selectedCarsRowKeys", selectedRowKeys);
	}
}
Open CarsCompare.jsff page.
  • From component palette drop the shuttle component and Bind to list value as "#{viewScope.CarsCompareBean.shuttleList}", looks like below code.
  • Add the shuttle component value as "#{viewScope.CarsCompareBean.selectedAttributes}"
  • Go to Bindings tab and create method action for "getCompareAttributes".
<af:selectManyShuttle label="" id="sms1" leadingHeader="Available Attributes"
					  trailingHeader="Selected Attributes"
					  value="#{viewScope.CarsCompareBean.selectedAttributes}" valuePassThru="true">
	<f:selectItems value="#{viewScope.CarsCompareBean.shuttleList}" id="si1"/>
</af:selectManyShuttle>
  • Add the button, name as "Process" and  create the actionListener method as "processAction".
  • Go to Bindings tab and create method action for "populateSelectedRows".
  • Create a Tree bindings as shown below.
  • Add the below dynamic table code to the page
<af:table var="row" rowBandingInterval="0" value="#{viewScope.CarsCompareBean.rows}" rowSelection="single"
		  id="t1b" styleClass="AFStretchWidth" partialTriggers=":::cb1">
	<af:forEach items="#{viewScope.CarsCompareBean.columns}" var="col">
		<af:column headerText="#{col['label']}" sortable="true" sortProperty="#{'name'}" id="c1b">
			<af:outputText value="#{row[col['name']]}" id="ot1b"/>
		</af:column>
	</af:forEach>
</af:table>
Open the CarsCompareBean.java and add the below methods code.
//Holds selected values in shuttle component
List selectedAttributes;
//Populates the shuttle component
List shuttleList;
//Populates the comparison table columns
private List> columns;
//Populates the comparison table rows
private List> rows;

public CarsCompareBean() {
}

public void setSelectedAttributes(List selectedAttributes) {
	this.selectedAttributes = selectedAttributes;
}

public List getSelectedAttributes() {
	return selectedAttributes;
}

public void setShuttleList(List shuttleList) {
	this.shuttleList = shuttleList;
}

public BindingContainer getBindings() {
	return oracle.adf.model.BindingContext.getCurrent().getCurrentBindingsEntry();
}

/**
 * This method will read the attributes from CarsView1
 * and popluate the shuttle component
 * @return
 */
public List getShuttleList() {
	BindingContainer bindings = getBindings();
	OperationBinding operBind = bindings.getOperationBinding("getCompareAttributes");
	List compareAttr = (List)operBind.execute();

	List shuttleList = new ArrayList();
	for (int i = 0; i < compareAttr.size(); i++) {
		CompareAttributes attr = compareAttr.get(i);
		SelectItem item = new SelectItem(attr.getColumnName(), attr.getColumnName(), attr.getColumnAliasName());
		shuttleList.add(item);
	}
	return shuttleList;
}

/**
 * This method will populate the dynamic table
 * @param actionEvent
 */
public void processAction(ActionEvent actionEvent) {
	List selectedCarsKeysList = (List)ADFContext.getCurrent().getPageFlowScope().get("selectedCarsRowKeys");
	BindingContainer bindings = getBindings();
	OperationBinding operBind = bindings.getOperationBinding("populateSelectedRows");
	operBind.getParamsMap().put("carRowKeysList", selectedCarsKeysList);
	operBind.execute();
	
	//Calling the populateDynamicTable
	populateDynamicTable();
}

/**
 * This method will populate the dynamic table based in selected row Objects
 * and attributes selected for comparison
 */
private void populateDynamicTable() {
	List attributes = getSelectedAttributes();
	columns = new ArrayList>();
	rows = new ArrayList>();

	Map column = new HashMap();
	column.put("label", "Cars Name");
	column.put("name", "header");
	columns.add(column);

	for (int i = 0; i < attributes.size(); i++) {
		Map row = new HashMap();
		row.put("header", attributes.get(i).toString());
		row.put("attribute", attributes.get(i).toString());
		rows.add(row);
	}
	DCBindingContainer dcBindings = (DCBindingContainer)getBindings();
	DCIteratorBinding iter = dcBindings.findIteratorBinding("ChildCarsView1Iterator");
	Row[] depts = iter.getAllRowsInRange();
	for (Row dept : depts) {
		column = new HashMap();
		column.put("label", dept.getAttribute("Name").toString());
		column.put("name", dept.getAttribute("Name").toString());
		columns.add(column);
		for (Map trow : rows) {
			trow.put(column.get("name"), dept.getAttribute((String)trow.get("attribute")));
		}
	}

}

public void setColumns(List> columns) {
	this.columns = columns;
}

public List> getColumns() {
	return columns;
}

public void setRows(List> rows) {
	this.rows = rows;
}

public List> getRows() {
	return rows;
}
Last step create a index.jspx page and drop Compare-btf as region into the page.

Monday, May 28, 2012

Commit the child taskflow transaction in parent taskflow transaction using DataContolFrame Api

In this post I'm sharing sample for how can we use "DataContolFrame" to commit the child taskflow transaction in parent taskflow transaction. 

Take a scenario, where we have two taskflows. The parent taskflow contain employee table and child taskflow contains selected employee rows. Alter the values and save, once clicking on Save button will save the data into cache. Now in parent taskflow user can click on Commit button would commit all the changes down in the child taskflow to DB, Rollback button will undo all changes done in child taskflow.

Here DataControlFrame api is used to commit/rollback the data at taskflow controller level. A Data Control Frame is the container associated with a task flow that contains data control instances. To specify whether data control instances are shared between the calling and called task flows, you must set a data-control-scope value of either shared or isolated on the called bounded task flow. In above scenario we can use shared data-control-scope. 

[Runs with Oracle JDeveloper 11.1.2.0.0 (11g R2) + HR Schema]

Implementation Steps

Create Fusion Web Application with business components from tables based on Departments, Employees table, create a new extended object from Employees View as shown in below image.


Open the AppModule and select Data Model tab move "childEmployeesView" from available view objects to data model.


Next go to Java tab in AppModule and click on edit java options. Generate the application module class: AppModuleImpl.java.

Open the AppModuleImpl.java file and the below methods code.
/**
 * This method create's the view crietria at the runtime,
 * set the IN clause operator by accessing the ChildEmployeesView1
 * @param empList
 */
public void populateSelectedRowData(List empList) {
 try {
  if (empList.size() > 0) {
   //cleanUpChildEmployeesView1 just in case before populating new set of rows
   cleanUpChildEmployeesView1();
   ViewObject childEmpVo = getChildEmployeesView1();
   ViewCriteria childEmpVC = childEmpVo.createViewCriteria();
   ViewCriteriaRow childEmpVCRow = childEmpVC.createViewCriteriaRow();
   ViewCriteriaItem childEmpVCRowItem = childEmpVCRow.ensureCriteriaItem("EmployeeId");
   childEmpVCRowItem.setOperator("IN");
   for (int i = 0; i < empList.size(); i++) {
    childEmpVCRowItem.setValue(i, empList.get(i));
   }
   childEmpVC.addElement(childEmpVCRow);
   childEmpVo.applyViewCriteria(childEmpVC);
   childEmpVo.executeQuery();
   System.out.println("populateSelectedRowData - Estimated Row Count - " +
          childEmpVo.getEstimatedRowCount());
  }
 } catch (Exception e) {
  e.printStackTrace();
 }
}

/**
 * Clean up the childemployeesView existing rows from collection.
 */
public void cleanUpChildEmployeesView1() {
 ViewObject childEmpVO = (ViewObject)this.getChildEmployeesView1();
 //avoid validation when navigating rows
 childEmpVO.setRowValidation(false);
 while (childEmpVO.hasNext()) {
  childEmpVO.setCurrentRow(childEmpVO.next());
  childEmpVO.removeCurrentRowFromCollection();
 }
}

/**
 * This method will update the departmentId for selected Employees rows
 * @param empKeysList
 * @param departmentId
 */
public void updateAllChildEmployeesRows(List empKeysList, String departmentId) {
 if (empKeysList != null && empKeysList.size() > 0) {
  ViewObject empVO = (ViewObject)this.getEmployeesView1();
  Iterator iter = empKeysList.iterator();
  Key rowKey = null;
  Row[] matchingInvoiceRows = null;
  Row currRow = null;
  while (iter.hasNext()) {
   //get the key for the invoice row
   rowKey = (Key)iter.next();
   //find the row by key in InvoiceVO
   matchingInvoiceRows = empVO.findByKey(rowKey, 1);
   if (matchingInvoiceRows != null && matchingInvoiceRows.length > 0)
    currRow = matchingInvoiceRows[0];
   if (currRow != null) {
    if (departmentId != null) {
     currRow.setAttribute("DepartmentId", departmentId);
    }
   }
  }
 }
}

Go back to AppModule.xml and select Java tab in client interface section move populateSelectedRows, updateAllChildEmployeesRows from available to selected block.


In ViewController project, create below mentioned bounded taskflows.
  1. "EmployeeDetails-btf" and set the Transaction as "Always Begin New Transaction", select the data-control-scope "Shared data controls with calling task flow".
  2. "EmployeeEdit-btf" and set the Transaction as "Always Use Existing Transaction", select the data-control-scope "Shared data controls with calling task flow" and create two pageFlowScope parameters as empList and empKeyList.
Open EmployeeDetail-btf, from component palette drop view as "EmployeeDetails" and generate EmployeeDetails.jsff page and "EmployeeDetailsBean.java". Add the EmployeeDetailsBean.java file in taskflow with scope requestScope.
  • From data control palette drag and drop EmployeesView1->Table as ADF Read Only Table, set RowSelection as "muliptle". 
  • Surround the table with panel collection component and add Edit button with text as "Edit". Create the actionListener method for edit button as "onEditAction".
  • Add two more button to the page Commit/Rollback and create actionListener method as "onCommit","onRollback" respectively.
  • From component palette drop popup inside the page and drop "EmployeeEdit-btf" as region inside popup, set the popupCanceledListener, popupFetchListener as show in the below code.
 <af:popup childCreation="deferred" autoCancel="disabled" id="p1" contentDelivery="lazyUncached"
              popupCanceledListener="#{EmployeeDetailsBean.popupCancelled}"
              popupFetchListener="#{EmployeeDetailsBean.poupFetchListener}" binding="#{EmployeeDetailsBean.popup}">
        <af:panelWindow id="pw1" title="Edit Employees">
            <af:region value="#{bindings.EmployeeEditbtf1.regionModel}" id="r1"
                       regionNavigationListener="#{EmployeeDetailsBean.hearNavigation}"/>
        </af:panelWindow>
  </af:popup>

Open the EmployeeDetailsBean.java file and copy the below methods code.
private RichPopup popup;
private RichTable empTable;

public EmployeeDetailsBean() {
}

public void setPopup(RichPopup popup) {
 this.popup = popup;
}

public RichPopup getPopup() {
 return popup;
}

public void setEmpTable(RichTable empTable) {
 this.empTable = empTable;
}

public RichTable getEmpTable() {
 return empTable;
}

public void popupCancelled(PopupCanceledEvent popupCanceledEvent) {
 ADFContext.getCurrent().getPageFlowScope().put("forceActivate", "false");
 System.out.println("popupCancelled");
}

public void poupFetchListener(PopupFetchEvent popupFetchEvent) {
 ADFContext.getCurrent().getPageFlowScope().put("forceActivate", "true");
 System.out.println("poupFetchListener");
}

public void hearNavigation(RegionNavigationEvent regionNavigationEvent) {
 this.popup.hide();

 AdfFacesContext.getCurrentInstance().addPartialTarget(this.empTable);
 System.out.println("Finished closing popup");
}

public void onEditAction(ActionEvent actionEvent) {
 RowKeySet selectedEmps = getEmpTable().getSelectedRowKeys();
 if (selectedEmps.size() > 0) {
  //Restart the taskflow
  DCBindingContainer dc = (DCBindingContainer)BindingContext.getCurrent().getCurrentBindingsEntry();
  DCTaskFlowBinding tf = (DCTaskFlowBinding)dc.findExecutableBinding("EmployeeEditbtf1");
  tf.getRegionModel().refresh(FacesContext.getCurrentInstance());

  Iterator selectedEmpIter = selectedEmps.iterator();
  DCBindingContainer bindings = (DCBindingContainer)BindingContext.getCurrent().getCurrentBindingsEntry();
  DCIteratorBinding empIter = bindings.findIteratorBinding("EmployeesView1Iterator");
  RowSetIterator empRSIter = empIter.getRowSetIterator();
  List selectedRowKeys = new ArrayList();
  List SelectedDeptIdRowValue = new ArrayList();
  while (selectedEmpIter.hasNext()) {
   Key key = (Key)((List)selectedEmpIter.next()).get(0);
   selectedRowKeys.add(key);
   Row currentRow = empRSIter.getRow(key);
   SelectedDeptIdRowValue.add(currentRow.getAttribute("EmployeeId"));
  }

  ADFContext.getCurrent().getRequestScope().put("empList", SelectedDeptIdRowValue);
  ADFContext.getCurrent().getRequestScope().put("empKeysList", selectedRowKeys);
  RichPopup.PopupHints hints = new RichPopup.PopupHints();
  this.popup.show(hints);
 }
}

public void onCommit(ActionEvent actionEvent) {
 Map sessionMap = FacesContext.getCurrentInstance().getExternalContext().getSessionMap();
 BindingContext context = (BindingContext)sessionMap.get(BindingContext.CONTEXT_ID);
 String currentFrameName = context.getCurrentDataControlFrame();
 DataControlFrame dcFrame = context.findDataControlFrame(currentFrameName);
 dcFrame.commit();
 dcFrame.beginTransaction(null);
}

public void onRollBack(ActionEvent actionEvent) {
 Map sessionMap = FacesContext.getCurrentInstance().getExternalContext().getSessionMap();
 BindingContext context = (BindingContext)sessionMap.get(BindingContext.CONTEXT_ID);
 String currentFrameName = context.getCurrentDataControlFrame();
 DataControlFrame dcFrame = context.findDataControlFrame(currentFrameName);
 dcFrame.rollback();
 dcFrame.beginTransaction(null);
 AdfFacesContext.getCurrentInstance().addPartialTarget(this.empTable);
}

Now go to EmployeeDetails.jsff page binding and set the condition for taskflow-EmployeeEditbtf1 executables as shown in below image.


Open the EmployeeEdit-btf, create the flow as shown below.


  • Drag and drop populateSelectedRowData from data control and set the parameter value for empList as "#{pageFlowScope.empList}".
  • From component palette drop view as "EmployeeEdit" and generate EmployeeEdit.jsff page and "EmployeeEditBean.java". Add the EmployeeEditBean.java file in taskflow with scope backingBean.
  • Draw the control flow case from  populateSelectedRowData to EmployeeEdit and keep default outcome
  • Drop  EmployeesView1->Execute from data control palette.
  • Draw the control flow case from EmployeeEdit to Execute and outcome as save.
  • Now add two Task Flow Return and name them as Save and Cancel.
  • Draw the control flow case from EmployeeEdit to Cancel and outcome as exit.
  • Draw the control flow case from Execute to Save and outcome as Execute.
Open EmployeeEdit.jsff page.
  • From data control palette drop ChildEmployeesView1->Table as ADF Table.
  • Drop DepartmentView1->Single Selection as ADF Select One Choice and select display attribute as departmentId and create valueChangeListener method as "getSelectedDeptId".
  • Go to page bindings page, add method action updateAllChildEmployeesRows  set the parameters value for empKeyList as "#{pageFlowScope.empList}" and departmentId as "#{pageFlowScope.departmentId}".
  • From component palette add two button as Save/Cancel and set the action to save/exit respectively.
Open the EmployeeEditBean page and add the below code.
public void getSelectedDeptId(ValueChangeEvent valueChangeEvent) {
        ADFContext.getCurrent().getPageFlowScope().put("departmentId", valueChangeEvent.getNewValue());
    }

Last step create the index.jspx page and drop EmployeeDetail-btf as region. Run the index.jspx page and page should look like below.


Select multiple employee rows and click on edit button.


Select the required DepartmentId and click on Save button will save the data in cache not to the DB. If Cancel button is clicked no action will happen, it will just close the popup window.


Now we can notice the departmentId for the selected employee rows as updated. In this page if Commit button is clicked DataControlFrame will update the child taskflow values to the database and Rollback button will undo all the changes.

Thursday, May 24, 2012

Dynamic Control Flow Case using ActionEvent

Here is a scenario where we need to navigate from one page to another page based on some condition. In design time set the 'Action' property of UI component can be used to navigate between pages, but here Action property can't be used since navigation is based on condition. In this article will see how can we programmatically handle the control flow case in managed bean using ActionEvent.

This can be achieved using handleNavigation method from NavigationHandler class. But direct invocation of methods on the NavigationHandler doesn't conform with JSF specification and it bypasses JSF lifecycle invoke application phase, also pending changes may not be submitted.

Take an example, here we have DeptBrowsePage which display departments table with multiple select option enabled and with edit button. If user selects the single row and click on edit Control Flow Case should go to DeptFormPage and if multiple rows selected it should go to DeptTablePage.

You can download the sample workspace from here
[Runs with Oracle JDeveloper 11.1.2.0.0(11g R2) + HR Schema]

The following code illustrates the Control Flow Case dynamically at run time using handleNavigation method. Please download the application to see the entire scenario.

Note: - Here created the bindings for buttons DeptForm, DeptButton respective with getDeptFormButton(), getDeptTableButton() and buttons rendered property made false.
/**
* In this method first looking for the selected row keys
* Based on the condition, queue the action event on respective command button
* @return
*/
public String navigateHanlderMethod() {
        //Get the selected rowkey values
        RowKeySet selectedDepts = getDeptTable().getSelectedRowKeys();
        if (selectedDepts.size() == 1) { //If Single row is selected
            ActionEvent actionEvent = new ActionEvent(this.getDeptFormButton());
            actionEvent.queue();
        } else if (selectedDepts.size() > 1) { // If multiple rows are selected
            List selectedRowKeys = getSelectedRowKeys();
            Map pfScope = ADFContext.getCurrent().getPageFlowScope();
            pfScope.put("deptList", selectedRowKeys);
            ActionEvent actionEvent = new ActionEvent(this.getDeptTableButton());
            actionEvent.queue();
        }
        return null;
 }

Output: Run the index.jspx page.


Select single row and click on the Edit button should take to DeptFormPage.jspx and display only selected row.

Select multiple rows and click on the Edit button should take to DeptTablePage.jspx and display only selected rows.

Monday, May 21, 2012

Get ViewObject attributes pro-grammatically and display in Shuttle component

In this article, I'm trying to explain how can ViewObject attributes be read pro-grammatically and display these attributes in ADF Shuttle component.

The ADF Shuttle component is appropriate for when the business process requires sequencing selected objects for further action, and the user needs to see the source data and items selected for process. The above scenario can be useful when you want to compare two objects, where in user can quickly add and remove items from the pool. Here database table column will be displayed as comparable fields.

You can download the sample workspace from here
[Runs with Oracle JDeveloper 11.1.2.0.0 (11g R2) + HR Schema]

Implementation steps

Create a Fusion Web Application, click on ADF Business Components and create business components from table based on Employees. Create a CompareAttributes.java class file and add the below code.

public class CompareAttributes {
 private String columnName;
 private String columnAliasName;

 public CompareAttributes() {
  super();
 }

 public CompareAttributes(String columnName, String columnAliasName) {
  super();
  this.columnName = columnName;
  this.columnAliasName = columnAliasName;
 }

 public void setColumnName(String columnName) {
  this.columnName = columnName;
 }

 public String getColumnName() {
  return columnName;
 }

 public void setColumnAliasName(String columnAliasName) {
  this.columnAliasName = columnAliasName;
 }

 public String getColumnAliasName() {
  return columnAliasName;
 }
}

Open the AppModule.xml and goo to Java tab in AppModule and click on edit java options. Generate the application module class: AppModuleImpl.java and open the AppModuleImpl.java file and the below method code.

/**
* This method reads the ViewObject attributes and populate CompareAttributes list 
* @return CompareAttributes list
*/
public List getCompareAttributes() {
 ViewObjectImpl vo = getEmployeesView1();
 ViewAttributeDefImpl[] attrDefs = vo.getViewAttributeDefImpls();
 int count = 0;
 List compareAttrs = new ArrayList();
 for (ViewAttributeDefImpl attrDef : attrDefs) {
  byte attrKind = attrDefs[count].getAttributeKind();
  //checks attribute kind for each element in an array of AttributeDefs
  if (attrKind != AttributeDef.ATTR_ASSOCIATED_ROW && attrKind != AttributeDef.ATTR_ASSOCIATED_ROWITERATOR) {
   String columnName = attrDef.getName();
   String columnAliasName = attrDef.getAliasName();
   compareAttrs.add(new CompareAttributes(columnName, columnAliasName));
   count++;
  }
 }
 return compareAttrs;
}

Go back to AppModuleImpl.java and select Java tab in client interface section move getCompareAttributes from available to selected block.


In ViewController project, create index.jspx page and generate page definition page. Go to bindings tab and insert methodAction as "getCompareAttributes" from AppModuleDataControl.

Create the managedBean as "IndexBean", set the scope as pageFlowScope and copy the below code.

public List getShuttleList() {
        BindingContainer bindings = BindingContext.getCurrent().getCurrentBindingsEntry();
        OperationBinding operBind = bindings.getOperationBinding("getCompareAttributes");
        List<CompareAttributes> compareAttr = (List)operBind.execute();

        List shuttleList = new ArrayList();
        for (int i = 0; i < compareAttr.size(); i++) {
            CompareAttributes attr = compareAttr.get(i);
            SelectItem item = new SelectItem(i, attr.getColumnName(), attr.getColumnAliasName());
            shuttleList.add(item);
        }
        return shuttleList;
    }

Open index.jspx page and from component palette drag and drop the Shuttle Component, In Insert shuttle window for "Bind to list (select items) bind to #{pageFlowScope.IndexBean.shuttleList}" as shown below.


Run the index.jspx page, now user can quickly add and remove items from the pool.


Thursday, May 3, 2012

Implement Tree/Details With Taskflow Regions Using EJB DataControl

Let us take scenario where we need to display Tree/Details, left region contains category hierarchy with items listed in a tree structure (ex:- Region-Countries-Locations-Departments in tree format) and right region contains the Employees list.

In detail, Here User may drills down through categories using a tree until Employees are listed. Clicking the tree node name displays Employee list in the adjacent pane related to particular tree node. This article describes on Display Tree/Details using taskflow regions.

Read complete article

Tuesday, May 1, 2012

EJB Named Criteria - Apply bind variable in Backingbean

EJB Named criteria are predefined and reusable where-clause definitions that are dynamically applied to a ViewObject query. Here we often use to filter the ViewObject SQL statement query based on Where Clause conditions.

Take a scenario where we need to filter the SQL statements query based on Where Clause conditions, instead of playing with SQL statements use the EJB Named Criteria which is supported by default in ADF and set the Bind Variable parameter at run time.

You can download the sample workspace from here
[Runs with Oracle JDeveloper 11.1.2.0.0 (11g R2) + HR Schema]

Implementation Steps

Create Fusion Web Application with entity based on Employees table, then create a session bean and data control for the session bean.

Open the DataControls.dcx file and create sparse xml for as shown below.


In sparse xml navigate to Named criteria tab -> Bind Variable section, create binding variable deptId.


Now create a named criteria and map the query attributes to the bind variable.


In the ViewController create index.jspx page, from data control palette drop employeesFindAll->Named Criteria->EmployeesCriteria->Table as ADF Read-Only Filtered Table and create the backingBean as "IndexBean".

Open the index.jspx page and remove the "filterModel" binding from the table, add <af:inputText />, command button and bind them to backingBean. For command button create the actionListener as "applyEmpCriteria" and add below code to the file.

public void applyEmpCriteria(ActionEvent actionEvent) {
   DCIteratorBinding dc = (DCIteratorBinding)evaluteEL("#{bindings.employeesFindAllIterator}");
   ViewObject vo = dc.getViewObject();
   vo.applyViewCriteria(vo.getViewCriteriaManager().getViewCriteria("EmployeesCriteria"));
   vo.ensureVariableManager().setVariableValue("deptId", this.getDeptId().getValue());
   vo.executeQuery();
}

/**
 * Programmtic evaluation of EL
 *
 * @param el EL to evalaute
 * @return Result of the evalutaion
 */
public Object evaluteEL(String el) {
 FacesContext fctx = FacesContext.getCurrentInstance();
 ELContext elContext = fctx.getELContext();
 Application app = fctx.getApplication();
 ExpressionFactory expFactory = app.getExpressionFactory();
 ValueExpression valExp = expFactory.createValueExpression(elContext, el, Object.class);
 return valExp.getValue(elContext);
}
Run the index.jspx page, enter departmentId value as 90 and click in ApplyEmpCriteria button. Now the bind variable for the Named criteria will be applied at runtime in the backing bean and it will re-execute ViewObject query to filter based on where clause condition.

Saturday, April 21, 2012

AutoSuggest behavior In ADF Using EJB DataControl

AutoSuggest feature somewhat expected feature, nowadays that most of the top sites have implemented this functionality. This feature makes your site as user friendly and easy to navigate in inputText feature.

AutoSuggest behavior in ADF adds a pull-down menu of suggested values to a text field. The user can either click directly on a suggestion to enter it into the field, or navigate the list using the up and down arrow keys, selecting a value using the enter key.

You can download the sample workspace from here
[Runs with Oracle JDeveloper 11.1.2.0.0 (11g R2) + HR Schema]

Lets create a Fusion Web Application with Entities based on Departments, edit the Departments.java entity and add the below code.
@NamedQuery(name = "Departments.filteredValues",
            query = "select o from Departments o where o.departmentName like CONCAT(:deptName,'%')

Create a Stateless Session Bean and data control for the Stateless Session Bean. Add the below code to the session bean and expose the method in local/remote interface and generate a data control for that.

Note:- Here in the below code "em" is a EntityManager.
/** select o from Departments o where o.departmentName like CONCAT(:deptName,'%') */
public List<String> getDepartmentsFilteredValues(String deptName) {
   //To store the resultset
   List<String> deptNameResultset = new ArrayList<String>();
   Query query = em.createNamedQuery("Departments.filteredValues").setParameter("deptName", deptName);
   Vector result = (Vector)query.getResultList();
   int resultSize = result.size();
   for (int i = 0; i > resultSize; i++) {
      Departments dept = (Departments)result.get(i);
      deptNameResultset.add(dept.getDepartmentName());
   }
   return deptNameResultset;
}

In the ViewController create a file AutoSuggest.jspx page, from component palette drag and drop ADF inputText and in PI palette change the label to Dept Name. Add the autoSuggestBehavior tag to the inputText. Click on the autoSuggestBehavior, in PI palette click on Edit property for Suggested Items and create a "AutoSuggest" managed bean with scope as "request" as shown in below Image.


Create new method as deptNameResultList and click Ok.


In AutoSuggest.jspx page, go to binding tab and click create binding by selecting methodAction and click ok with parameter blank as shown in below image


Open AutoSuggest.java managed bean and paste the below code.
public List deptNameResultList(String paramValue) {
  //Store the deptName result set
  List deptResultList = new ArrayList();
  //Filter the values using Items List
  List items = new ArrayList();
        
  BindingContainer bindings = getBindings();
  //Execute the Method
  OperationBinding operationBinding = bindings.getOperationBinding("getDepartmentsFilteredValues");
  //Populate the deptName parameter 
  operationBinding.getParamsMap().put("deptName", paramValue);
  operationBinding.execute();
  if (operationBinding.getResult() != null) {
      operationBinding.getResult();
      ArrayList result = (ArrayList)operationBinding.getResult();
      int resultSize = result.size();
      for (int i = 0; i < resultSize; i++) {
         deptResultList.add(new SelectItem(result.get(i)));
      }
   }
   for (SelectItem item : deptResultList) {
     if (item.getLabel().startsWith(paramValue)) {
          items.add(item);
     }
   }
  return items;
}

public BindingContainer getBindings() {
   return BindingContext.getCurrent().getCurrentBindingsEntry();
}

Run AutoSuggest.jspx, Dept Name text field will be displayed. As soon as the user has typed a character, a filtered list of suggested values is presented( for ex: C), Now traverse the list by using up and down arrow and select a suggested value from the list and thus applying that value to the inputText component.

Friday, April 20, 2012

Custom Table Pagination Using EJB Native Query

Let us take scenario where the table has more records. Here employees table has more number of records, if the entire records are displayed in single ADF table, It will be difficult for user to navigate or traverse to the exact record. This can be achieved by implementing pagination, Pagination is an important aspect when displaying large number of records. This blog would be of help if you are building applications that render large number of records in a table. With pagination, the number of records displayed can be controlled into several manageable chunks, thus making it easy to locate the records of interest.

You can download the sample workspace from here
[Runs with Oracle JDeveloper 11.1.2.0.0 (11g R2) + HR Schema]

Model Diagram:

Here in the above model diagram, Employees table schema.

Let us consider the above Employees table has more number of records, User will not be able to see all the records at the same time on web page.

For ex:- Employees Details Page


We use the af:iterator tag to implement the custom table with pagination. This tag renders a collection in the same fashion as the af:table tag does. Same as af:table tag, af:iterator can be based on table binding available in page definition. It iterates over data collection and renders data rows.

First, create entities based on  Employees, then create a stateless session bean and data control for the session bean. Add the below code to the session bean and expose the method in local/remote interface and generate a data control for that.

Note:- Here in the below code "em" is a EntityManager.

 /**
  * Returns list of employee list starting at the given first index with the given max row count.
  * @return list of  employee list starting at the given first index with the given max row count.
  */
   public List<Employees> employeesByLimit(int firstRow, int maxRow) {
        String queryString = "select * from Employees order by employee_id ASC";
        return em.createNativeQuery(queryString,
                                    Employees.class).setMaxResults(maxRow).setFirstResult(firstRow).getResultList();
   }

 /**
  * Returns total amount of rows in table.
  * @return Total amount of rows in table.
  */
   public int employeesTotalRows() {
        String queryString = "select * from Employees order by employee_id ASC";
        Query query = em.createNativeQuery(queryString);
        List results = query.getResultList();
        return results.size();
   }

In the ViewController create a file CustomPagination.jspx page, right click and "Go to Page Definition", CustomPaginationPageDef.xml file will be created. 

Create a CustomPagination managed bean with scope as "sessionScope" add the below code:
    private int firstRow = 0;
    private int rowsPerPage = 10;
    private int totalRows;
    private int totalPages;
    private int currentPage = 1;

    public CustomPagination() {
        this.loadList();
    }

    public void loadList() {
        /**
         * Returns total amount of rows in table.
         * @return Total amount of rows in table.
         */
        BindingContainer bindings = BindingContext.getCurrent().getCurrentBindingsEntry();
        AttributeBinding attr = (AttributeBinding)bindings.getControlBinding("EmployeesTotalRowCount");
        String val = attr.getInputValue().toString();
        int rows = Integer.parseInt(val);
        this.setTotalRows(rows);

        double val1 = ((double)this.getTotalRows() / this.getRowsPerPage());
        int totalPagesCal = (int)Math.ceil(val1);
        this.setTotalPages((totalPagesCal != 0) ? totalPagesCal : 1);

    }

    public void firstActionListener(ActionEvent actionEvent) {
        this.setCurrentPage(1);
        this.setFirstRow(0);
    }

    public void previousActionListener(ActionEvent actionEvent) {
        this.setCurrentPage(this.getCurrentPage() - 1);
        this.setFirstRow(this.getFirstRow() - this.getRowsPerPage());
    }

    public void nextActionListener(ActionEvent actionEvent) {
        this.setCurrentPage(this.getCurrentPage() + 1);
        this.setFirstRow(this.getFirstRow() + this.getRowsPerPage());

    }

    public void lastActionListener(ActionEvent actionEvent) {
        this.setCurrentPage(this.getTotalPages());
        this.setFirstRow(this.getTotalRows() -
                         ((this.getTotalRows() % this.getRowsPerPage() != 0) ? this.getTotalRows() %
                          this.getRowsPerPage() : this.getRowsPerPage()));
    }

    public boolean isBeforeDisabled() {
        return this.getFirstRow() == 0;
    }

    public boolean isAfterDisabled() {
        return this.getFirstRow() >= this.getTotalRows() - this.getRowsPerPage();
    }

    public void setFirstRow(int firstRow) {
        this.firstRow = firstRow;
    }

    public int getFirstRow() {
        return firstRow;
    }

    public void setRowsPerPage(int rowsPerPage) {
        this.rowsPerPage = rowsPerPage;
    }

    public int getRowsPerPage() {
        return rowsPerPage;
    }

    public void setTotalRows(int totalRows) {
        this.totalRows = totalRows;
    }

    public int getTotalRows() {
        return totalRows;
    }

    public void setTotalPages(int totalPages) {
        this.totalPages = totalPages;
    }

    public int getTotalPages() {
        return totalPages;
    }

    public void setCurrentPage(int currentPage) {
        this.currentPage = currentPage;
    }

    public int getCurrentPage() {
        return currentPage;
    }

Open CustomPagination.jspx, click on Binding tab and and click on Create control binding and select methodAction for employeesTotalRows as shown in below image.


Open CustomPaginationPageDef.xml and add the below code snippet inside "variableIterator" tag.


<variable Type="int" Name="employeesTotalRows_Return" IsQueriable="false" IsUpdateable="0" DefaultValue="${bindings.employeesTotalRows.result}"/>

Open CustomPagination.jspx,  click on Binding tab and click on Create control binding and select attributeValues and create attribute binding for employeesTotalRows_Return and in Property Inspector change the id to "EmployeesTotalRowCount"


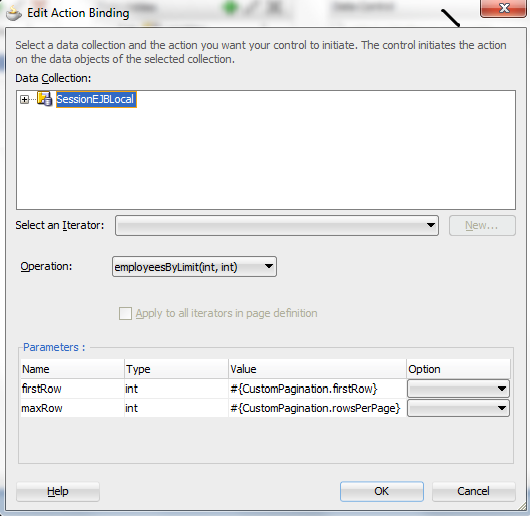
Click on Create control binding and select methodAction for employeesByLimit as shown in below image


Create Tree binding for control of Employees result set.


Click on Create Executable binding and select Invoke action and follow as shown in below image.


Edit TotalRows invoke actiion and set the Refresh to prepareModel, so when ever page loads employeesTotalRows method will get executed.


Go to CustomPagination.jspx Source tab and copy the below code snippet. As mentioned above af:iterator tag to implement the custom table with pagination.

<af:group id="g1">
 <af:panelGroupLayout id="pgl1" layout="scroll">
  <af:spacer width="10" height="10" id="s16"/>
  <af:panelGroupLayout id="pgl9" layout="horizontal">
   <af:spacer width="10" height="10" id="s9"/>
   <af:panelGroupLayout id="pgl10" inlineStyle="width:75px;" layout="horizontal">
    <af:outputText value="Employeed Id" id="ot1" inlineStyle="font-weight:bold;"/>
   </af:panelGroupLayout>
   <af:spacer width="10" height="10" id="s7"/>
   <af:panelGroupLayout id="pgl7" inlineStyle="width:75px;" layout="horizontal">
    <af:outputText value="First Name" id="ot6" inlineStyle="font-weight:bold;"/>
   </af:panelGroupLayout>
   <af:spacer width="10" height="10" id="s10"/>
   <af:panelGroupLayout id="pgl11" inlineStyle="width:75px;" layout="horizontal">
    <af:outputText value="Last Name" id="ot4" inlineStyle="font-weight:bold;"/>
   </af:panelGroupLayout>
   <af:spacer width="10" height="10" id="s11"/>
   <af:panelGroupLayout id="pgl12" inlineStyle="width:75px;" layout="horizontal">
    <af:outputText value="Email" id="ot7" inlineStyle="font-weight:bold;"/>
   </af:panelGroupLayout>
   <af:spacer width="10" height="10" id="s12"/>
   <af:panelGroupLayout id="pgl15" inlineStyle="width:75px;" layout="horizontal">
    <af:outputText value="Salary" id="ot10" inlineStyle="font-weight:bold;"/>
   </af:panelGroupLayout>
  </af:panelGroupLayout>
  <af:separator id="s15"/>
  <af:spacer width="10" height="10" id="s2"/>
  <af:iterator id="i1" value="#{bindings.result.collectionModel}" var="row">
   <af:panelGroupLayout id="pgl2" layout="horizontal">
    <af:spacer width="10" height="10" id="s3"/>
    <af:panelGroupLayout id="pgl3" layout="horizontal" inlineStyle="width:75px;">
     <af:outputText value="#{row.employeeId}" id="ot8"/>
    </af:panelGroupLayout>
    <af:spacer width="10" height="10" id="s13"/>
    <af:panelGroupLayout id="pgl13" layout="horizontal" inlineStyle="width:75px;">
     <af:outputText value="#{row.firstName}" id="ot11"/>
    </af:panelGroupLayout>
    <af:spacer width="10" height="10" id="s4"/>
    <af:panelGroupLayout id="pgl4" layout="horizontal" inlineStyle="width:75px;">
     <af:outputText value="#{row.lastName}" id="ot9"/>
    </af:panelGroupLayout>
    <af:spacer width="10" height="10" id="s6"/>
    <af:panelGroupLayout id="pgl5" layout="horizontal" inlineStyle="width:75px;">
     <af:outputText value="#{row.email}" id="ot2"/>
    </af:panelGroupLayout>
    <af:spacer width="10" height="10" id="s8"/>
    <af:panelGroupLayout id="pgl8" inlineStyle="width:75px;" layout="horizontal">
     <af:outputText value="#{row.salary}" id="ot3"/>
    </af:panelGroupLayout>
   </af:panelGroupLayout>
   <af:spacer width="10" height="10" id="s1"/>
  </af:iterator>
  <af:panelGroupLayout id="pgl6">
   <af:commandButton text="First" id="cb1"
         actionListener="#{CustomPagination.firstActionListener}"
         partialTriggers="i1" disabled="#{CustomPagination.beforeDisabled}"/>
   <af:commandButton text="Prev" id="cb2"
         actionListener="#{CustomPagination.previousActionListener}"
         partialTriggers="i1" disabled="#{CustomPagination.beforeDisabled}"/>
   <af:commandButton text="Next" id="cb3"
         actionListener="#{CustomPagination.nextActionListener}"
         partialTriggers="i1" disabled="#{CustomPagination.afterDisabled}"/>
   <af:commandButton text="Last" id="cb4"
         actionListener="#{CustomPagination.lastActionListener}"
         partialTriggers="i1" disabled="#{CustomPagination.afterDisabled}"/>
   <af:spacer width="10" height="10" id="s5"/>
   <af:outputText value="Page #{CustomPagination.currentPage} / #{CustomPagination.totalPages}"
         id="ot5"/>
  </af:panelGroupLayout>
 </af:panelGroupLayout>
</af:group>

Run the CustomPagination.jspx, Now It always displays 10 rows (configurable) in the CustomPagination.java page. The page provides buttons to navigate between pages and shows current page number. If user is moves to second or third page, navigation buttons for

previous page will be enabled, If we navigate to the last page, navigation buttons for next navigation become disabled and If we navigate to the first page, First and Prev buttons should be disabled.