Tuesday, February 19, 2013

Usage of User Preferences in ADF Mobile

Preferences enable you to add settings that can be configured by end users. In this article will see how to use adfmf:preferenceList to change the display name format setting in the Contacts list at run time.

 ADF Mobile supports application-level and application feature-level user preference pages, in this demo I'm using application feature-level user preference page. Preferences are populated with default values at startup. These values are defined in the adf-feature.xml file, on load of application user can click on preferences feature in navigation bar and select the display name format to be displayed.

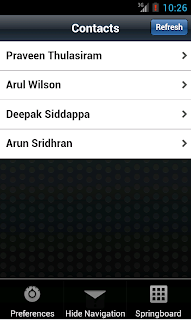
Application screen looks like below when it deployed and run on Android Device/Emulator. Displays the Contacts list on the screen.


Click on the menu button, this will launch the Navigation Bar with Preferences, Hide Navigation and SpringBoard options. Click on Preferences.


In Contact Preference Screen, clicking on Name Display will open the popup by displaying Name Display formats which are defined in adf-feature.xml  file. Now select "LastName FirstName".


I found the way to refresh the Contacts list in the screen, so striking of the below section. Here user don't need to click on the refresh button, after clicking on the device back button will refresh the contact list.

Next click on the device back button will take you to the Contacts screen, notice here data will be displayed in the old format only "FirstName LastName". Here clicking of the device back button handler should be provide to refresh the Contacts list on the screen. I didn't find any ways to refresh list after back button action, so filed the bug against this once I get the solution will update the article. Time being as a workaround provide refresh button, after clicking on refresh button Contacts list will be redraw with updated name display format.


You can download the sample workspace from here. In below section I will not provide all the steps to create the application, only key ones are shown. Above sample download workspace doesn't have extended lifecycle listener class, please follow the below steps to create LifeCycleListener for fetaure.

By design, for a feature to be informed of Device Actions that are sourced from outside of that feature that feature must have a lifecycle listener. Follow the below steps.
  1. Add new Java Class
  2. Set Name and package as desired
  3. Click '+' under Optional Attributes to add an interface
  4. Choose the interface LifeCycleListener (oracle.adfmf.feature),  Save (no other changes to default class contents need to be made for this) 

Next Open the adfmf-feature.xml and map ExtendedFetureLifeCycleListener.java to LifeCycle Event Listener as shown below.


Use the adfmf:preferences element to create the preferences in adf-feature.xml file as below.
<adfmf:feature id="Preference" name="Preference">
 <adfmf:content id="Preference.1">
  <adfmf:amx file="Preference/ContactList.amx"/>
 </adfmf:content>
 <adfmf:preferences>
  <adfmf:preferenceGroup id="Pref1" label="Contact Preference">
   <adfmf:preferenceList id="Pref1NameDisplay" label="Name Display" default="NF1">
    <adfmf:preferenceValue name="FirstName LastName" value="NF1"/>
    <adfmf:preferenceValue name="LastName FirstName" value="NF2"/>
   </adfmf:preferenceList>
  </adfmf:preferenceGroup>
 </adfmf:preferences>
</adfmf:feature>

In ContactList.amx page access the preference values using EL expression and ternary operator is used the switch between the display names.
#{preferenceScope.feature.Preference.Pref1.Pref1NameDisplay eq 'NF1' ? row.firstLastName : row.lastFirstName}"

Monday, February 11, 2013

ADF Mobile Email - Send Multiple File Attachments with amx:selectManyCheckbox option

Here's a use case: A presenter is showing presentation on their Android/iPhone/iPad devices to the client. After the presentation, client may asks for the presentation files for there further understanding. Now presenter wants to attach all the files used in presentation and send mail to the client.

Application screen looks like below when it deployed and run on Android Device/Emulator. Displays the Employees List in first screen.


Clicking on any employee will leads to the Compose screen, where the selected employee email will be pre-populated in "To" field.


Enter the subject and message details need to be send. Click on "Attach a file" button, a popup window will open and files under the "/mnt/sdcard/Download" folder will be displayed. Now select the files that as to be attached and click on Ok button.


Now notice the attached files will be displayed in-front of  Attached Files. Next clicking on Send Email button will take you to the next screen where all the email clients installed in the device will be listed, select any client and send the email.


Tested in Android device, I'm able to send email with multiple attachments. You can download the sample workspace from here.

Implementation Steps

Create an ADF Mobile Application, the application consists of two projects. Application Controller project of Application LifeCycle, Listeners, Device Features DataControl and ViewController project contains mobile features content like AMX Files, Task Flows and DataControl.

In ViewController project, locate and expand the Application Sources folder, create a Employee.java file and add the below code.
public class Employee {
    protected int id;
    protected String firstName;
    protected String lastName;
    protected String email;
    private transient PropertyChangeSupport propertyChangeSupport = new PropertyChangeSupport(this);

    public void addPropertyChangeListener(PropertyChangeListener l) {
        propertyChangeSupport.addPropertyChangeListener(l);
    }

    public void removePropertyChangeListener(PropertyChangeListener l) {
        propertyChangeSupport.removePropertyChangeListener(l);
    }

    public Employee() {
        super();
    }

    public Employee(int id, String firstName, String lastName, String email) {
        super();
        this.id = id;
        this.firstName = firstName;
        this.lastName = lastName;
        this.email = email;
    }

    public void setId(int id) {
        int oldId = this.id;
        this.id = id;
        propertyChangeSupport.firePropertyChange("id", oldId, id);
    }

    public int getId() {
        return id;
    }

    public void setFirstName(String firstName) {
        String oldFirstName = this.firstName;
        this.firstName = firstName;
        propertyChangeSupport.firePropertyChange("first", oldFirstName, firstName);
    }

    public String getFirstName() {
        return firstName;
    }

    public void setLastName(String lastName) {
        String oldLastName = this.lastName;
        this.lastName = lastName;
        propertyChangeSupport.firePropertyChange("last", oldLastName, lastName);
    }

    public String getLastName() {
        return lastName;
    }

    public void setEmail(String email) {
        String oldEmail = this.email;
        this.email = email;
        propertyChangeSupport.firePropertyChange("email", oldEmail, email);
    }

    public String getEmail() {
        return email;
    }
}
Create EmployeeListDC.java file and add the below code, create DataControl based on EmployeeListDC.java file.
public class EmployeeListDC {
    private static List s_employees = null;
    private transient ProviderChangeSupport providerChangeSupport = new ProviderChangeSupport(this);


    public void addProviderChangeListener(ProviderChangeListener l) {
        providerChangeSupport.addProviderChangeListener(l);
    }

    public void removeProviderChangeListener(ProviderChangeListener l) {
        providerChangeSupport.removeProviderChangeListener(l);
    }

    public EmployeeListDC() {
        super();
        if (s_employees == null) {
            s_employees = new ArrayList();
            s_employees.add(new Employee(1, "Praveen", "Thulasiraman", "praveen.thulasiraman@xyz.com"));
            s_employees.add(new Employee(2, "Arul", "wilson", "arul.wilson@xyz.com"));
            s_employees.add(new Employee(3, "Deepak", "Siddappa", "deepak.siddappa@xyz.com"));
            s_employees.add(new Employee(4, "Arun", "Sridhran", "arun.x.sridharan@xyz.com"));
        }
    }

    public Employee[] getEmployees() {
        Employee e[] = null;
        e = (Employee[])s_employees.toArray(new Employee[s_employees.size()]);
        return e;
    }
}
Create FileAttachment.java file and add below code.
public class FileAttachment {
    private int fileIndex;
    private String fileName;
    private String filePath;
    private transient PropertyChangeSupport propertyChangeSupport = new PropertyChangeSupport(this);

    public void addPropertyChangeListener(PropertyChangeListener l) {
        propertyChangeSupport.addPropertyChangeListener(l);
    }

    public void removePropertyChangeListener(PropertyChangeListener l) {
        propertyChangeSupport.removePropertyChangeListener(l);
    }

    public FileAttachment() {
        super();
    }

    public FileAttachment(int fileIndex, String fileName, String filePath) {
        super();
        this.fileName = fileName;
        this.filePath = filePath;
        this.fileIndex = fileIndex;
    }

    public void setFileIndex(int fileIndex) {
        int oldFileIndex = this.fileIndex;
        this.fileIndex = fileIndex;
        propertyChangeSupport.firePropertyChange("fileIndex", oldFileIndex, fileIndex);
    }

    public int getFileIndex() {
        return fileIndex;
    }

    public void setFileName(String fileName) {
        String oldFileName = this.fileName;
        this.fileName = fileName;
        propertyChangeSupport.firePropertyChange("fileName", oldFileName, fileName);
    }

    public String getFileName() {
        return fileName;
    }

    public void setFilePath(String filePath) {
        String oldFilePath = this.filePath;
        this.filePath = filePath;
        propertyChangeSupport.firePropertyChange("fileName", oldFilePath, filePath);
    }

    public String getFilePath() {
        return filePath;
    }
}
Create FileAttachmentListDC.java file and add the below code, create DataControl based on FileAttachmentListDC.java file.
public class FileAttachmentListDC {
    private static List s_FileAttachment = null;
    private transient ProviderChangeSupport providerChangeSupport = new ProviderChangeSupport(this);

    public void addProviderChangeListener(ProviderChangeListener l) {
        providerChangeSupport.addProviderChangeListener(l);
    }

    public void removeProviderChangeListener(ProviderChangeListener l) {
        providerChangeSupport.removeProviderChangeListener(l);
    }

    public FileAttachmentListDC() {
        super();
        if (s_FileAttachment == null) {
            s_FileAttachment = new ArrayList();
            executeReadDir();
        }
    }

    public void executeReadDir() {
        //  String dirName = AdfmfJavaUtilities.getDirectoryPathRoot(AdfmfJavaUtilities.DeviceOnlyDirectory);
        //Hard Coding the Folder path
        String dirName = "/mnt/sdcard/Download";
        try {
            showDir(new File(dirName));
            providerChangeSupport.fireProviderRefresh("FileAttachment");
        } catch (IOException e) {
            e.printStackTrace();
        }
    }

    /**
     * Recursively read the dir and get the file list
     * @param file
     * @throws IOException
     */
    static void showDir(File file) throws IOException {
        int indexCounter = 0;
        if (file.isDirectory()) {
            File[] files = file.listFiles();
            for (int i = 0; i < files.length; i++)
                showDir(files[i]);
        } else {
            s_FileAttachment.add(new FileAttachment(indexCounter, file.getName(), file.getPath()));
            indexCounter++;
        }
    }

    public FileAttachment[] getFileAttachment() {
        FileAttachment a[] = null;
        a = (FileAttachment[])s_FileAttachment.toArray(new FileAttachment[s_FileAttachment.size()]);
        return a;
    }

    /**
     * Clear the PageScopeVariables
     */
    public void clearScopeVariables() {
        ValueExpression ve1 = AdfmfJavaUtilities.getValueExpression("#{pageFlowScope.filePaths}", String.class);
        ve1.setValue(AdfmfJavaUtilities.getAdfELContext(), "");

        ValueExpression ve2 = AdfmfJavaUtilities.getValueExpression("#{pageFlowScope.fileNames}", String.class);
        ve2.setValue(AdfmfJavaUtilities.getAdfELContext(), "");
    }
}
In ViewController project. Locate and expand the Application Sources folder, then expand the META-INF folder. You will see the adfmf-feature.xml file, click on the adfmf-feature.xml file to launch the Feature editor. Add a new feature by clicking the green plus sign on the Features table near top of the editor this will launch the new Create ADF Mobile Feature dialog, modify the values as shown below.


In the Features table, select the newly created feature Email. Under the Features table, click the Content tab, and locate the Content table. Notice that the content item Email.1 is created by default. Next add a new file by clicking the green plus sign and select taskflow option, this will launch the new Create ADF Mobile Task Flow dialog, modify the value as shown below.


Click on the EmailTaskflow.xml to open the file in taskflow editor and follow the below steps.
1) Create two views and name them as EmpList and Email respectively.
2) Draw the control flow case from EmpList to Email and Outcome as "composeEmail", Behavior->Transition as "flipRight".
3) Draw the control flow case from Email to EmpList and Outcome as "empList", Behavior->Transition as "slideLeft".

Double click on EmpList view will launch Create ADF Mobile AMX Page dialog. Open the EmpList.amx page and to source tab and follow the below steps:
1) In Header facet, amx:outputText set the value as "Employee List"
2) From DC palette drag and drop EmployeeListDC->employees->ADF Mobile List View and select the default options
3) From Component palette drag and drop amx:setPropertyListener into amx:listItem and modify the values as shown in below code.
<amx:listView var="row" value="#{bindings.employees.collectionModel}"
			  fetchSize="#{bindings.employees.rangeSize}" id="lv1">
	<amx:listItem id="li1" action="composeEmail">
		<amx:outputText value="#{row.firstName} #{row.lastName}" id="ot2"/>
		<amx:setPropertyListener from="#{row.email}" to="#{pageFlowScope.email}" type="action"/>
	</amx:listItem>
</amx:listView>
Double click on Email view will launch Create ADF Mobile AMX Page dialog, in page facets select Header. Open the Email.amx page and to source tab and follow the below steps:

1) In Header facet, amx:outputText set the value as "Compose"
2) From DC palette drag and drop DeviceFeatures->sendEmail->ADF Mobile Parameter Form
3) Drop the command button and showPopupBehavior on the button
3) From Component palette drag and drop Popup component on the Panel Page
4) Inside the Popup, drop FileAttachmentListDC->fileAttachment->MultipleSelection as ADF Mobile    Select Many Checkbox and in Edit List binding dialog select values as below
    Multi Select Base Attribute : fileName
    Multi Select Display Attribute : filePath
5) Next drop a command button inside the popup window and closePopupBehavior onto the command button.
6) Create the valueChangeListener for amx:selectManyCheckbox
<amx:panelPage id="pp1">
	<amx:facet name="header">
		<amx:outputText value="Compose" id="ot1"/>
	</amx:facet>
	<amx:panelFormLayout id="pfl1" labelPosition="topStart" fieldHalign="start">
		<amx:inputText value="#{pageFlowScope.email}" label="To" id="it4" readOnly="true"/>
		<amx:inputText value="#{bindings.subject.inputValue}" label="Subject" id="it1"/>
		<amx:inputText value="#{bindings.body.inputValue}" label="Body" id="it5"/>
		<amx:inputText value="Attached Files: #{pageFlowScope.fileNames}" label="" id="it3" readOnly="true"/>
	</amx:panelFormLayout>
	<amx:commandButton text="Attach a file" id="cb3" styleClass="adfmf-commandButton-rounded">
		<amx:showPopupBehavior popupId="AttachmentPopup" type="action" align="overlapBottom" alignId="pp1"/>
	</amx:commandButton>
	<amx:commandButton actionListener="#{bindings.sendEmail.execute}" text="Send Email"
					   disabled="#{!bindings.sendEmail.enabled}" id="cb1" action="empList"
					   styleClass="adfmf-commandButton-rounded"/>
</amx:panelPage>
<amx:popup id="AttachmentPopup" animation="slideUp">
	<amx:selectManyCheckbox value="#{bindings.fileAttachment.inputValue}" id="smc1"
							valueChangeListener="#{pageFlowScope.EmailBean.fetchSelectedFileNames}">
		<amx:selectItems value="#{bindings.fileAttachment.items}"/>
	</amx:selectManyCheckbox>
	<amx:commandButton text="Ok" id="cb2" styleClass="adfmf-commandButton-rounded ">
		<amx:closePopupBehavior popupId="AttachmentPopup" type="action"/>
	</amx:commandButton>
</amx:popup>
7) Create a pageFlowScope managed bean and copy the below method code.
/**
 * Get the selected filePaths
 * @param valueChangeEvent
 */
public void fetchSelectedFileNames(ValueChangeEvent valueChangeEvent) {
	Object[] objArr = (Object[])valueChangeEvent.getNewValue();

	ValueExpression ve =
		AdfmfJavaUtilities.getValueExpression("#{bindings.fileAttachment1.collectionModel}", AmxCollectionModel.class);
	AmxCollectionModel model = (AmxCollectionModel)ve.getValue(AdfmfJavaUtilities.getAdfELContext());

	StringBuffer sbFilePath = new StringBuffer();
	StringBuffer sbFileName = new StringBuffer();
	for (int x = 0; x < objArr.length; x++) {
		Object obj = objArr[x];

		Map provider = (Map)model.getProviders().get(obj);
		String filePathVal = provider.get("filePath").toString();
		sbFilePath.append("," + filePathVal.toString());

		String fileNameval = provider.get("fileName").toString();
		sbFileName.append("," + fileNameval.toString());
	}

	ValueExpression ve1 = AdfmfJavaUtilities.getValueExpression("#{pageFlowScope.filePaths}", String.class);
	ve1.setValue(AdfmfJavaUtilities.getAdfELContext(), sbFilePath.substring(1));

	ValueExpression ve2 = AdfmfJavaUtilities.getValueExpression("#{pageFlowScope.fileNames}", String.class);
	ve2.setValue(AdfmfJavaUtilities.getAdfELContext(), sbFileName.substring(1));
}
8) Go to the bindings tab and modify the values as below for sendEmail Method


9) Create a tree binding as shown below.


10) Create a Action binding


11) Click on Create Executable binding and select Invoke action and follow as shown in below image.


Edit clearVars invoke action and set the Refresh to always, so when ever page loads clearScopeVariables method will get executed to clear all the pageFlowScope variable values.

In the Application menu, select Deploy - New Deployment Profile to start the Create Deployment Profile dialog box. In the Profile Type drop-down list, ensure ADF Mobile for Android/IOS is selected and then click OK. Next select Deploy - New Deployment deployment profile. In the subsequent dialog box, select Deploy application to device/emulator/package, and click Finish.

Friday, February 8, 2013

Adf Mobile - Iterate through all the rows in tree binding using CollectionModel

Scenario is how to iterate through all the rows in tree bindings using managed bean method, using collectionModel we can get the rows. collectionModel exposes a collection of data, EL expressions used within a component that is bound to a collectionModel can be referenced with a row variable, which will resolve the expression for each element in the collection.

Here is the code below which iterate through the rows using collection model. Make sure the departments should be of type Tree binding.
ValueExpression ve1 =
 AdfmfJavaUtilities.getValueExpression("#{bindings.departments.collectionModel}", AmxCollectionModel.class);
AmxCollectionModel model = (AmxCollectionModel)ve1.getValue(AdfmfJavaUtilities.getAdfELContext());

StringBuffer deptNamesString = new StringBuffer();
Object[] myArr = model.getKeys();
for (int x = 0; x < myArr.length; x++) {
 Object myObj = myArr[x];
 Map provider = (Map)model.getProviders().get(myObj);
 String val = provider.get("deptName").toString();
 deptNamesString.append("," + val);
}
//Populating the pageFlowscope variable, which will be displayed in amx page
ValueExpression ve2 =
 AdfmfJavaUtilities.getValueExpression("#{pageFlowScope.departmentNameString}", String.class);
ve2.setValue(AdfmfJavaUtilities.getAdfELContext(), deptNamesString.substring(1));
You can download the sample workspace from here. Application screen looks like below when it deployed and run on Android Device/Emulator. In first screen DepartmentNames values will be empty after clicking on Execute button, in managed bean method using collection model rows will be iterated and stored in pageFlowScope variable, same variable value will be displayed on the screen.

Thursday, February 7, 2013

How to retrieve Selected Items from selectManyCheckbox using ValueChnageListener

The selectManyCheckbox component creates a component which allows the user to select many values from a series of checkboxes. Below is the code to retrieve selected items from selectManyCheckbox using ValueChangeListener method.

Note:- valueChangeEvent.getNewValue() will return Object value like [Ljava.lang.Object;@fcfd12, need to loop the object arrayList to get the values.

public void myValueChangeListener(ValueChangeEvent valueChangeEvent) {
        Object[] objArr = (Object[])valueChangeEvent.getNewValue();
        for (int x = 0; x < objArr.length; x++) {
            Object obj = objArr[x];
            System.out.println(obj.toString());
       }
}

In Below image, how the selectManyCheckbox will be displayed at run time and user selected check box values will be displayed in Jdeveloper console.

Thursday, January 31, 2013

ADF Mobile - Create Drill Down Graph Reports

Drill Down Graph Report - Scenario here is to show all the cars sales report for this year in Pie Chart and when user click a individual car in pie chart slice, a drill through report opens, which accepts the car type as a parameter, and then displays car models sale in Bar Chart.

In ADF Mobile, "clickListener" method is not provided for DVT components. Click listener interface will receive click events on the gauge components and can do further data process in BC4J.  In ADF Mobile "Action" method is supported on DataItem in the graphs. Action defines a reference to the an action method sent by the command button component, or static outcome of an action. So in this article I'm explaining how to build drill down reports using <dvtm:pieChart> and <dvtm:barChart>.

Application screen looks like below when it deployed and run on Android Device/Emulator. Displays the Cars Sales Reports in first screen.


In above screen, slide the screen towards right. Notice only check boxes are displayed and attributes values(Legends) are not getting displayed for the pie chart slices, this could be an error. 

Next click on any pie chart slice and respective car models will be displayed in Bar Chart screen.


[Runs with Oracle JDeveloper 11.1.2.3.0]

Implementation Steps

Create an ADF Mobile Application, the application consists of two projects. Application Controller project of Application LifeCycle, Listeners, Device Features DataControl and ViewController project contains mobile features content like AMX Files, Task Flows and DataControl.

In ViewController project, locate and expand the Application Sources folder, create a Cars.java file and add the below code.
public class Cars {
    private String carName;
    private int carSalesCount;
    private transient PropertyChangeSupport propertyChangeSupport = new PropertyChangeSupport(this);

    public Cars() {
        super();
    }

    public Cars(String carName, int carSalesCount) {
        this.carName = carName;
        this.carSalesCount = carSalesCount;
    }

    public void setCarName(String carName) {
        String oldCarName = this.carName;
        this.carName = carName;
        propertyChangeSupport.firePropertyChange("carName", oldCarName, carName);
    }

    public String getCarName() {
        return carName;
    }

    public void setCarSalesCount(int carSalesCount) {
        int oldCarSalesCount = this.carSalesCount;
        this.carSalesCount = carSalesCount;
        propertyChangeSupport.firePropertyChange("carSalesCount", oldCarSalesCount, carSalesCount);
    }

    public int getCarSalesCount() {
        return carSalesCount;
    }

    public void setPropertyChangeSupport(PropertyChangeSupport propertyChangeSupport) {
        this.propertyChangeSupport = propertyChangeSupport;
    }

    public PropertyChangeSupport getPropertyChangeSupport() {
        return propertyChangeSupport;
    }
}
Create CarModels.java file and add the below code.
public class CarModels extends Cars {
    private String modelName;
    private int modelSalesCount;
    private transient PropertyChangeSupport propertyChangeSupport = new PropertyChangeSupport(this);

    public CarModels() {
        super();
    }

    public CarModels(String carName, String modelName, int modelSalesCount) {
        super();
        setCarName(carName);
        this.modelName = modelName;
        this.modelSalesCount = modelSalesCount;
    }

    public void setModelName(String modelName) {
        String oldModelName = this.modelName;
        this.modelName = modelName;
        propertyChangeSupport.firePropertyChange("modelName", oldModelName, modelName);
    }

    public String getModelName() {
        return modelName;
    }

    public void setModelSalesCount(int modelSalesCount) {
        int oldModelSalesCount = this.modelSalesCount;
        this.modelSalesCount = modelSalesCount;
        propertyChangeSupport.firePropertyChange("modelSalesCount", oldModelSalesCount, modelSalesCount);
    }

    public int getModelSalesCount() {
        return modelSalesCount;
    }

    public void setPropertyChangeSupport(PropertyChangeSupport propertyChangeSupport) {
        this.propertyChangeSupport = propertyChangeSupport;
    }

    public PropertyChangeSupport getPropertyChangeSupport() {
        return propertyChangeSupport;
    }
}
Create Generic.java file and add the below code, create DataControl based on Generic.java file.
public class Generic {
    private static List s_cars = null;
    private static List s_carModels = null;
    private static List s_filterCarModels = null;
    private transient ProviderChangeSupport providerChangeSupport = new ProviderChangeSupport(this);
    private transient PropertyChangeSupport propertyChangeSupport = new PropertyChangeSupport(this);

    public Generic() {
        super();
        if (s_cars == null) {
            s_cars = new ArrayList();
            s_cars.add(new Cars("Audi", 2000));
            s_cars.add(new Cars("BMW", 2500));
            s_cars.add(new Cars("Honda", 5000));
            s_cars.add(new Cars("Mitsubishi", 1000));
            s_cars.add(new Cars("Toyota", 4000));
            s_cars.add(new Cars("Volkswagen", 3000));
        }
        if (s_carModels == null) {
            s_carModels = new ArrayList();
            s_carModels.add(new CarModels("Audi", "A3", 300));
            s_carModels.add(new CarModels("Audi", "A4", 1000));
            s_carModels.add(new CarModels("Audi", "Quattro", 700));
            s_carModels.add(new CarModels("BMW", "BMW128", 1000));
            s_carModels.add(new CarModels("BMW", "BMW528", 800));
            s_carModels.add(new CarModels("BMW", "Gran Coupe", 700));
            s_carModels.add(new CarModels("Honda", "Accord", 1200));
            s_carModels.add(new CarModels("Honda", "Civic", 2000));
            s_carModels.add(new CarModels("Honda", "Hybrid", 1800));
            s_carModels.add(new CarModels("Mitsubishi", "Lancer", 400));
            s_carModels.add(new CarModels("Mitsubishi", "Evolution", 300));
            s_carModels.add(new CarModels("Mitsubishi", "Outlander", 300));
            s_carModels.add(new CarModels("Toyota", "Camry", 1800));
            s_carModels.add(new CarModels("Toyota", "Corolla", 1200));
            s_carModels.add(new CarModels("Toyota", "Cruiser", 1000));
            s_carModels.add(new CarModels("Volkswagen", "Beetle", 1300));
            s_carModels.add(new CarModels("Volkswagen", "Jetta", 800));
            s_carModels.add(new CarModels("Volkswagen", "Tiguan", 900));
        }

    }

    public void addPropertyChangeListener(PropertyChangeListener l) {
        propertyChangeSupport.addPropertyChangeListener(l);
    }

    public void removePropertyChangeListener(PropertyChangeListener l) {
        propertyChangeSupport.removePropertyChangeListener(l);
    }

    public void addProviderChangeListener(ProviderChangeListener l) {
        providerChangeSupport.addProviderChangeListener(l);
    }

    public void removeProviderChangeListener(ProviderChangeListener l) {
        providerChangeSupport.removeProviderChangeListener(l);
    }

    /**
     * Method will populate the result list to s_cars.
     */
    public Cars[] getCars() {
        Cars c[] = null;
        c = (Cars[])s_cars.toArray(new Cars[s_cars.size()]);
        return c;
    }

    /**
     * Method will populate the result list to s_carModels.
     */
    public CarModels[] getCarModels() {
        CarModels cm[] = null;
        cm = (CarModels[])s_carModels.toArray(new CarModels[s_carModels.size()]);
        return cm;
    }

    /**
     * Method will filter the result from s_carModels list.
     */
    public CarModels[] filteredCarModels(String carType) {
        CarModels cm[] = null;
        s_filterCarModels = new ArrayList();
        for (Iterator i = s_carModels.iterator(); i.hasNext(); ) {
            CarModels curCM = (CarModels)i.next();
            if (curCM.getCarName().equals(carType)) {
                s_filterCarModels.add(new CarModels(curCM.getCarName(), curCM.getModelName(),
                                                    curCM.getModelSalesCount()));
            }
        }
        cm = (CarModels[])s_filterCarModels.toArray(new CarModels[s_filterCarModels.size()]);
        providerChangeSupport.fireProviderRefresh("carModels");
        return cm;
    }
}
In ViewController project. Locate and expand the Application Sources folder, then expand the META-INF folder. You will see the adfmf-feature.xml file, click on the adfmf-feature.xml file to launch the Feature editor. Add a new feature by clicking the green plus sign on the Features table near top of the editor this will launch the new Create ADF Mobile Feature dialog, modify the values as shown below.


In the Features table, select the newly created feature Graph. Under the Features table, click the Content tab, and locate the Content table. Notice that the content item Graph.1 is created by default. Next add a new file by clicking the green plus sign and select taskflow option, this will launch the new Create ADF Mobile Task Flow dialog, modify the value as shown below.


Click on the GraphTaskflow.xml to open the file in taskflow editor and follow the below steps.
1) Create two views and name them as carsView and carModelsView respectively.
 2) Draw the control flow case from carsView to carModelsView and Outcome as "carsModel", Behavior->Transition as "flipRight".
 3) Draw the control flow case from carModelsView to carsView and Outcome as "car", Behavior->Transition as "slideLeft".

Double click on carsView view will launch Create ADF Mobile AMX Page dialog. Open the carsView.amx page and to source tab and follow the below steps:

1) In Header facet, amx:outputText set the value as "Sales Report"
2) From DC palette drag and drop Generic->Cars->ADF Mobile Chart and in Component Gallery dialog, select Pie chart and click ok.
3) In Create Mobile Pie Chart dialog, select the values as shown in below image.


4) For dvtm:pieDataItem, set the action as "action" and drop amx:setPropertyListener and modify the values as shown in below code.
 <dvtm:pieChart var="row" value="#{bindings.cars.collectionModel}" id="pc1" animationOnDisplay="auto"
                       inlineStyle="width:400px; height:280px; float:left; background-color:white;" threeDEffect="on"
                       title="Car">
            <amx:facet name="dataStamp">
                <dvtm:pieDataItem sliceId="#{row.carName}" value="#{row.carSalesCount}" action="carsModel">
                    <amx:setPropertyListener from="#{row.carName}" to="#{pageFlowScope.carName}"/>
                </dvtm:pieDataItem>
            </amx:facet>
 </dvtm:pieChart>           
Double click on carModelsView view will launch Create ADF Mobile AMX Page dialog, in page facets select Header, Primary Action. Open the deptList.amx page and to source tab and follow the below steps:

1) In Header facet, amx:outputText set the value as "Sales Report"
2) In Seconday Action facet, for amx:commandButton modify the values text: Back, action: __back.
3) From DC palette drag and drop Generic->filteredCarModels->CarModels->ADF Mobile Chart and in Component Gallery dialog, select Bar chart and click ok.
4) In Create Mobile Bar Chart dialog, select the values as shown in below image.


Enter the carType parameter value as #{pageFlowScope.carName}.


Open the carModelsView.amx and modify the properties for dvtm:barChart as shown below.
<dvtm:barChart var="row" value="#{bindings.CarModels.collectionModel}" id="bc1"
      inlineStyle="width:400px; height:300px; float:left; background-color:white;"
      title="#{pageFlowScope.carName} Car Models">
 <amx:facet name="dataStamp">
  <dvtm:chartDataItem group="#{row.modelName}" value="#{row.modelSalesCount}" series="Sales Count"/>
 </amx:facet>
 <dvtm:legend position="end" id="l1"/>
</dvtm:barChart>
Click on Create Executable binding and select Invoke action and follow as shown in below image.


Edit invokeFilterdCarModels invoke actiion and set the Refresh to always, so when ever page loads employeesTotalRows method will get executed.

Note:- When the screen loads for the first time Bar Chart will get cached and for second time execution filteredCarModels method will not get executed at all even if the parameter value changed. To overcome this we have to set invoke Action for filteredCarModels method, this executes the  invokeAction every time a page is navigated to regardless of the state of the binding container.


Preview of the carsView.amx and carModelsView.amx will looks like below.


In the Application menu, select Deploy - New Deployment Profile to start the Create Deployment Profile dialog box. In the Profile Type drop-down list, ensure ADF Mobile for Android/IOS is selected and then click OK. Next select Deploy - New Deployment deployment profile. In the subsequent dialog box, select Deploy application to device/emulator/package, and click Finish.

Thursday, January 24, 2013

ADF Mobile - Access Device Native SQLite Database to Store Data

Today I learnt on how to access device native SQLite database to store data and perform CRUD operations. This is my first article on ADF Mobile, In this article I will show on how to read data for display, create and save new record to the database.

You can find more examples in Oracle ADF Mobile Samples, by looking into the samples and Debugging ADF Mobile Apps on Android. I was able to use SQLite database to store the data.

Download the sample workspace from here and application screen looks like below when it deployed to Android Emulator. Displaying the Departments List is fetched from SQLite, click on the Add button to create new department record.


Enter the details in the department form and click on Save button. The Department information will saved to the database and moved to Dept List screen.


Department list will get updated by newly added department record.


Implementation Steps

Create an ADF Mobile Application, the application consists of two projects. Application Controller project of Application LifeCycle, Listeners, Device Features DataControl and ViewController project contains mobile features content like AMX Files, Task Flows and DataControl.

In Application Controller project. Create a DBConnectionFactory.java class and copy the below code, this class contains code for connecting to SQLlite DB. Connecting to the SQLite database is somewhat different from opening a connection to an Oracle database, here use the java.sql.Connection object associated with your application to connect to the SQLite database.
public class DBConnectionFactory {
    protected static Connection conn = null;

    public DBConnectionFactory() {
        super();
    }

    /**
     * Connect to the SQLite database
     * @return
     * @throws Exception
     */
    public static Connection getConnection() throws Exception {
        if (conn == null) {
            try {
                // ApplicationDirectory returns the private read-write sandbox area
                // of the mobile device's file system that this application can access.
                // This is where the database is created
                String Dir = AdfmfJavaUtilities.getDirectoryPathRoot(AdfmfJavaUtilities.ApplicationDirectory);
                String connStr = "jdbc:sqlite:" + Dir + "/DEMO.db";

                // If the database does not exist, a new database is automatically
                // created when the SQLite JDBC connection is created
                conn = new SQLite.JDBCDataSource(connStr).getConnection();
            } catch (SQLException e) {
                e.printStackTrace();
            }
        }
        return conn;
    }
}
Note:- demo.sql file should be put in .adf/META-INF/ folder. You can get the sql file by downloading the MobileDemo application.

Open LifeCycleListenerImpl.java file and add the below method code.
/**
* This method will read the sql file and
* commit the sql statements to the SQLite DB
*/
private void InitDB() {
	try {
		// Since the SQL script has been packaged as a resource within
		// the application, the getResourceAsStream method is used
		ClassLoader cl = Thread.currentThread().getContextClassLoader();
		InputStream is = cl.getResourceAsStream(".adf/META-INF/demo.sql");
		if (is == null) {
			System.err.println("Could not look up : .adf/META-INF/demo.sql");
			return;
		}

		BufferedReader bReader = new BufferedReader(new InputStreamReader(is));
		List stmts = new ArrayList();
		String strstmt = "";
		String ln = bReader.readLine();

		// The while loop iterates over all the lines in the SQL script,
		// assembling them into valid SQL statements and executing them as
		// a terminating semicolon is encountered
		while (ln != null) {
			// Skipping blank lines, comments, and COMMIT statements
			if (ln.startsWith("REM") || ln.startsWith("COMMIT")) {
				ln = bReader.readLine();
				continue;
			}
			strstmt = strstmt + ln;
			if (strstmt.endsWith(";")) {
				stmts.add(strstmt);
				strstmt = "";
				ln = bReader.readLine();
				continue;
			}
			ln = bReader.readLine();
		}

		// To improve performance, the statements are executed
		// one at a time in the context of a single transaction
		DBConnectionFactory.getConnection().setAutoCommit(false);
		for (int i = 0; i < stmts.size(); i++) {
			Statement pStmt = DBConnectionFactory.getConnection().createStatement();
			pStmt.executeUpdate((String)stmts.get(i));
		}
		DBConnectionFactory.getConnection().commit();
	} catch (Exception e) {
		e.printStackTrace();
	}
}
In Start() method LifeCycleListenerImpl.java file, add the below code.
try {
	//Getting the connection to the database
	Statement stat = DBConnectionFactory.getConnection().createStatement();
	ResultSet rs = stat.executeQuery("SELECT * FROM DEPARTMENTS;");
  } catch (SQLException e) {
	// if the error message is "out of memory",
	// it probably means no database file is found
	InitDB();
  } catch (Exception e) {
	e.printStackTrace();
}
Expand the ViewController project. Locate and expand the Application Sources folder, create a Department.java file and add the below code.
public class Department {
    protected int deptId;
    protected String deptName;
    protected int mgrId;
    protected int locId;
    private transient PropertyChangeSupport propertyChangeSupport = new PropertyChangeSupport(this);

    public Department() {
        super();
    }

    public Department(int deptId, String deptName, int mgrId, int locId) {
        setDeptId(deptId);
        setDeptName(deptName);
        setMgrId(mgrId);
        setLocId(locId);
    }

    Department(Department newDept) {
        setDeptId(newDept.getDeptId());
        setDeptName(newDept.getDeptName());
        setMgrId(newDept.getMgrId());
        setLocId(newDept.getLocId());
    }

    public String getKey() {
        Integer i = new Integer(deptId);
        return i.toString();
    }

    public void addPropertyChangeListener(PropertyChangeListener l) {
        propertyChangeSupport.addPropertyChangeListener(l);
    }

    public void removePropertyChangeListener(PropertyChangeListener l) {
        propertyChangeSupport.removePropertyChangeListener(l);
    }


    public void setDeptId(int deptId) {
        int oldDeptId = this.deptId;
        this.deptId = deptId;
        propertyChangeSupport.firePropertyChange("deptId", oldDeptId, deptId);
    }

    public int getDeptId() {
        return deptId;
    }

    public void setDeptName(String deptName) {
        String oldDeptName = this.deptName;
        this.deptName = deptName;
        propertyChangeSupport.firePropertyChange("deptName", oldDeptName, deptName);
    }

    public String getDeptName() {
        return deptName;
    }

    public void setMgrId(int mgrId) {
        int oldMgrId = this.mgrId;
        this.mgrId = mgrId;
        propertyChangeSupport.firePropertyChange("mgrId", oldMgrId, mgrId);
    }

    public int getMgrId() {
        return mgrId;
    }

    public void setLocId(int locId) {
        int oldLocId = this.locId;
        this.locId = locId;
        propertyChangeSupport.firePropertyChange("locId", oldLocId, locId);
    }

    public int getLocId() {
        return locId;
    }
}
Create DepartmentList.java file and add the below code. Create DataControl based on DepartmentList.java file.
public class DepartmentList {
    private static List s_departments = null;
    private Department editDepartment = new Department();

    private transient ProviderChangeSupport providerChangeSupport = new ProviderChangeSupport(this);

    public void addProviderChangeListener(ProviderChangeListener l) {
        providerChangeSupport.addProviderChangeListener(l);
    }

    public void removeProviderChangeListener(ProviderChangeListener l) {
        providerChangeSupport.removeProviderChangeListener(l);
    }

    public DepartmentList() {
        if (s_departments == null) {
            s_departments = new ArrayList();
            Execute();
        }
    }

    /**
     * Method will query the database and populate
     * the result list to s_departments
     */
    public void Execute() {
        Trace.log(Utility.ApplicationLogger, Level.INFO, DepartmentList.class, "Execute",
                  "Coming Inside Execute Method");
        try {
            Connection conn = DBConnectionFactory.getConnection();
            s_departments.clear();
            conn.setAutoCommit(false);
            PreparedStatement stat = conn.prepareStatement("SELECT * from DEPARTMENTS ORDER BY DEPARTMENT_NAME");
            ResultSet rs = stat.executeQuery();
            while (rs.next()) {
                int id = rs.getInt("DEPARTMENT_ID");
                String deptName = rs.getString("DEPARTMENT_NAME");
                int mgrId = rs.getInt("MANAGER_ID");
                int locId = rs.getInt("LOCATION_ID");
                Department d = new Department(id, deptName, mgrId, locId);
                s_departments.add(d);
            }
            rs.close();
            Trace.log(Utility.ApplicationLogger, Level.INFO, DepartmentList.class, "Execute",
                      "Exiting from Execute Method");
            //  providerChangeSupport.fireProviderRefresh("departments");
        } catch (SQLException e) {
            System.err.println(e.getMessage());
        } catch (Exception e) {
            System.err.println(e.getMessage());
        }
    }

    /**
     * Method will get count of departments in database
     * @return
     */
    public int getDepartmentCount() {
        return s_departments.size();
    }

    /**
     * Method will get the list of departments
     * @return
     */
    public Department[] getDepartments() {
        Department d[] = null;
        d = (Department[])s_departments.toArray(new Department[s_departments.size()]);
        return d;
    }

    /**
     * Method will create new deptartment object instance
     */
    public void AddDepartment() {
        Trace.log(Utility.ApplicationLogger, Level.INFO, DepartmentList.class, "AddDepartment",
                  "Coming inside AddDepartment");
        //Incrementing the intial deptId by 10
        int deptId = getDepartmentCount() + 10;
        setEditDepartment(new Department(deptId, "", 0, 0));
        Trace.log(Utility.ApplicationLogger, Level.INFO, DepartmentList.class, "AddDepartment",
                  "Exiting AddDepartment");
    }

    /**
     * Method will commit the details of newly created department object
     * @return
     */
    public boolean AddDepartmentToDB() {
        Trace.log(Utility.ApplicationLogger, Level.INFO, DepartmentList.class, "AddDepartmentToDB",
                  "Coming inside AddDepartmentToDB");
        boolean result = false;
        try {
            Connection conn = DBConnectionFactory.getConnection();
            conn.setAutoCommit(false);
            String insertSQL =
                "Insert into DEPARTMENTS (DEPARTMENT_ID,DEPARTMENT_NAME,MANAGER_ID,LOCATION_ID) values (?,?,?,?)";
            PreparedStatement pStmt = conn.prepareStatement(insertSQL);
            pStmt.setInt(1, editDepartment.getDeptId());
            pStmt.setString(2, editDepartment.getDeptName());
            pStmt.setInt(3, editDepartment.getMgrId());
            pStmt.setInt(4, editDepartment.getLocId());
            pStmt.execute();
            conn.commit();
            result = true;
        } catch (SQLException e) {
            System.err.println(e.getMessage());
        } catch (Exception e) {
            System.err.println(e.getMessage());
        }
        Trace.log(Utility.ApplicationLogger, Level.INFO, DepartmentList.class, "AddDepartment",
                  "Exiting AddDepartmentToDB");
        return result;
    }

    /**
     * Method will call the AddDepartmentToDB
     * Call PropertyChangeSupport listener to push data changes to the UI
     */
    public void saveDepartment() {
        Trace.log(Utility.ApplicationLogger, Level.INFO, DepartmentList.class, "saveDepartment",
                  "Coming inside saveDepartment");
        if (AddDepartmentToDB()) {
            Department newDepartment = new Department(editDepartment);
            s_departments.add(0, newDepartment);
            providerChangeSupport.fireProviderCreate("departments", newDepartment.getKey(), newDepartment);
        }
        Trace.log(Utility.ApplicationLogger, Level.INFO, DepartmentList.class, "saveDepartment",
                  "Exiting saveDepartment");
    }

    public void setEditDepartment(Department editDepartment) {
        this.editDepartment = editDepartment;
    }

    public Department getEditDepartment() {
        return editDepartment;
    }
}
Note:- Import Error might be showing in DepartmentList java, in viewController project properties->Dependencies add the ApplicationContoller.jpr

In ViewController project. Locate and expand the Application Sources folder, then expand the META-INF folder. You will see the adfmf-feature.xml file, click on the adfmf-feature.xml file to launch the Feature editor. Add a new feature by clicking the green plus sign on the Features table near top of the editor this will launch the new Create ADF Mobile Feature dialog, modify the values as shown below.


In the Features table, select the newly created feature Departments. Under the Features table, click the Content tab, and locate the Content table. Notice that the content item Departments.1 is created by default. Next add a new file by clicking the green plus sign and select taskflow option, this will launch the new Create ADF Mobile Task Flow dialog, modify the value as shown below.


Click on the DepartmentsTaskflow.xml to open the file in taskflow editor and follow the below steps.
1) Create views and name them as deptList and editDept respectively.
2) Draw the control flow case from deptList to editDept and Outcome as "add", Behavior->Transition as "flipRight".
3) Draw the control flow case from editDept to deptList and Outcome as "list", Behavior->Transition as "slideRight".

Double click on deptList view will launch Create ADF Mobile AMX Page dialog, in page facets select Header and Secondary Action. Open the deptList.amx page and go to page bindings, in Bindings section click on create control binding and select methodAction item. In create action binding wizard select DepartmentList->AddDepartment


Go to source tab and follow the below steps:
1) In Header facet, amx:outputText set the value as "Dept List"
2) In Seconday Action facet, for amx:commandButton modify the values
    text: Add, action: add, actionListener: #{bindings.AddDepartment.execute}
3) From DC palette drag and drop departments->ADF Mobile List View and select the default options

Double click on editDept view will launch Create ADF Mobile AMX Page dialog, in page facets select Header, Primary Action and Secondary Action. Open the deptList.amx page and go to page bindings, in Bindings section click on create control binding and select methodAction item. In create action binding wizard select DepartmentList->saveDepartment


Go to source tab and follow the below steps:
1) In Header facet, amx:outputText set the value as "Add Dept"
2) In Primary Action facet, for amx:commandButton modify the values
    text:Cancel, action:_back
3) In Seconday Action facet, for amx:commandButton modify the values
     text: Save, action: _back, actionListener: #{bindings.saveDepartment.execute}
4)  From DC palette drag and drop editDepartments->Form as ADF Mobile form, In Edit Form fields delete "key" value binding

Preview of the deptList.amx and editDept.amx will looks like below.


Now last configuration, in Application Resources palette expand Descriptor->ADF META-INF. You will see the adfmf-application.xml, click on the adfmf-application.xml file to launch the adfmf-application editor. In Application section for Lifecycle Event Listener set as "application.LifeCycleListenerImpl".

Make sure the below Libraries and Classpath present in the ViewController project.


In the Application menu, select Deploy - New Deployment Profile to start the Create Deployment Profile dialog box. In the Profile Type drop-down list, ensure ADF Mobile for Android/IOS is selected and then click OK.


In the ADF Mobile for Android Deployment Profile Properties dialog box, Select the Android Options node and confirm your values look like the ones below.


In the Application menu, select Deploy - New Deployment deployment profile. In the subsequent dialog box, select Deploy application to device/emulator/package, and click Finish.


Watch the Deployment Log window for any errors.
Thursday, January 17, 2013

EJB DC - Deleting Multi-Selected Rows From Adf Table

Let us take a scenario where in users wants to delete multiple records in the ADF table. In EJB this can't be achieved in straight forward way, we have to manually get all the selected row keys and delete the rows data using EntityManager API.

You can download the sample workspace from here
[Runs with Oracle JDeveloper 11.1.2.3.0 + HR Schema]

You can also look at  how to achieve in this article link "Update multiple rows using EJB Data Control".

Implementation Steps

Create Fusion Web Application with entity based on Departments, then create a stateless session bean and add the below method. Expose the method to local/remote interface and generate data control.

Note:- Here in the below code "em" is a EntityManager.
/**
* Here param deptList will be having the selected row.
* Iterating through the deptList and find the depratments object instance by primary key
* Delete the data using entity manager api
* @param deptList
*/
public void deleteMultipleDeptRows(List deptList) {
	if (deptList.size() > 0) {
		Iterator iter = deptList.iterator();
		while (iter.hasNext()) {
			HashMap map = (HashMap)iter.next();
			//Finding the departments object instance
			Departments departments = em.find(Departments.class, map.get("departmentId"));
			em.remove(departments);
		}
	}
}
Create index.jspx page and drag and drop departmentsFindAll->Table as ADF Table. and create the backingBean as "IndexBean". Surround the table with panel collection, add the toolbar, drop button inside toolbar and name as "Delete Multiple Rows".

Bind the departments table to the backing bean as show below.


Create the ActionListener method called "deleteAction" for save button.


Open the IndexBean backing bean and add the below code.
public void deleteAction(ActionEvent actionEvent) {
	RowKeySet selectedDepts = getDeptTable().getSelectedRowKeys();
	Iterator selectedDeptIter = selectedDepts.iterator();
	DCBindingContainer bindings = (DCBindingContainer)BindingContext.getCurrent().getCurrentBindingsEntry();
	DCIteratorBinding deptIter = bindings.findIteratorBinding("departmentsFindAllIterator");
	RowSetIterator deptRSIter = deptIter.getRowSetIterator();
	List deptList = new ArrayList();
	while (selectedDeptIter.hasNext()) {
		Key key = (Key)((List)selectedDeptIter.next()).get(0);
		Row currentRow = deptRSIter.getRow(key);

		HashMap rowValues = new HashMap();
		rowValues.put("departmentId", currentRow.getAttribute("departmentId"));
		deptList.add(rowValues);
	}
	//Execute the deleteMultipleDeptRows method by passing deptList param
	OperationBinding oper = bindings.getOperationBinding("deleteMultipleDeptRows");
	oper.getParamsMap().put("deptList", deptList);
	oper.execute();
	deptIter.executeQuery();
	//Refresh the table
	AdfFacesContext.getCurrentInstance().addPartialTarget(this.getDeptTable());
}
Go to Bindings tab in index.jspx page and add deleteMultipleDeptRows method action.


Run the index.jspx page, select the multiple rows and clicking on "Delete Multiple Rows" button should delete the multiple records from the database.