Monday, June 10, 2013

Offline Data Synchronization for ADF Mobile

In Mobile applications very desired feature is able to work offline. For data-driven applications, it means user can store (a subset of) the application data locally, and implement a data synchronization mechanism that keeps your local and server data in sync.

In work offline scenario user need not connect to the internet always, but needs to collect data (offline) for later submission. Another usage can be an offline cache on the client for faster data access and also preserve network bandwidth.

In this article we will create an ADF Mobile application with offline capability, here user can add/modify the data and store it in persistent local database. Every once in a while we push all the added/modified data to the server using SOAP based WebService to sync online data.

Architecture Diagram


Note: - 
  • WebServices exposed are based on EJB.
  • Current implementation supports unidirectional (client to server) synchronize from Local DB to Server DB. 
Workflow
  1. Data Initialization - When the application loads for the first time, required data will be pulled from Local DB to Server DB. In this demo application I'm pulling all departments detail to Local DB, so that sample departments detail can be displayed on application load.
  2. Auto Sync - User can add/modify the data and click on save button, here first step is to save data into Local DB then check for the synchronization settings preferences. If Auto Sync is enabled then check for the network connection is available, if yes push the current request data to the Server DB.
  3. Manual Sync - Next is to turn it into an app that is able to run offline, without network connection present, user can go to synchronization settings preferences and disable the Auto Sync, so that data will be stored and cached locally for faster access and also preserve network bandwidth. Once in a while push all the added/modified data to Server DB from Local DB.
Application screen looks like below when it is deployed and run on the Android Device/Emulator. As soon application starts it will bring the "Data Initialization Screen", click on "Start Data Initialization" button then required data will be populated from Server DB to Local DB using SOAP services.
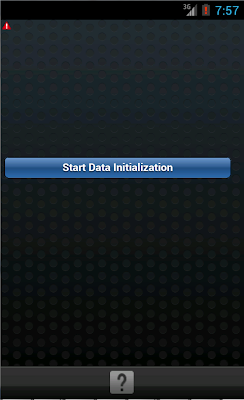

Above screen will appear only when application start for the first time, once the data initialization completes it will navigates automatically to Dept List screen.


Click on the menu button, this will launch the Navigation Bar with Preferences, Hide Navigation and Springboard options. Click on Preferences icon.


Synchronization Settings
  • If Auto Sync is checked, when ever user perform CRUD operations the data will be first saved to the local db and immediately check the network connection, if connection exists send the current request data to the Server DB.
  • If Auto Sync is unchecked, when ever user perform CRUD operations the data will be first saved to the local db and current request data will not be send to Server DB.
From Dept List screen click on add button to add the new record. Enter the details and click on Save button to submit the data, newly added records appears on Dept List screen.


Clicking on any department will take you to the selected Department details page, click on the edit button to  edit the details, modify the details and click on the Save button to submit the data and navigate back to detail screen. Clicking on delete button will delete the current department.


From main screen clicking on the Sync button will first check the network connection, if connection not exists alert notification will be displayed on the screen and synchronization of data will not happen.


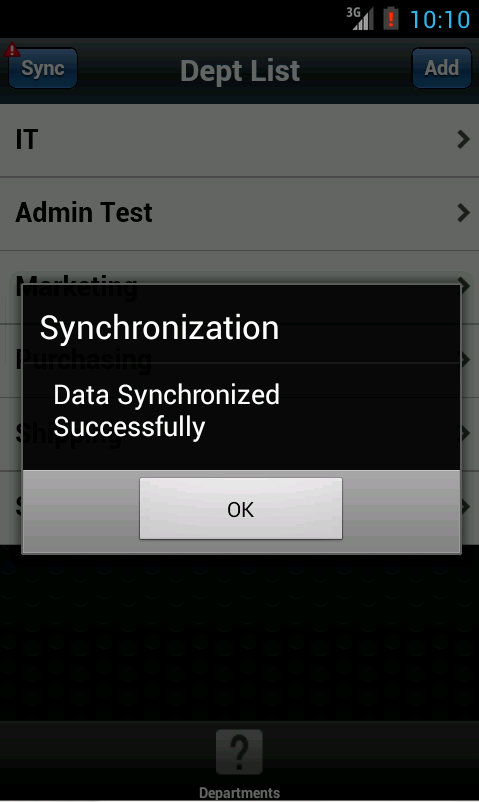
So after enabling the connection, click on Sync button to send all the new/modified data to Server DB from Local DB, once the synchronization completes alert notification will be displayed on the screen.

You can download the sample workspace from here, sample workspace contains both EJBSyncWebServiceApp and SyncMobileApp applications.
[Runs with Oracle JDeveloper 11.1.2.4.0]

In below section I will not provide all the steps to create the application from scratch, only key ones will be explained. 

EJBSyncWebServiceApp - If you are deploying application to standalone server, modify the application with following steps:
  1. Create the DataSource in standalone server and name as "MobiledemoDS".
  2. Open the persistence.xml and modify the string "java:/app/jdbc/jdbc/MobiledemoDS" to "jdbc/MobiledemoDS" in jta-data-source and property tag.
  3. Right click on the Application navigator and select application properties and go to Deployment->Weblogic, there uncheck "Auto Generate and Synchronize WebLogic JDBC Descriptors During Deployment"option
SyncMobileApp - 
  1. Following DataControls are created in application. 
    • DepartmentsDC -  Consists of methods to cache and store the data locally
    • EJBServiceWSDC -  Consists of methods to access remote server data 
    • SynchronizationDC -  Consists of methods to synchronize data from offline to online 
  2. In connections.xml provide the path where EJBSyncWebServiceApp Webservices is deployed.
  3. Used "navigator.network.connection.type" cordova api to check the active network connection that is being used. This property is a fast way to determine the device's network connection state, and type of connection.

Thursday, May 30, 2013

Problematic while calling WebService Data Control in LifeCycleListenerImpl on application start

In this article I wants to share the issue faced while working on sample online/offline data synchronization application. Here I wanted to populate user related data from online to offline database(SQLite db) on application start, so that offline data can be used across the feature. I assumed that it can be done when the ApplicationController initialized by the LifeCycleListenerImpl and call web service data control programmatic way using AdfmfJavaUtilities.invokeDataControlMethod.

I have created the data control in ApplicationController project, since I need to call the web service data control in LifeCycleListenerImpl. My assumption went wrong, I noticed when application run in debug mode, web service data control will not be called at all in LifeCycleListenerImpl. Because AdfmfJavaUtilities.invokeDataControlMethod requires DataBindings.cpx with Data Control Name entry in Data Control Usages section. But DataBindings.cpx will be created in ViewController project.

In one of forum entry as explained by Denis Tyrell and Chris Muir, above approach will not work when we have Secured Web Service, since the login page won't be displayed yet and we won't have the credentials to use for the Web Service.

Sometime you may also hit the error while using AdfmfJavaUtilities.invokeDataControlMethod - "[SEVERE - oracle.adfmf.framework - AmxBindingContext - loadDataControlById] Unable to load Data Control testDataControl due to following error: ERROR [oracle.adfmf.framework.exception.AdfException] - Unable to load definition for testDataControl".

Make sure you have a data control name entry in DataBindings.cpx as shown below.

Sunday, May 19, 2013

ADF Mobile With EJB Restful Web Service

This article is the continuation of my previous article on Configuring EJB with Restful Web Service in ADF. Here will see how to integrate EJB Restful Web Service with ADF mobile.

Application screen looks like below when it is deployed and run on the Android Device/Emulator. In the below screen Department list will be displayed.


Clicking on any department will take you to the selected Department details page, edit the details and click on the Save button to submit the data. Clicking on delete button will delete the current department.


From Department List screen, click on add button to add the new record. Enter the details and click on Save button to submit the data.


After the below actions, updated department result page will be displayed as shown below.


You can download the sample workspace from here
[Runs with Oracle JDeveloper 11.1.2.4.0 + HR Schema]

Implementation Steps

Create an ADF Mobile Application, the application consists of two projects. Application Controller project of Application LifeCycle, Listeners, Device Features DataControl and ViewController project contains mobile features content like AMX Files, Task Flows and DataControl.

In Application Controller project, create a Departments.java file and add the below code.
public class Departments {
    private BigDecimal departmentId;
    private String departmentName;
    private BigDecimal locationId;
    private BigDecimal managerId;

    public Departments() {
        super();
    }

    public Departments(BigDecimal departmentId, String departmentName, BigDecimal locationId, BigDecimal managerId) {
        this.departmentId = departmentId;
        this.departmentName = departmentName;
        this.locationId = locationId;
        this.managerId = managerId;
    }

    public void setDepartmentId(BigDecimal departmentId) {
        this.departmentId = departmentId;
    }

    public BigDecimal getDepartmentId() {
        return departmentId;
    }

    public void setDepartmentName(String departmentName) {
        this.departmentName = departmentName;
    }

    public String getDepartmentName() {
        return departmentName;
    }

    public void setLocationId(BigDecimal locationId) {
        this.locationId = locationId;
    }

    public BigDecimal getLocationId() {
        return locationId;
    }

    public void setManagerId(BigDecimal managerId) {
        this.managerId = managerId;
    }

    public BigDecimal getManagerId() {
        return managerId;
    }
}
Create DepartmentsDC.java file and add the below code, create DataControl based on DepartmentsDC file
public class DepartmentsDC {
    public DepartmentsDC() {
        super();
    }

    public Departments ediDepartment(BigDecimal departmentId, String departmentName, BigDecimal locationId,
                                     BigDecimal managerId) {
        return new Departments(departmentId, departmentName, locationId, managerId);
    }

    public Departments addDepartment() {
        BigDecimal defaultVal = new BigDecimal("0");
        return new Departments(defaultVal, "", defaultVal, defaultVal);
    }
}
In the New Gallery expand the General - XML nodes and select XML Schema and click OK, enter Departments.xsd in File Name field and the following attributes as shown in below image.


In the New Gallery expand the General - Connection nodes and select URL Connection and click OK, enter the URL Endpoint details, You can download Configuring EJB with Restful Web Service in ADF from my previous article.


Note: - Next create a URL Service Data Control from - http://IpAddress:7101/EJBRestService/jersey/EJBRESTService api with HTTP Methods: GET, PUT, POST, DELETE.

In the New Gallery expand the General - Data Control nodes and select URL Service Data Control and click OK and enter the details to create the GET method


In the New Gallery expand the General - Data Control nodes and select URL Service Data Control and click OK and enter the details to create the POST method.


In Create URL Service Data Control wizard - step 3 of 5, specify the XSD url which we created earlier.


In the New Gallery expand the General - Data Control nodes and select URL Service Data Control and click OK and enter the details to create the PUT method.


In Create URL Service Data Control wizard - step 3 of 5, specify the XSD url which we created earlier.


In the New Gallery expand the General - Data Control nodes and select URL Service Data Control and click OK and enter the details to create the DELETE method.


In Create URL Service Data Control wizard - step 3 of 5, enter the departmentId value as 0.


Next open the DataControls.dcx file and change the Definition id values to looks like below.


In ViewController project. Locate and expand the Application Sources folder, then expand the META-INF folder. You will see the adfmf-feature.xml file, click on the adfmf-feature.xml file to launch the Feature editor. Add a new feature by clicking the green plus sign on the Features table near top of the editor this will launch the new Create ADF Mobile Feature dialog, modify the values as shown below.


In the Features table, select the newly created feature Departments. Under the Features table, click the Content tab, and locate the Content table. Notice that the content item Departments.1 is created by default. Next add a new file by clicking the green plus sign and select taskflow option, this will launch the new Create ADF Mobile Task Flow dialog, modify the value as shown below.


Click on the DepartmentsTaskflow.xml to open the file in taskflow editor and follow the below steps.
  • Create three views and name them as deptList, deptAdd and deptEdit respectively
  • Draw the control flow case from deptList to addDept and Outcome as "add"
  • Draw the control flow case from deptList to editDept and Outcome as "edit" 
  • From DataControl palette drag and drop getDepartmentsFindAll and drop as method-call
  • Draw the control flow case from getDepartmentsFindAll method-call to deptList and Outcome as "getDepartmentsFindAll"
  • Draw the control flow case from addDept to getDepartmentsFindAll method-call and Outcome as "list"
  • Draw the control flow case from editDept to getDepartmentsFindAll method-call and Outcome as "list"
DepartmentsTaskflow.xml will looks as shown below diagram.


Double click on deptList view will launch Create ADF Mobile AMX Page dialog, in page facets select Header and Secondary Action. Go to source tab and follow the below steps:
  • In Header facet, amx:outputText set the value as "Dept List"
  • In Secondary Action facet, for amx:commandButton modify the values text: Add, action: add
  • From DC palette drag and drop EJBService->getDepartmentsFindAll()->Return->departmentss->departments->ADF Mobile List View and select the default options
  • In amx:Item, set the action as "edit"
  • Inside amx:Item set the setPropertyListener as shown below

Note:- Created the DataControl DepartmentsDC with addDepartment and editDepartment methods, so that the type casting the ADF form values to departments object will be easy.

Double click on deptAdd view will launch Create ADF Mobile AMX Page dialog, in page facets select Header, Primary Action. Go to source tab and follow the below steps:
  • In Header facet, amx:outputText set the value as "Add Dept"
  • In Primary Action facet, for amx:commandButton modify the values text: Back, action: __back
  • From DC palette drag and drop DepartmentsDC->addDepartment->Departments->Form as ADF Mobile Form.
  • Go to bindings and add the following attributesValues, departmentId, departmentName, locationId, managerId as shown below.
  • From DC palette drag and drop postDepartments->Method as ADF Mobile Button, set name as "Save", action as "list" and set the setPropertyListener as shown below 

Double click on deptAdd view will launch Create ADF Mobile AMX Page dialog, in page facets select Header, Primary, Secondary Action. Go to source tab and follow the below steps:
  • In Header facet, amx:outputText set the value as "Edit Dept"
  • In Primary Action facet, for amx:commandButton modify the values text: Back, action: __back
  • In Secondary Action facet,  from DC palette drag and drop EJBService->deleteDepartments->Method as ADF Mobile Button, set action as "list". In Edit Action Binding wizard mention the parameter for departmentId as #{pageFlowScope.departmentId}
  • From DC palette drag and drop DepartmentsDC->editDepartment->Departments->Form as ADF Mobile Form and in edit action binding wizard mention the parameters as shown below
  • Go to bindings and add the following attributesValues, departmentId, departmentName, locationId, managerId as shown below.
  • From DC palette drag and drop putDepartments->Method as ADF Mobile Button, set name as "Save", action as "list" and set the setPropertyListener as shown below.

Thursday, April 18, 2013

Configuring EJB with Restful Web Service in ADF

In current JDeveloper we can expose EJB's as Web Service, however this will be a SOAP based web service. In this article will discuss on configuring EJB with restful web service using jersey support. This article provides an example of building a complete RESTful API using the different HTTP methods:
  • GET to retrieve data
  • POST to add data
  • PUT to update data
  • DELETE to delete data
You can download the sample workspace from here
[Runs with Oracle JDeveloper 11.1.2.3.0 + HR Schema]

Implementation Steps:-

Create a EJB project, then create the DEPARTMENT JPA/EJB 3.0 Entity using the"Entities from tables" EJB wizard, create a Stateless Session bean and select Departments JPA Entity to generates façade methods.

Open the Departments entity and annotate with @XmlRootElement, when a top level class or an enum type is annotated with the @XmlRootElement annotation, then its value is represented as XML element in an XML document. Basically this allow ADF to convert this object directly to XML.JSON.


Add a new project ('REST Web Service Project') in the application and mention the name as WebService. Go to 'Project properties' > 'Dependencies' and add the Model project as a dependency.

Next add the supporting libraries to the Rest Web Service project, go to 'Project properties' > 'Libraries and Classpath'. Libraries are listed in the below screen shot, you can find the libraries in EJBRestService/libs folder.


Create and open EJBRestService java class, annotate with @Path("EJBRESTService") on class level. Click on the @Path notice on the left side yellow bulb will be appeared and click on the bulb to "Configure web.xml for jersey JAX-RS web services" as shown in below.


Now web.xml is created under WEB-INF folder. Open the file and replace with the below xml code.
<?xml version = '1.0' encoding = 'windows-1252'?>
<web-app xmlns="http://java.sun.com/xml/ns/javaee" xmlns:xsi="http://www.w3.org/2001/XMLSchema-instance"
         xsi:schemaLocation="http://java.sun.com/xml/ns/javaee http://java.sun.com/xml/ns/javaee/web-app_2_5.xsd"
         version="2.5">
    <filter>
        <filter-name>JpsFilter</filter-name>
        <filter-class>oracle.security.jps.ee.http.JpsFilter</filter-class>
        <init-param>
            <param-name>enable.anonymous</param-name>
            <param-value>true</param-value>
        </init-param>
    </filter>
    <filter-mapping>
        <filter-name>JpsFilter</filter-name>
        <url-pattern>/*</url-pattern>
        <dispatcher>FORWARD</dispatcher>
        <dispatcher>REQUEST</dispatcher>
        <dispatcher>INCLUDE</dispatcher>
    </filter-mapping>
    <servlet>
        <servlet-name>jersey</servlet-name>
        <servlet-class>com.sun.jersey.spi.container.servlet.ServletContainer</servlet-class>
        <init-param>
            <param-name>com.sun.jersey.config.property.resourceConfigClass</param-name>
            <param-value>com.sun.jersey.api.core.PackagesResourceConfig</param-value>
        </init-param>
        <init-param>
            <param-name>com.sun.jersey.config.property.packages</param-name>
            <param-value>webservice</param-value>
        </init-param>
        <init-param>
            <param-name>com.sun.jersey.api.json.POJOMappingFeature</param-name>
            <param-value>true</param-value>
        </init-param>
        <!--load-on-startup>1</load-on-startup-->
    </servlet>
    <servlet-mapping>
        <servlet-name>jersey</servlet-name>
        <url-pattern>/jersey/*</url-pattern>
    </servlet-mapping>
    <ejb-local-ref>
        <ejb-ref-name>ejb/SessionEJBBean</ejb-ref-name>
        <ejb-ref-type>Session</ejb-ref-type>
        <local>model.SessionEJBLocal</local>
        <ejb-link>SessionEJB</ejb-link>
    </ejb-local-ref>
</web-app>
Points to be noticed from the above xml code are :
  1. param-value under com.sun.jersey.config.property.packages tag - change the package name by your own package name used in the application.
  2. Add the Ejb References 
Open the EJBRestService.java file and add the below code.
@Path("EJBRESTService")
public class EJBRestService {
    public EJBRestService() {
        super();
    }

    @GET
    @Produces(MediaType.APPLICATION_XML)
    public List getAllDepts() {
        List list = new ArrayList();
        try {
            Context ic = getInitialContext();
            SessionEJBLocal sessionEJB = (SessionEJBLocal)ic.lookup("java:comp/env/ejb/SessionEJBBean");
            for (Departments departments : (List)sessionEJB.getDepartmentsFindAll()) {
                list.add(departments);
            }
            ic.close();
        } catch (NamingException e) {
            e.printStackTrace();
        }
        return list;
    }

    @POST
    @Consumes(MediaType.APPLICATION_XML)
    public void persistDept(Departments departments) {
        try {
            Context ic = getInitialContext();
            SessionEJBLocal sessionEJB = (SessionEJBLocal)ic.lookup("java:comp/env/ejb/SessionEJBBean");
            sessionEJB.persistDepartments(departments);
            ic.close();
        } catch (NamingException e) {
            e.printStackTrace();
        }
    }

    @PUT
    @Consumes(MediaType.APPLICATION_XML)
    public void mergeDept(Departments departments) {
        try {
            Context ic = getInitialContext();
            SessionEJBLocal sessionEJB = (SessionEJBLocal)ic.lookup("java:comp/env/ejb/SessionEJBBean");
            sessionEJB.mergeDepartments(departments);
            ic.close();
        } catch (NamingException e) {
            e.printStackTrace();
        }
    }

    @DELETE
    @Path("{departmentId}")
    public void removeDept(@PathParam("departmentId")
        BigDecimal departmentId) {
        try {
            Context ic = getInitialContext();
            SessionEJBLocal sessionEJB = (SessionEJBLocal)ic.lookup("java:comp/env/ejb/SessionEJBBean");
            Departments departments = new Departments();
            departments.setDepartmentId(departmentId);
            sessionEJB.removeDepartments(departments);
            ic.close();
        } catch (NamingException e) {
            e.printStackTrace();
        }
    }

    private static Context getInitialContext() throws NamingException {
        InitialContext ic = new InitialContext(); // WebLogic Server 10.x connection details
        return ic;
    }
}
Now deploy/run the EJBRestService.java client in the Integrated Weblogic Server to test. Once client runs it will provide the Target Application WADL/Target URL in JDeveloper console, click on any link to run the service in HTTP Analyzer. Below screen shows the GET method accessed in HTTP Analyzer with result.


Note:- Put and Post method are not working with HTTP Analyzer, you might need to create java client/ADF application to test these methods.

Tuesday, April 2, 2013

Sync Device Back Button With ADF Mobile App's Back Button In TaskFlows

This article is the continuation of my previous article on Handling the Device Back button in ADF Mobile Application. Scenario in this article is to use the device back button to go back to previous page within taskflows, Android device has a back button and our apps should take an advantage of that.

Thanks for Bryan Laipple, in his forum reply he provided the solution on how to programmatically navigate within task flows. Application screen looks like below when it is deployed and run on the Android Device/Emulator. In the below screen Employee list will be displayed.


Clicking on any employee will take you to the selected Employee details page. Notice in the below screen there is no back button provided explicitly, here we can take an advantage of device back button to navigate back to previous page. Now click on the device back button to go back to previous page.


You can download the sample workspace from here. I have checked in Android Device/Emulator and it's working fine.

In below section I will not provide all the steps to create the application from scratch, only key ones are shown. Created DeviceBackButtonTaskFlow.xml taskflow in this application looks like below.


Programmatically navigate within task flows in two ways: -
  • Javascript - Create Javascript file under the feature and add the below code which catches the event that fires when the user presses the device back button. In Javascript function directly call adf.mf.api.amx.doNavigation(outcome), here outcome is the variable that represents the navigation string corresponding to the control flow case.
//This is an event that fires when the user presses the device back button
document.addEventListener("deviceready", onDeviceReady, false);

function onDeviceReady() {
    document.addEventListener("backbutton", backKeyDown, true);
}

function backKeyDown() {
    //Check the device back button action happened in Employee.amx
    if ($('#EmployeeId').length) {
  //Navigate within taskflows using javascript
  adf.mf.api.amx.doNavigation("backToEmployeeList");
    }
}
  • Java - Create Javascript file under the feature and add the below code which catches the event that fires when the user presses the device back button.
//This is an event that fires when the user presses the device back button
document.addEventListener("deviceready", onDeviceReady, false);

function onDeviceReady() {
    document.addEventListener("backbutton", backKeyDown, true);
}

function backKeyDown() {
    //Check the device back button action happened in Employee.amx
    if ($('#EmployeeId').length) {
        //Call the java method in managed bean
        adf.mf.api.invokeMethod("mobile.EmployeeManagedBean", "handleNavigation", onInvokeSuccess, onFail);
    }
}

function onInvokeSuccess(param) {
    //To do code after success
};

function onFail() {
    //To do code after failure
};
Next create a EmployeeManagedBean class under DeviceBackButtonTaskFlow. Add the below code to navigate within the taskflow. This method will be called from javascript function.
public void handleNavigation() {
        //Code to naviagte within task flows programmatically
        AdfmfContainerUtilities.invokeContainerJavaScriptFunction(AdfmfJavaUtilities.getFeatureName(),
                                                                  "adf.mf.api.amx.doNavigation",
                                                                  new Object[] { "backToEmployeeList" });
}

Oracle JDeveloper and Oracle ADF 11g Release 1 (11.1.1.7.0) released

The 11g Release 1 (11.1.1.7.0) version of JDeveloper and ADF is a minor update release, download here. It contains many bug fixes as well as a few new features to enjoy.

Sunday, March 31, 2013

Handling the Device Back button in ADF Mobile Application

While developing an ADF Mobile application for Android/IOS, you may require to capture the device back button on user click. Here we will add little logic to exit the application once the user clicks on device back button.

We can directly use the phone gap backbutton api to override the default back button behaviour, you can register an event listener for the 'backbutton' event. It is no longer necessary to call any other method to over ride the back button behaviour. Now, you only need to register an event listener for 'backbutton'.

Application screen looks like below when it is deployed and run on the Android Device/Emulator. Click on the device back button will launch the confirm dialog, user can click OK to exit the application.


You can download the sample workspace from here. I have checked in Android Device/Emulator and it's working fine, not sure in IOS device.

Implementation Steps

Create an ADF Mobile Application, the application consists of two projects. Application Controller project of Application LifeCycle, Listeners, Device Features DataControl and ViewController project contains mobile features content like AMX Files, Task Flows and DataControl.

Right click on the ViewController project and in New Gallery window, select Web Tier-> HTML -> JavaScript File and name as "index.js". Next locate and expand the Application Sources folder, then expand the META-INF folder. You will see the adfmf-feature.xml file, click on the adfmf-feature.xml file to launch the Feature editor. Add a new feature by clicking the green plus sign on the Features table near top of the editor this will launch the new Create ADF Mobile Feature dialog, leave the default values and click ok.

In the Features table, select the newly created feature "feature1". Under the Features table, click the Content tab, and locate the Content table. Notice that the content item feature1.1 is created by default. Next add a new file by clicking the green plus sign and select ADF Mobile AMX Page, this will launch the new Create ADF Mobile AMX Page dialog, modify the File Name as index.amx.

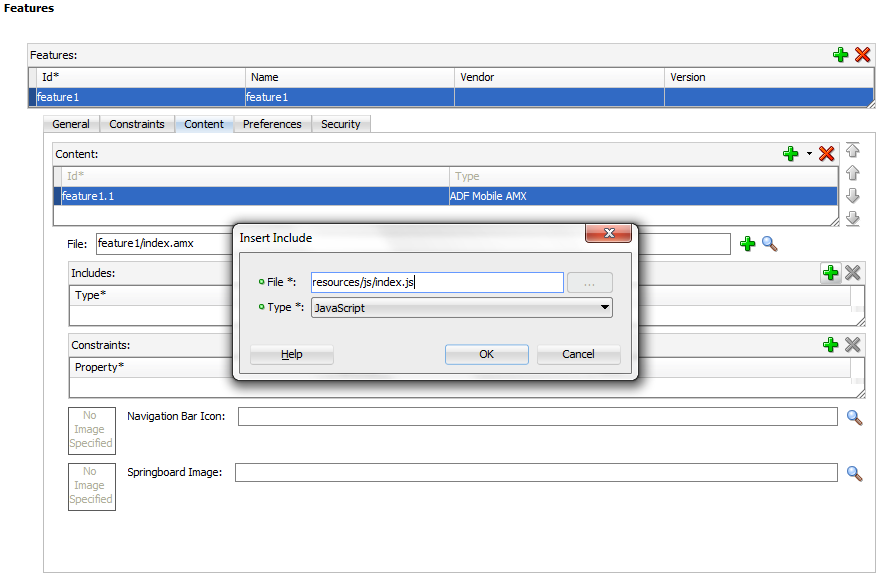
Next in Includes section, click the green plus sign and Insert Include the javascript file as shown below.

Open the index.js file and below code catches the event that fires when the user presses the device back button.
//This is an event that fires when the user presses the device back button
document.addEventListener("deviceready", onDeviceReady, false);

function onDeviceReady() {
    document.addEventListener("backbutton", backKeyDown, true);
}

function backKeyDown() {
    var cFirm = confirm("Are you sure you want to exit the application?");
    if (cFirm == true) {
        //Code to exit the application
        navigator.app.exitApp();
    }
}