Saturday, April 21, 2012

Achieve Named Criteria with multiple tables in EJB Data control

In EJB create a named criteria using sparse xml and in named criteria wizard, only attributes related to the that particular entities will be displayed.  So here we can filter results only on particular entity bean.

Take a scenario where we need to create Named Criteria based on multiple tables using EJB. In BC4J we can achieve this by creating view object based on multiple tables. So in this article, we will try to achieve named criteria based on multiple tables using EJB.

You can download the sample workspace from here
[Runs with Oracle JDeveloper 11.1.2.0.0 (11g R2) + HR Schema]

Implementation Steps

Create Fusion Web Application with entity based on Departments and Employees, then create a session bean and data control for the session bean.

Create a Java Bean, name as CustomBean and add below code to the file. Here in java bean from both Departments and Employees tables three fields are taken.
public class CustomBean {
    private BigDecimal departmentId;
    private String departmentName;
    private BigDecimal locationId;
    private BigDecimal employeeId;
    private String firstName;
    private String lastName;

    public CustomBean() {
      super();
    }

    public void setDepartmentId(BigDecimal departmentId) {
        this.departmentId = departmentId;
    }

    public BigDecimal getDepartmentId() {
        return departmentId;
    }

    public void setDepartmentName(String departmentName) {
        this.departmentName = departmentName;
    }

    public String getDepartmentName() {
        return departmentName;
    }

    public void setLocationId(BigDecimal locationId) {
        this.locationId = locationId;
    }

    public BigDecimal getLocationId() {
        return locationId;
    }

    public void setEmployeeId(BigDecimal employeeId) {
        this.employeeId = employeeId;
    }

    public BigDecimal getEmployeeId() {
        return employeeId;
    }

    public void setFirstName(String firstName) {
        this.firstName = firstName;
    }

    public String getFirstName() {
        return firstName;
    }

    public void setLastName(String lastName) {
        this.lastName = lastName;
    }

    public String getLastName() {
        return lastName;
    }
}

Open the sessionEJb file and add the below code to the session bean and expose the method in local/remote interface and generate a data control for that.
Note:- Here in the below code "em" is a EntityManager.
public List<CustomBean> getCustomBeanFindAll() {
     String queryString =
            "select d.department_id, d.department_name, d.location_id, e.employee_id, e.first_name, e.last_name from departments d, employees e\n" +
            "where e.department_id = d.department_id";
     Query genericSearchQuery = em.createNativeQuery(queryString, "CustomQuery");
     List resultList = genericSearchQuery.getResultList();
     Iterator resultListIterator = resultList.iterator();
     List<CustomBean> customList = new ArrayList();
     while (resultListIterator.hasNext()) {
         Object col[] = (Object[])resultListIterator.next();
         CustomBean custom = new CustomBean();
         custom.setDepartmentId((BigDecimal)col[0]);
         custom.setDepartmentName((String)col[1]);
         custom.setLocationId((BigDecimal)col[2]);
         custom.setEmployeeId((BigDecimal)col[3]);
         custom.setFirstName((String)col[4]);
         custom.setLastName((String)col[5]);
         customList.add(custom);
     }
     return customList;
}
Open the DataControls.dcx file and create sparse xml for customBean. In sparse xml navigate to Named criteria tab -> Bind Variable section, create two binding variables deptId,fName.


In sparse xml navigate to Named criteria tab ->Named criteria, create a named criteria and map the query attributes to the bind variables.


In the ViewController create a file jspx page, from data control palette drop customBeanFindAll->Named Criteria->CustomBeanCriteria->Query as ADF Query Panel with Table. Run the jspx page and enter values in search form with departmentId as 50 and firstName as "M". Named criteria will filter the query of a data source and display the result like below.

AutoSuggest behavior In ADF Using EJB DataControl

AutoSuggest feature somewhat expected feature, nowadays that most of the top sites have implemented this functionality. This feature makes your site as user friendly and easy to navigate in inputText feature.

AutoSuggest behavior in ADF adds a pull-down menu of suggested values to a text field. The user can either click directly on a suggestion to enter it into the field, or navigate the list using the up and down arrow keys, selecting a value using the enter key.

You can download the sample workspace from here
[Runs with Oracle JDeveloper 11.1.2.0.0 (11g R2) + HR Schema]

Lets create a Fusion Web Application with Entities based on Departments, edit the Departments.java entity and add the below code.
@NamedQuery(name = "Departments.filteredValues",
            query = "select o from Departments o where o.departmentName like CONCAT(:deptName,'%')

Create a Stateless Session Bean and data control for the Stateless Session Bean. Add the below code to the session bean and expose the method in local/remote interface and generate a data control for that.

Note:- Here in the below code "em" is a EntityManager.
/** select o from Departments o where o.departmentName like CONCAT(:deptName,'%') */
public List<String> getDepartmentsFilteredValues(String deptName) {
   //To store the resultset
   List<String> deptNameResultset = new ArrayList<String>();
   Query query = em.createNamedQuery("Departments.filteredValues").setParameter("deptName", deptName);
   Vector result = (Vector)query.getResultList();
   int resultSize = result.size();
   for (int i = 0; i > resultSize; i++) {
      Departments dept = (Departments)result.get(i);
      deptNameResultset.add(dept.getDepartmentName());
   }
   return deptNameResultset;
}

In the ViewController create a file AutoSuggest.jspx page, from component palette drag and drop ADF inputText and in PI palette change the label to Dept Name. Add the autoSuggestBehavior tag to the inputText. Click on the autoSuggestBehavior, in PI palette click on Edit property for Suggested Items and create a "AutoSuggest" managed bean with scope as "request" as shown in below Image.


Create new method as deptNameResultList and click Ok.


In AutoSuggest.jspx page, go to binding tab and click create binding by selecting methodAction and click ok with parameter blank as shown in below image


Open AutoSuggest.java managed bean and paste the below code.
public List deptNameResultList(String paramValue) {
  //Store the deptName result set
  List deptResultList = new ArrayList();
  //Filter the values using Items List
  List items = new ArrayList();
        
  BindingContainer bindings = getBindings();
  //Execute the Method
  OperationBinding operationBinding = bindings.getOperationBinding("getDepartmentsFilteredValues");
  //Populate the deptName parameter 
  operationBinding.getParamsMap().put("deptName", paramValue);
  operationBinding.execute();
  if (operationBinding.getResult() != null) {
      operationBinding.getResult();
      ArrayList result = (ArrayList)operationBinding.getResult();
      int resultSize = result.size();
      for (int i = 0; i < resultSize; i++) {
         deptResultList.add(new SelectItem(result.get(i)));
      }
   }
   for (SelectItem item : deptResultList) {
     if (item.getLabel().startsWith(paramValue)) {
          items.add(item);
     }
   }
  return items;
}

public BindingContainer getBindings() {
   return BindingContext.getCurrent().getCurrentBindingsEntry();
}

Run AutoSuggest.jspx, Dept Name text field will be displayed. As soon as the user has typed a character, a filtered list of suggested values is presented( for ex: C), Now traverse the list by using up and down arrow and select a suggested value from the list and thus applying that value to the inputText component.

Friday, April 20, 2012

Custom Table Pagination Using EJB Native Query

Let us take scenario where the table has more records. Here employees table has more number of records, if the entire records are displayed in single ADF table, It will be difficult for user to navigate or traverse to the exact record. This can be achieved by implementing pagination, Pagination is an important aspect when displaying large number of records. This blog would be of help if you are building applications that render large number of records in a table. With pagination, the number of records displayed can be controlled into several manageable chunks, thus making it easy to locate the records of interest.

You can download the sample workspace from here
[Runs with Oracle JDeveloper 11.1.2.0.0 (11g R2) + HR Schema]

Model Diagram:

Here in the above model diagram, Employees table schema.

Let us consider the above Employees table has more number of records, User will not be able to see all the records at the same time on web page.

For ex:- Employees Details Page


We use the af:iterator tag to implement the custom table with pagination. This tag renders a collection in the same fashion as the af:table tag does. Same as af:table tag, af:iterator can be based on table binding available in page definition. It iterates over data collection and renders data rows.

First, create entities based on  Employees, then create a stateless session bean and data control for the session bean. Add the below code to the session bean and expose the method in local/remote interface and generate a data control for that.

Note:- Here in the below code "em" is a EntityManager.

 /**
  * Returns list of employee list starting at the given first index with the given max row count.
  * @return list of  employee list starting at the given first index with the given max row count.
  */
   public List<Employees> employeesByLimit(int firstRow, int maxRow) {
        String queryString = "select * from Employees order by employee_id ASC";
        return em.createNativeQuery(queryString,
                                    Employees.class).setMaxResults(maxRow).setFirstResult(firstRow).getResultList();
   }

 /**
  * Returns total amount of rows in table.
  * @return Total amount of rows in table.
  */
   public int employeesTotalRows() {
        String queryString = "select * from Employees order by employee_id ASC";
        Query query = em.createNativeQuery(queryString);
        List results = query.getResultList();
        return results.size();
   }

In the ViewController create a file CustomPagination.jspx page, right click and "Go to Page Definition", CustomPaginationPageDef.xml file will be created. 

Create a CustomPagination managed bean with scope as "sessionScope" add the below code:
    private int firstRow = 0;
    private int rowsPerPage = 10;
    private int totalRows;
    private int totalPages;
    private int currentPage = 1;

    public CustomPagination() {
        this.loadList();
    }

    public void loadList() {
        /**
         * Returns total amount of rows in table.
         * @return Total amount of rows in table.
         */
        BindingContainer bindings = BindingContext.getCurrent().getCurrentBindingsEntry();
        AttributeBinding attr = (AttributeBinding)bindings.getControlBinding("EmployeesTotalRowCount");
        String val = attr.getInputValue().toString();
        int rows = Integer.parseInt(val);
        this.setTotalRows(rows);

        double val1 = ((double)this.getTotalRows() / this.getRowsPerPage());
        int totalPagesCal = (int)Math.ceil(val1);
        this.setTotalPages((totalPagesCal != 0) ? totalPagesCal : 1);

    }

    public void firstActionListener(ActionEvent actionEvent) {
        this.setCurrentPage(1);
        this.setFirstRow(0);
    }

    public void previousActionListener(ActionEvent actionEvent) {
        this.setCurrentPage(this.getCurrentPage() - 1);
        this.setFirstRow(this.getFirstRow() - this.getRowsPerPage());
    }

    public void nextActionListener(ActionEvent actionEvent) {
        this.setCurrentPage(this.getCurrentPage() + 1);
        this.setFirstRow(this.getFirstRow() + this.getRowsPerPage());

    }

    public void lastActionListener(ActionEvent actionEvent) {
        this.setCurrentPage(this.getTotalPages());
        this.setFirstRow(this.getTotalRows() -
                         ((this.getTotalRows() % this.getRowsPerPage() != 0) ? this.getTotalRows() %
                          this.getRowsPerPage() : this.getRowsPerPage()));
    }

    public boolean isBeforeDisabled() {
        return this.getFirstRow() == 0;
    }

    public boolean isAfterDisabled() {
        return this.getFirstRow() >= this.getTotalRows() - this.getRowsPerPage();
    }

    public void setFirstRow(int firstRow) {
        this.firstRow = firstRow;
    }

    public int getFirstRow() {
        return firstRow;
    }

    public void setRowsPerPage(int rowsPerPage) {
        this.rowsPerPage = rowsPerPage;
    }

    public int getRowsPerPage() {
        return rowsPerPage;
    }

    public void setTotalRows(int totalRows) {
        this.totalRows = totalRows;
    }

    public int getTotalRows() {
        return totalRows;
    }

    public void setTotalPages(int totalPages) {
        this.totalPages = totalPages;
    }

    public int getTotalPages() {
        return totalPages;
    }

    public void setCurrentPage(int currentPage) {
        this.currentPage = currentPage;
    }

    public int getCurrentPage() {
        return currentPage;
    }

Open CustomPagination.jspx, click on Binding tab and and click on Create control binding and select methodAction for employeesTotalRows as shown in below image.


Open CustomPaginationPageDef.xml and add the below code snippet inside "variableIterator" tag.


<variable Type="int" Name="employeesTotalRows_Return" IsQueriable="false" IsUpdateable="0" DefaultValue="${bindings.employeesTotalRows.result}"/>

Open CustomPagination.jspx,  click on Binding tab and click on Create control binding and select attributeValues and create attribute binding for employeesTotalRows_Return and in Property Inspector change the id to "EmployeesTotalRowCount"


Click on Create control binding and select methodAction for employeesByLimit as shown in below image


Create Tree binding for control of Employees result set.


Click on Create Executable binding and select Invoke action and follow as shown in below image.


Edit TotalRows invoke actiion and set the Refresh to prepareModel, so when ever page loads employeesTotalRows method will get executed.


Go to CustomPagination.jspx Source tab and copy the below code snippet. As mentioned above af:iterator tag to implement the custom table with pagination.

<af:group id="g1">
 <af:panelGroupLayout id="pgl1" layout="scroll">
  <af:spacer width="10" height="10" id="s16"/>
  <af:panelGroupLayout id="pgl9" layout="horizontal">
   <af:spacer width="10" height="10" id="s9"/>
   <af:panelGroupLayout id="pgl10" inlineStyle="width:75px;" layout="horizontal">
    <af:outputText value="Employeed Id" id="ot1" inlineStyle="font-weight:bold;"/>
   </af:panelGroupLayout>
   <af:spacer width="10" height="10" id="s7"/>
   <af:panelGroupLayout id="pgl7" inlineStyle="width:75px;" layout="horizontal">
    <af:outputText value="First Name" id="ot6" inlineStyle="font-weight:bold;"/>
   </af:panelGroupLayout>
   <af:spacer width="10" height="10" id="s10"/>
   <af:panelGroupLayout id="pgl11" inlineStyle="width:75px;" layout="horizontal">
    <af:outputText value="Last Name" id="ot4" inlineStyle="font-weight:bold;"/>
   </af:panelGroupLayout>
   <af:spacer width="10" height="10" id="s11"/>
   <af:panelGroupLayout id="pgl12" inlineStyle="width:75px;" layout="horizontal">
    <af:outputText value="Email" id="ot7" inlineStyle="font-weight:bold;"/>
   </af:panelGroupLayout>
   <af:spacer width="10" height="10" id="s12"/>
   <af:panelGroupLayout id="pgl15" inlineStyle="width:75px;" layout="horizontal">
    <af:outputText value="Salary" id="ot10" inlineStyle="font-weight:bold;"/>
   </af:panelGroupLayout>
  </af:panelGroupLayout>
  <af:separator id="s15"/>
  <af:spacer width="10" height="10" id="s2"/>
  <af:iterator id="i1" value="#{bindings.result.collectionModel}" var="row">
   <af:panelGroupLayout id="pgl2" layout="horizontal">
    <af:spacer width="10" height="10" id="s3"/>
    <af:panelGroupLayout id="pgl3" layout="horizontal" inlineStyle="width:75px;">
     <af:outputText value="#{row.employeeId}" id="ot8"/>
    </af:panelGroupLayout>
    <af:spacer width="10" height="10" id="s13"/>
    <af:panelGroupLayout id="pgl13" layout="horizontal" inlineStyle="width:75px;">
     <af:outputText value="#{row.firstName}" id="ot11"/>
    </af:panelGroupLayout>
    <af:spacer width="10" height="10" id="s4"/>
    <af:panelGroupLayout id="pgl4" layout="horizontal" inlineStyle="width:75px;">
     <af:outputText value="#{row.lastName}" id="ot9"/>
    </af:panelGroupLayout>
    <af:spacer width="10" height="10" id="s6"/>
    <af:panelGroupLayout id="pgl5" layout="horizontal" inlineStyle="width:75px;">
     <af:outputText value="#{row.email}" id="ot2"/>
    </af:panelGroupLayout>
    <af:spacer width="10" height="10" id="s8"/>
    <af:panelGroupLayout id="pgl8" inlineStyle="width:75px;" layout="horizontal">
     <af:outputText value="#{row.salary}" id="ot3"/>
    </af:panelGroupLayout>
   </af:panelGroupLayout>
   <af:spacer width="10" height="10" id="s1"/>
  </af:iterator>
  <af:panelGroupLayout id="pgl6">
   <af:commandButton text="First" id="cb1"
         actionListener="#{CustomPagination.firstActionListener}"
         partialTriggers="i1" disabled="#{CustomPagination.beforeDisabled}"/>
   <af:commandButton text="Prev" id="cb2"
         actionListener="#{CustomPagination.previousActionListener}"
         partialTriggers="i1" disabled="#{CustomPagination.beforeDisabled}"/>
   <af:commandButton text="Next" id="cb3"
         actionListener="#{CustomPagination.nextActionListener}"
         partialTriggers="i1" disabled="#{CustomPagination.afterDisabled}"/>
   <af:commandButton text="Last" id="cb4"
         actionListener="#{CustomPagination.lastActionListener}"
         partialTriggers="i1" disabled="#{CustomPagination.afterDisabled}"/>
   <af:spacer width="10" height="10" id="s5"/>
   <af:outputText value="Page #{CustomPagination.currentPage} / #{CustomPagination.totalPages}"
         id="ot5"/>
  </af:panelGroupLayout>
 </af:panelGroupLayout>
</af:group>

Run the CustomPagination.jspx, Now It always displays 10 rows (configurable) in the CustomPagination.java page. The page provides buttons to navigate between pages and shows current page number. If user is moves to second or third page, navigation buttons for

previous page will be enabled, If we navigate to the last page, navigation buttons for next navigation become disabled and If we navigate to the first page, First and Prev buttons should be disabled.

Thursday, April 19, 2012

SQL 'IN' clause using EJB Native Query

Consider a case where we need to retrieve employees where Department and Employees entities are associated by One to Many mapping, the retrieval is using complex queries with a complex result set.


Ex: JPQL with "IN clause" where we need to pass series of values in one parameter, say list type. As the Java Persistence Query Language does not support passing a list of items as an input/named parameter, we are limited by the JPQL language to use "IN clause" in named queries.


Here is one solution to overcome this limitation, this can be achieved by creating native SQL queries to run complex queries and also handle complex result sets.


First, create entities based on Department, Employees, then create a stateless session bean and data control for the session bean. Add the below code to the session bean and expose the method in local/remote interface and generate a data control for that.

Note: Parameters in the example below are hard coded.

The code below describes one way of creating a native query and defining a result set that can map to an entity. Notice that the result set is mapped to the Employees entity class.

Note:- Here in the below code "em" is a EntityManager.

 public List<Employees> NativeQuery() {
        String queryString =
            "select * from Employees where department_id in (10, 20, 40, 50) order by department_id ASC";
        return em.createNativeQuery(queryString,
                                    Employees.class).getResultList();
    }

Here is another way of creating a native query using custom code to generate a custom result set.

 public List<Employees> NativeQueryCustomCode() {
        String queryString =
            "select * from Employees where department_id in (10, 20, 40, 50) order by department_id ASC";
        Query genericSearchQuery =
            em.createNativeQuery(queryString, "InQuery");
        List resultList = genericSearchQuery.getResultList();
        Iterator resultListIterator = resultList.iterator();
        List<Employees> employeesList = new ArrayList();
        while (resultListIterator.hasNext()) {
            Object col[] = (Object[])resultListIterator.next();
            Employees employees = new Employees();
            BigDecimal employeeId = (BigDecimal)col[0];
            employees.setEmployeeId(employeeId.longValue());
            employees.setFirstName((String)col[1]);
            employees.setLastName((String)col[2]);
            employees.setEmail((String)col[3]);
            employees.setPhoneNumber((String)col[4]);
            employees.setJobId((String)col[6]);
            BigDecimal salary = (BigDecimal)col[7];
            employees.setSalary(salary.doubleValue());
            employees.setCommissionPct((Double)col[8]);

            Departments departments = new Departments();
            BigDecimal departmentId = (BigDecimal)col[10];
            departments.setDepartmentId(departmentId.longValue());
            employees.setDepartments(departments);

            employeesList.add(employees);
        }
        return employeesList;
}

In the ViewController create a file NativeQuery.jspx, from the DataControl palette drag and drop NativeQuery->Employees as ADF Read-only Table and select the columns to be displayed.
Run NativeQuery.jspx, Employees who belong to the departments with Id (10,20,30,40) should only be displayed.

Wednesday, April 18, 2012

Dependent LOV using EJB Native Query

This Use case simulates dependent LOV. Consider a case where we need to retrieve employees where Department and Employees entities are associated by One to Many mapping. Here employees table has more number of records, if the entire records are  displayed in single ADF table. It will be difficult for user to search, Filter or traverse to the exact record.

Model Diagram: Employees, Departments table schema.
Below Employees details page has more number of records, User will not be able to see all the records at the same time on web page. User has to scroll down to find the exact record.


Toolbar filters is one of the solution for navigating to the records, Toolbar filter enables the user to filter the rows in a table. Using toolbar filters performance issues can be improved by reducing result set size while loading the page.

We will try to achieve the toolbar filters by simulating dependent LOV using EJb Native Query. From the above Employees Details Page, select the departmentId and jobId as toolbar filters.

First, create entities based on Department, Employees, then create a stateless session bean and data control for the session bean. Add the below code to the session bean and expose the method in local/remote interface and generate a data control for that.

Note:- Here in the below code "em" is a EntityManager.

public List<Employees> EmployeesFilteredResult(Long departmentId,
                                                   String jobId) {
        String queryString = null;
        if (departmentId == null &amp;&amp; jobId == null) {
            queryString =
                    "select * from Employees where department_id like '%' and job_id like '%'";
        } else if (departmentId != null &amp;&amp; jobId == null) {
            queryString =
                    "select * from Employees where department_id = " + departmentId +
                    " and job_id like '%'";
        } else if (departmentId != null &amp;&amp; jobId != null) {
            queryString =
                    "select * from Employees where department_id = " + departmentId +
                    " and job_id = '" + jobId + "'";
        }
        System.out.println(queryString);
        Query genericSearchQuery =
            em.createNativeQuery(queryString, Employees.class);
        return genericSearchQuery.getResultList();
}

public List<String> EmployeesDistinctJobByDept(Long departmentId) {
        List<String> empResultList = new ArrayList<String>();
        try {
            String queryString =
                "select distinct JOB_ID from Employees where department_id = " +
                departmentId;
            System.out.println(queryString);
            Query genericSearchQuery =
                em.createNativeQuery(queryString, "DistinctSearch");
            List resultList = genericSearchQuery.getResultList();
            Iterator resultListIterator = resultList.iterator();
            while (resultListIterator.hasNext()) {
                Object col[] = (Object[])resultListIterator.next();
                empResultList.add((String)col[0]);
            }
            return empResultList;
        } catch (NullPointerException npe) {
            return empResultList;
        }
}

In the ViewController create a file DependentLOV.jspx page, from Data Control palette  and drop Panel Collection component, drop ADF toolbar inside the Panel Collection area, drop Panel Group Layout inside ADF toolbar. From DataControl palette drag and drop departmentsFindAll->Single Selection as ADF Select One Choice, In Edit List Binding select departmentName as Display Attribute.
Select the departmentName select one choice, In Property Inspector make AutoSubmit: true, edit ValueChangeListener and create a DependentLOV.java managed bean with scope as "sessionScope"and create new method "selectedDeptIdValue", Open DependentLOV.java and paste the below code.

    private String deptIdValue;
    private String JobIdValue;
    public void setDeptIdValue(String deptIdValue) {
        this.deptIdValue = deptIdValue;
    }

    public String getDeptIdValue() {
        return deptIdValue;
    }

    public void setJobIdValue(String JobIdValue) {
        this.JobIdValue = JobIdValue;
    }

    public String getJobIdValue() {
        return JobIdValue;
    }
Right click on DependentLOV.jspx go to page definition. Create control binding by selecting attributeValues in Insert Item dialog window.


From DataControl palette drag and drop EmployeesDistinctJobByDept->return->element as Single Selection->ADF Select One Choice inside ADF toolbar, In Edit Action Binding select the parameter value as #{DependentLOV.deptIdValue}


Select the jobId select one choice, In Property Inspector make AutoSubmit: true and set partialTriggers to departmentName select one choice . Edit ValueChangeListener and create a new method "selectedJobIdValue".

From DataControl palette drag and drop EmployeesFilteredResult->Employees as Table->ADF Read-only Table and select the columns to be displayed. In Edit Action Binding select the parameter as below


Select the employee table, In Property Inspector set partialTriggers to both departmentName and jobId select one choice. Open DependentLOV.java and overwrite the below code.

public void selectedDeptIdValue(ValueChangeEvent valueChangeEvent) {
        Integer stateIndex = (Integer)valueChangeEvent.getNewValue();
        BindingContainer bindings =
            BindingContext.getCurrent().getCurrentBindingsEntry();
        JUCtrlListBinding listBinding =
            (JUCtrlListBinding)bindings.get("departmentsFindAll");
        Object assignedId = null;
        if (listBinding != null) {
            assignedId =
                    listBinding.getDCIteratorBinding().getRowAtRangeIndex(stateIndex.intValue()).getAttribute("departmentId");
            Long deptId = Long.parseLong(assignedId.toString());
            this.setDeptIdValue(deptId);
        }
        OperationBinding operationBinding =
            bindings.getOperationBinding("EmployeesDistinctJobByDept");
        Object result = operationBinding.execute();
        this.setJobIdValue(null);
    }

    public void selectedJobIdValue(ValueChangeEvent valueChangeEvent) {
        Integer stateIndex = (Integer)valueChangeEvent.getNewValue();
        DCBindingContainer bindings =
            (DCBindingContainer)BindingContext.getCurrent().getCurrentBindingsEntry();
        DCIteratorBinding tableIter =
            bindings.findIteratorBinding("EmployeesDistinctJobByDeptIter");
        RowSetIterator tableRowSetIter = tableIter.getRowSetIterator();
        Object iterRow = null;
        iterRow =
                tableRowSetIter.getRowAtRangeIndex(stateIndex.intValue()).getAttribute("element");
        this.setJobIdValue(iterRow.toString());
} 
Run the DependentLOV.jspx and select the Dept Name from Dept selection box. JobId selection box will be updated with JobId's associated with Dept Name and Employees table will be refreshed with records for the selected Dept Name. On select of both dept name and job id table will be refreshed with the respective records.


Alphabet filter using EJB NamedQuery

Let us take scenario where the table has more records. It will be difficult for user to search or travel to the exact record.

Model Diagram:

Here in the above model diagram, Employees table schema.

Let us assume the above Employees table has more records, User will not be able to see all the records at the same time on web page.
For ex:- Employees Details Page


Here In the above scenario, It will be difficult to search for the required records. Suppose if the records starts with alphabet "W" then user as to select scroll till the end page. Performance issues can be improved using using alphabet, and other toolbar filters by reducing result set size while loading the page.

Alphabet filters will be one of the solution for navigating to the records. Create a Entity based on Employees table and add one named query, create a session bean and data control for that.
@NamedQuery(name = "Employees.filterByAlphabet",
query = "select o from Employees o where o.email like CONCAT(:email,'%')")
Create a FilterByAlphabet.jspx page and drop the getEmployeesFilterByAlphabet->result DC as Table->ADF Read Only Table with email column sort option enabled. Surround the employee table with panel collection and toolbar with inside the panel. Add the below code inside the toolbar.

<af:commandLink text="All" id="cl1"
  actionListener="#{FilterByAlphabet.getSelectedAlphabet}"/>
<af:spacer width="15" height="10" id="s1"/>
<af:commandLink text="A" id="cl2"
  actionListener="#{FilterByAlphabet.getSelectedAlphabet}"/>
<af:commandLink text="B" id="cl3" actionListener="#{FilterByAlphabet.getSelectedAlphabet}"/>
<af:commandLink text="C" id="cl4" actionListener="#{FilterByAlphabet.getSelectedAlphabet}"/>
<af:commandLink text="D" id="cl5" actionListener="#{FilterByAlphabet.getSelectedAlphabet}"/>
<af:commandLink text="E" id="cl6" actionListener="#{FilterByAlphabet.getSelectedAlphabet}"/>
<af:commandLink text="F" id="cl7" actionListener="#{FilterByAlphabet.getSelectedAlphabet}"/>
<af:commandLink text="G" id="cl8" actionListener="#{FilterByAlphabet.getSelectedAlphabet}"/>
<af:commandLink text="H" id="cl9" actionListener="#{FilterByAlphabet.getSelectedAlphabet}"/>
<af:commandLink text="I" id="cl10"
  actionListener="#{FilterByAlphabet.getSelectedAlphabet}"/>
<af:commandLink text="J" id="cl11"
    actionListener="#{FilterByAlphabet.getSelectedAlphabet}"/>
<af:commandLink text="K" id="cl12"
    actionListener="#{FilterByAlphabet.getSelectedAlphabet}"/>
<af:commandLink text="L" id="cl13"
    actionListener="#{FilterByAlphabet.getSelectedAlphabet}"/>
<af:commandLink text="M" id="cl14"
    actionListener="#{FilterByAlphabet.getSelectedAlphabet}"/>
<af:commandLink text="N" id="cl15"
    actionListener="#{FilterByAlphabet.getSelectedAlphabet}"/>
<af:commandLink text="O" id="cl16"
    actionListener="#{FilterByAlphabet.getSelectedAlphabet}"/>
<af:commandLink text="P" id="cl27"
    actionListener="#{FilterByAlphabet.getSelectedAlphabet}"/>
<af:commandLink text="Q" id="cl28"
    actionListener="#{FilterByAlphabet.getSelectedAlphabet}"/>
<af:commandLink text="R" id="cl29"
    actionListener="#{FilterByAlphabet.getSelectedAlphabet}"/>
<af:commandLink text="S" id="cl30"
    actionListener="#{FilterByAlphabet.getSelectedAlphabet}"/>
<af:commandLink text="T" id="cl31"
    actionListener="#{FilterByAlphabet.getSelectedAlphabet}"/>
<af:commandLink text="U" id="cl32"
    actionListener="#{FilterByAlphabet.getSelectedAlphabet}"/>
<af:commandLink text="V" id="cl33"
    actionListener="#{FilterByAlphabet.getSelectedAlphabet}"/>
<af:commandLink text="W" id="cl34"
    actionListener="#{FilterByAlphabet.getSelectedAlphabet}"/>
<af:commandLink text="X" id="cl35"
    actionListener="#{FilterByAlphabet.getSelectedAlphabet}"/>
<af:commandLink text="Y" id="cl36"
    actionListener="#{FilterByAlphabet.getSelectedAlphabet}"/>
<af:commandLink text="Z" id="cl37"
    actionListener="#{FilterByAlphabet.getSelectedAlphabet}"/>
Create a FilterByAlphabet managed bean with scope as "sessionScope" add the below code :

private String filteredValue;
public void setFilteredValue(String filteredValue) {
          this.filteredValue = filteredValue;
}
public String getFilteredValue() {
          return filteredValue;
}
public void getSelectedAlphabet(ActionEvent actionEvent) { RichCommandLink rcl = (RichCommandLink)actionEvent.getComponent(); if (rcl.getText().equals("All")) { this.setFilteredValue(""); } else { this.setFilteredValue(rcl.getText()); } }
Go to the page definition and edit the getEmployeesFilterByAlphabet action binding and map the value to #{FilterByAlphabet.filteredValue}


Run the FilterByAlphabet.jspx and Selecting a letter adds an <attribute> Starts With condition to the query whose result set is displayed in the table. Clicking the alphabet "A" letter will results the records that starts with "A". So user can filter the records based on alphabet choice.

Ejb Commit On Master Child Relationship

Let us take scenario where in users wants to persist master child relationship. Here will have two tables dept, emp (using Scott Schema) which are having master child relation.

Model Diagram:

Here in the above model diagram, Dept is the Master table and Emp is child table and Dept is related to emp by one to n relationship.
Lets assume we need to make new entries in emp table using EJB persist method. Create a Emp form manually dropping the fields, where deptno will be dropped as Single Selection -> ADF Select One Choice (which is a foreign key in emp table) from deptFindAll DC. Make sure to bind all field variables in backing bean.

Employee Form:
Once the Emp form created, If the persistEmp() method is used to commit the record this will persist all the Emp fields into emp table except deptno, because the deptno will be passed as a Object reference in persistEmp method  (Its foreign key reference). So directly deptno can't be passed to the persistEmp method instead deptno should be explicitly set to the emp object, then the persist will save the deptno to the emp table.

Below solution is one way of work around to achieve this scenario -
  • Create a method in sessionBean for adding emp records and expose this method in DataControl.
     For Ex: Here in the below code 'em" is a EntityManager.
           private EntityManager em - will be member variable in sessionEJBBean

public void addEmpRecord(String ename, String job, BigDecimal deptno) {
        Emp emp = new Emp();
        emp.setEname(ename);
        emp.setJob(job);

        //setting the deptno explicitly
        Dept dept = new Dept();
        dept.setDeptno(deptno);

       //passing the dept object
       emp.setDept(dept);

       //persist the emp object data to Emp table
       em.persist(emp);
}
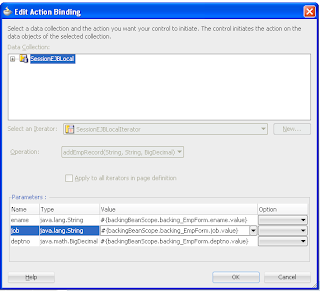
  • From DataControl palette Drop addEmpRecord as Method ADF button, In Edit action binding window enter the parameter values which are binded in backing bean.
     For Ex:
     If the name deptno textfield is binded with "deptno" variable in backing bean, then El Expression Builder pass value as "#{backingbean.deptno.value}"

Binding: